

Much like Nik Sharpener, Nik Dfine is designed to tackle a specific technical issue: digital noise. Whether it’s contrast noise or color noise, Nik Dfine lets you automatically or manually analyze your images for global or selective corrections, using local adjustments, and/or by color ranges.
IMPORTANT
This page presents Nik Dfine’s specific features and tools. All the tools common to the other Nik Collection plug-ins are presented in the Interface and common tools page of this user guide. Here you’ll find information on the following points:
- Preferences.
- Interface.
- Local adjustments.
Nik Dfine also offers specific noise correction brushes for use in Adobe Photoshop. For more information, see Nik Palette, Meta-presets and the Brush tool, in the Workflow with Photoshop page.
For optimal use of Nik Dfine, and to avoid accumulating noise corrections which could affect the details of your image, we advise you to deactivate the noise reduction functions of both your camera and the host software.
Preferences (Profile tab)
Options in the general tab are discussed in the Common Interface and Tools chapter > Preferences.
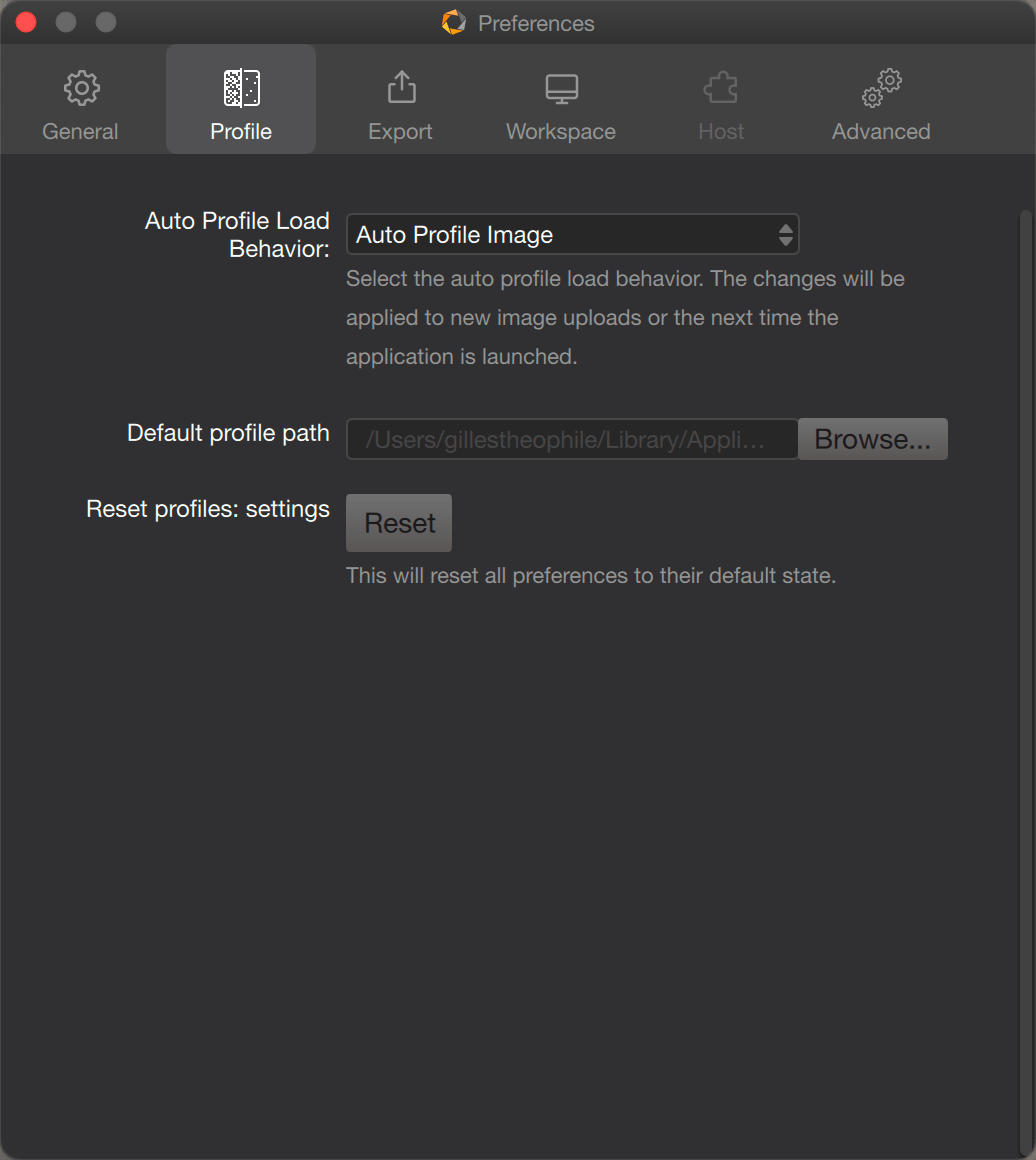
In Nik Dfine preferences, the Profile tab offers the following options:
- Auto Profile Load Behavior: when you open an image in Nik Dfine, the software automatically analyzes the noise in the image by default. You can also apply the last used profile or apply it based on the camera credentials written in your EXIF metadata of the image. Finally, if you don’t want automatic profiling when opening the module, select Do nothing.
- Default Profile Path: Nik Dfine lets you create noise analysis profiles which are stored in a predetermined location. Click Browse to access and change this location; a system dialog box will open.
- Reset : This button returns all options in the Profile tab to their defaults.
Special Display Modes
Common display modes for other Nik Collection apps are discussed in the Common Interface and Tools chapter > Interface.
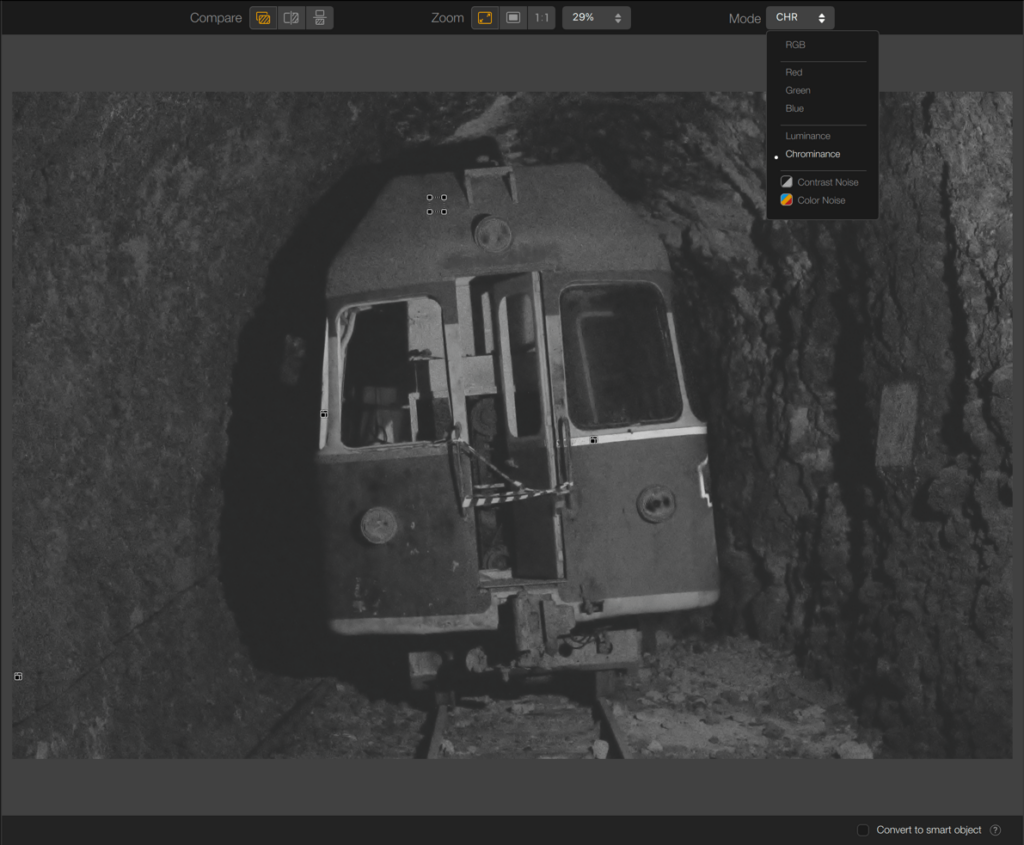
In addition to the common display modes to all Nik Collection apps, Nik Dfine also offers special modes linked to noise reduction. They are accessible in the top toolbar > Mode:
- RGB : normal image view.
- R, G or B: monochrome display of the red, green or blue channel. This display mode lets you identify the channel that has the most noise.
- Luminance or Chrominance: monochrome view of the image, according to noise type.
- Contrast noise: lets you visualize the effect of a local adjustment on contrast noise. White areas indicate maximum correction and black indicates zero correction.
- Color noise: shows the effect of a local adjustment on color noise. White areas indicate maximum correction and black indicates zero correction.
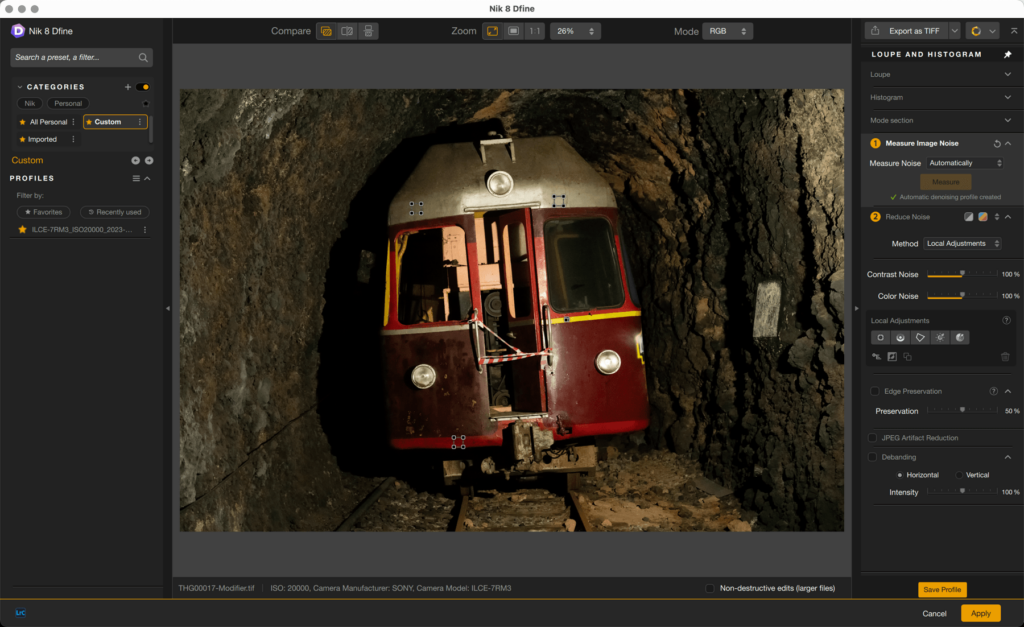
Measuring and reducing noise
There are two steps in the Nik Dfine process: automatic noise measurement, then noise processing itself, globally or selectively (the latter involving either local adjustments or color ranges).
- Measuring noise
- Overall noise reduction
- Reducing noise with local adjustments.
- Reducing noise with color ranges
- Advanced tools: edge preservation, JPEG artifact reduction, and debanding.
The Nik Dfine interface indicates working order by section number:
- Measure Image Noise.
- Reduce Noise.
IMPORTANT: For optimal use of Nik Dfine, and to avoid cumulative noise processing, disable noise correction on your camera, and more importantly, in your host application.
Nik Dfine also offers specific noise correction brushes for use in Adobe Photoshop. For more information, see the sections Nik Collection Palette, Meta-presets and Brush tool in the section on Workflows with Adobe Photoshop.
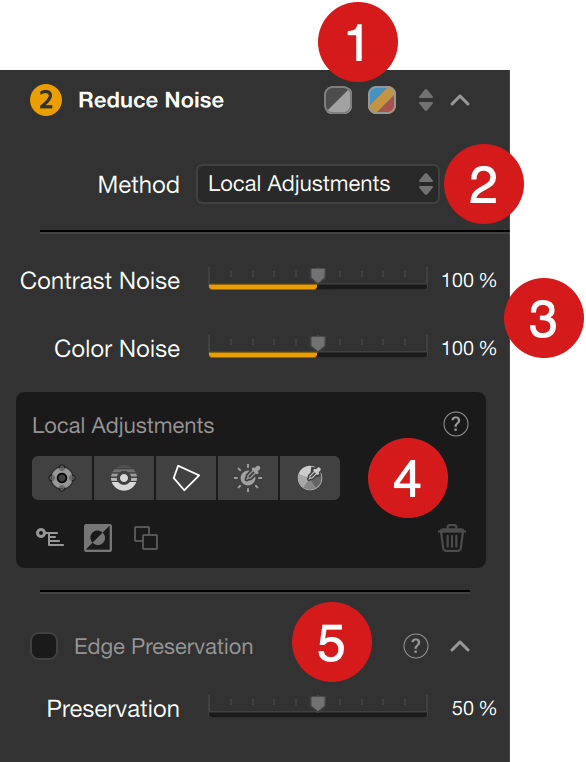
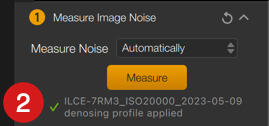
Measure image noise panel (1)
Automatic measurement
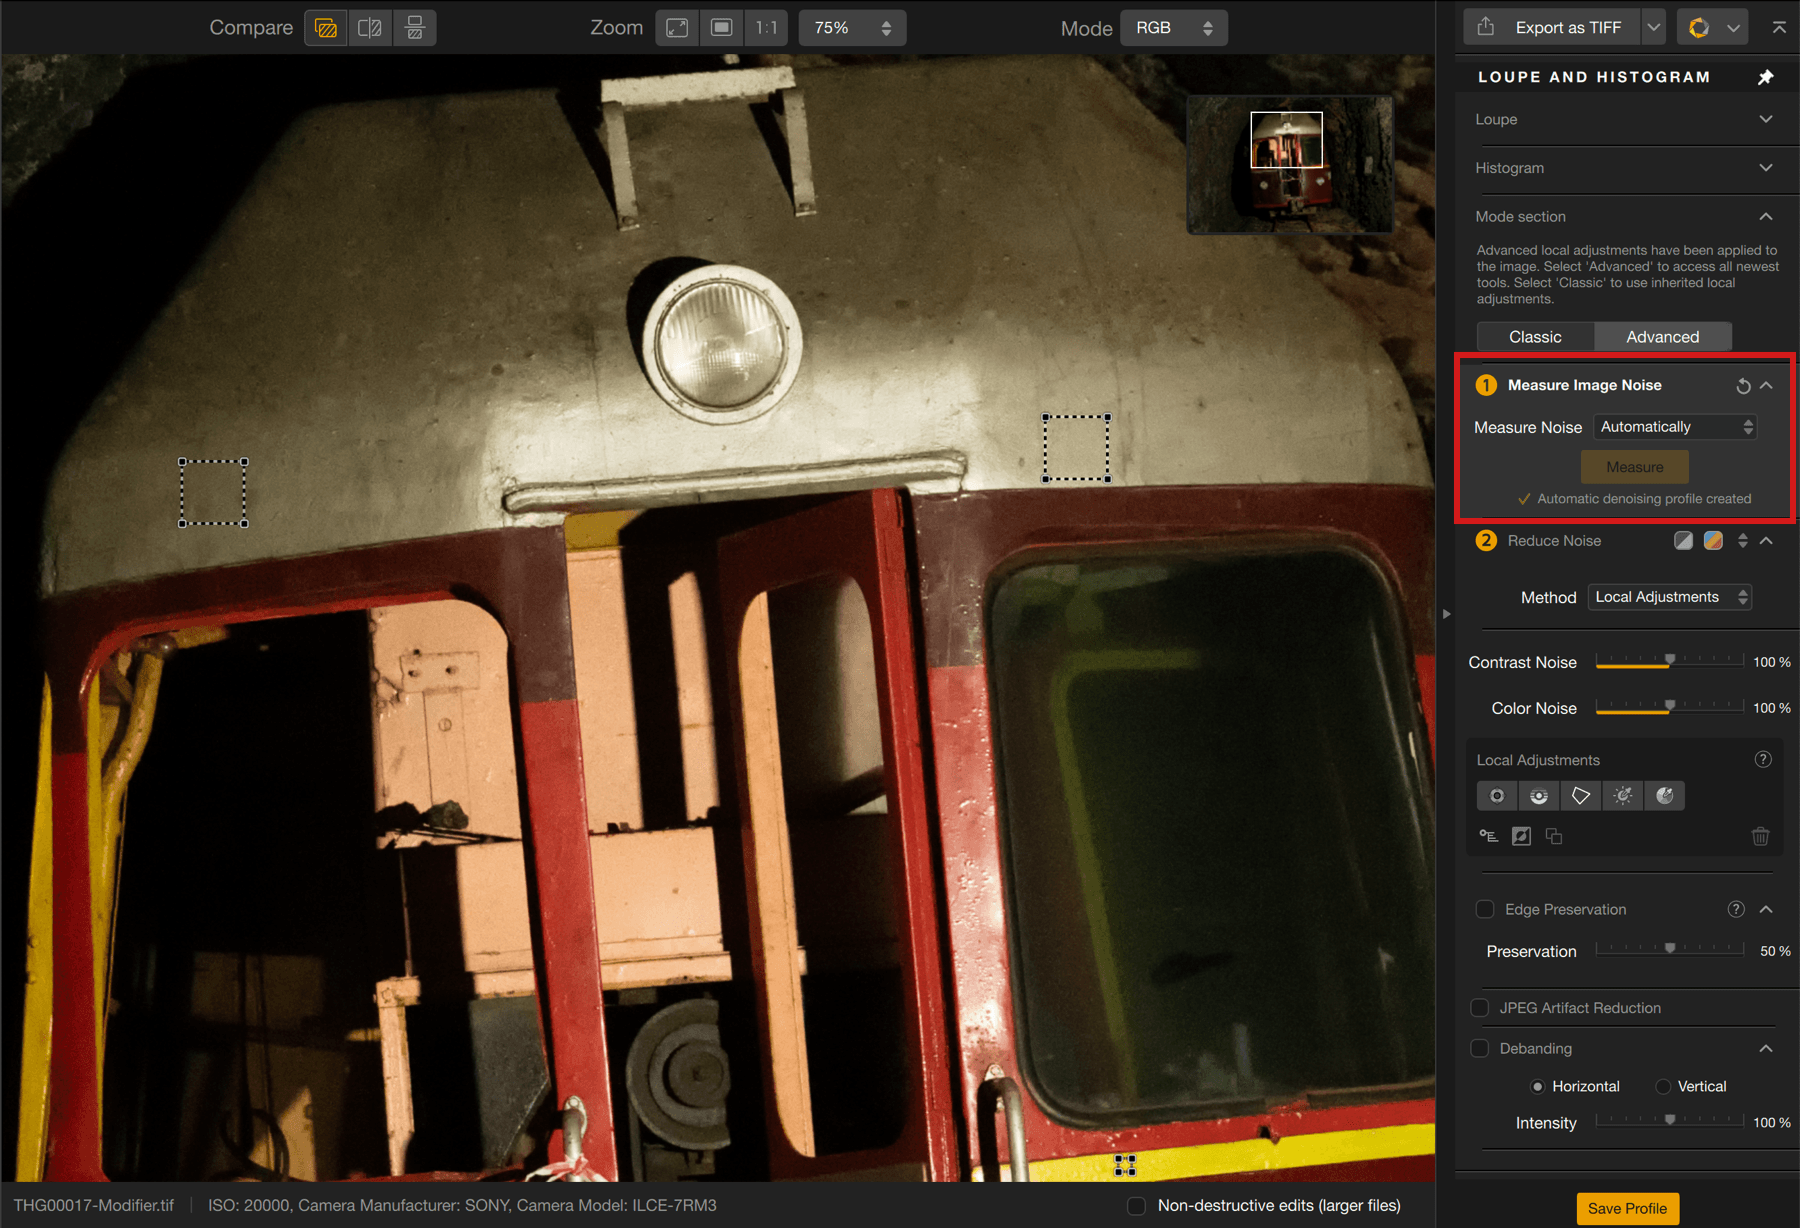
As soon as you open your image, Nik Dfine will analyze it and place measurement rectangles on the image.
Once the analysis is complete, an Automatic Noise Reduction Profile message is displayed with a green checkmark, and the image displays the analysis rectangles at several locations selected by Nik Dfine.
Manual measurement
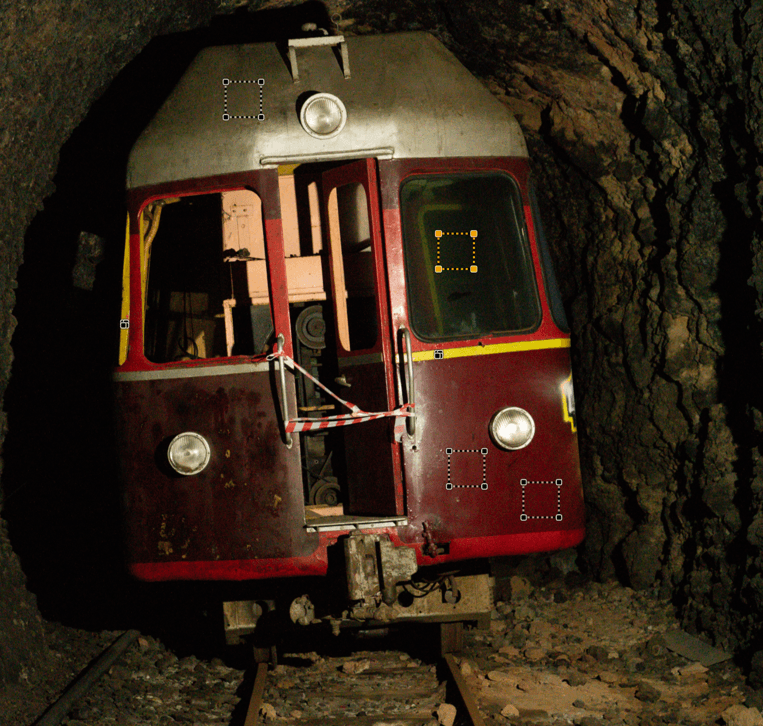
You can modify the analysis rectangles as you wish, which means a switch to the Manual method:
- Click to select (white dotted rectangle turns yellow).
- Use the mouse to move the rectangle where you want in the image.
- Use the corner handles to change the size of the rectangle.
- Duplicate a rectangle by clicking with the Alt/Option key held down (the pointer will show a “+” sign) then drag the mouse to detach and move the duplicated rectangle.
- To delete a rectangle, click on it to activate it, then press the Delete key on your keyboard.
Any action or change to an analysis rectangle generates a message inviting you to update by clicking Measure in the Measure section. This message also lets you cancel by clicking “Cancel Zone Changes”.
You can also draw your own rectangles: in manual mode, click the Select button, drag inside the image*, then re-analyze by clicking the Measure button. You can draw as many measurement rectangles as you want.
*Draw your rectangles on flat areas or in areas of the image with no details.
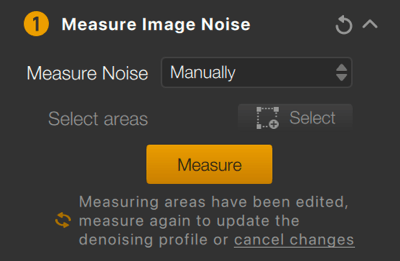
Reduce noise panel (2)
The Reduce panel is as follows:
- Buttons to display contrast noise and color noise masks.
- Method Selector: Local adjustments or Color Ranges
- General color and contrast noise reduction sliders.
- Local adjustments
- Edge preservation and edge preservation slider.
Overall noise reduction
To reduce overall noise, including after applying a profile, you can use the following sliders:
- Contrast Noise: Set to 100% by default, this slider acts on the noise that appears as grain reminiscent of analog film. Beware of too many advanced corrections which will not only excessively smooth the image, but also affect the micro details. You need to find a balance between acceptable noise presence and preservation of detail.
- Color Noise: Also set to 100% by default, this affects noise that is visible as colored pixels – green and magenta – and is particularly noticeable in dark areas or flat areas.
To display the contrast or color noise, click the Show/hide contrast or color noise mask buttons at the top of the Reduce panel.
Reducing noise with local adjustments
In this paragraph, only the tools specific to Nik Dfine are discussed. The basic operation of local adjustments is discussed in the Common Interface and Tools chapter.
Applying and using local adjustments
While automatic correction generally works well for most images, the real advantage of Nik Dfine is its ability to process noise with great precision using the local adjustments, or using the color ranges discussed in the next paragraph. In either case, you can correct noise in defined areas of the image, such as smoothing out noise visible in the sky, while protecting detail elements from excessive smoothing.
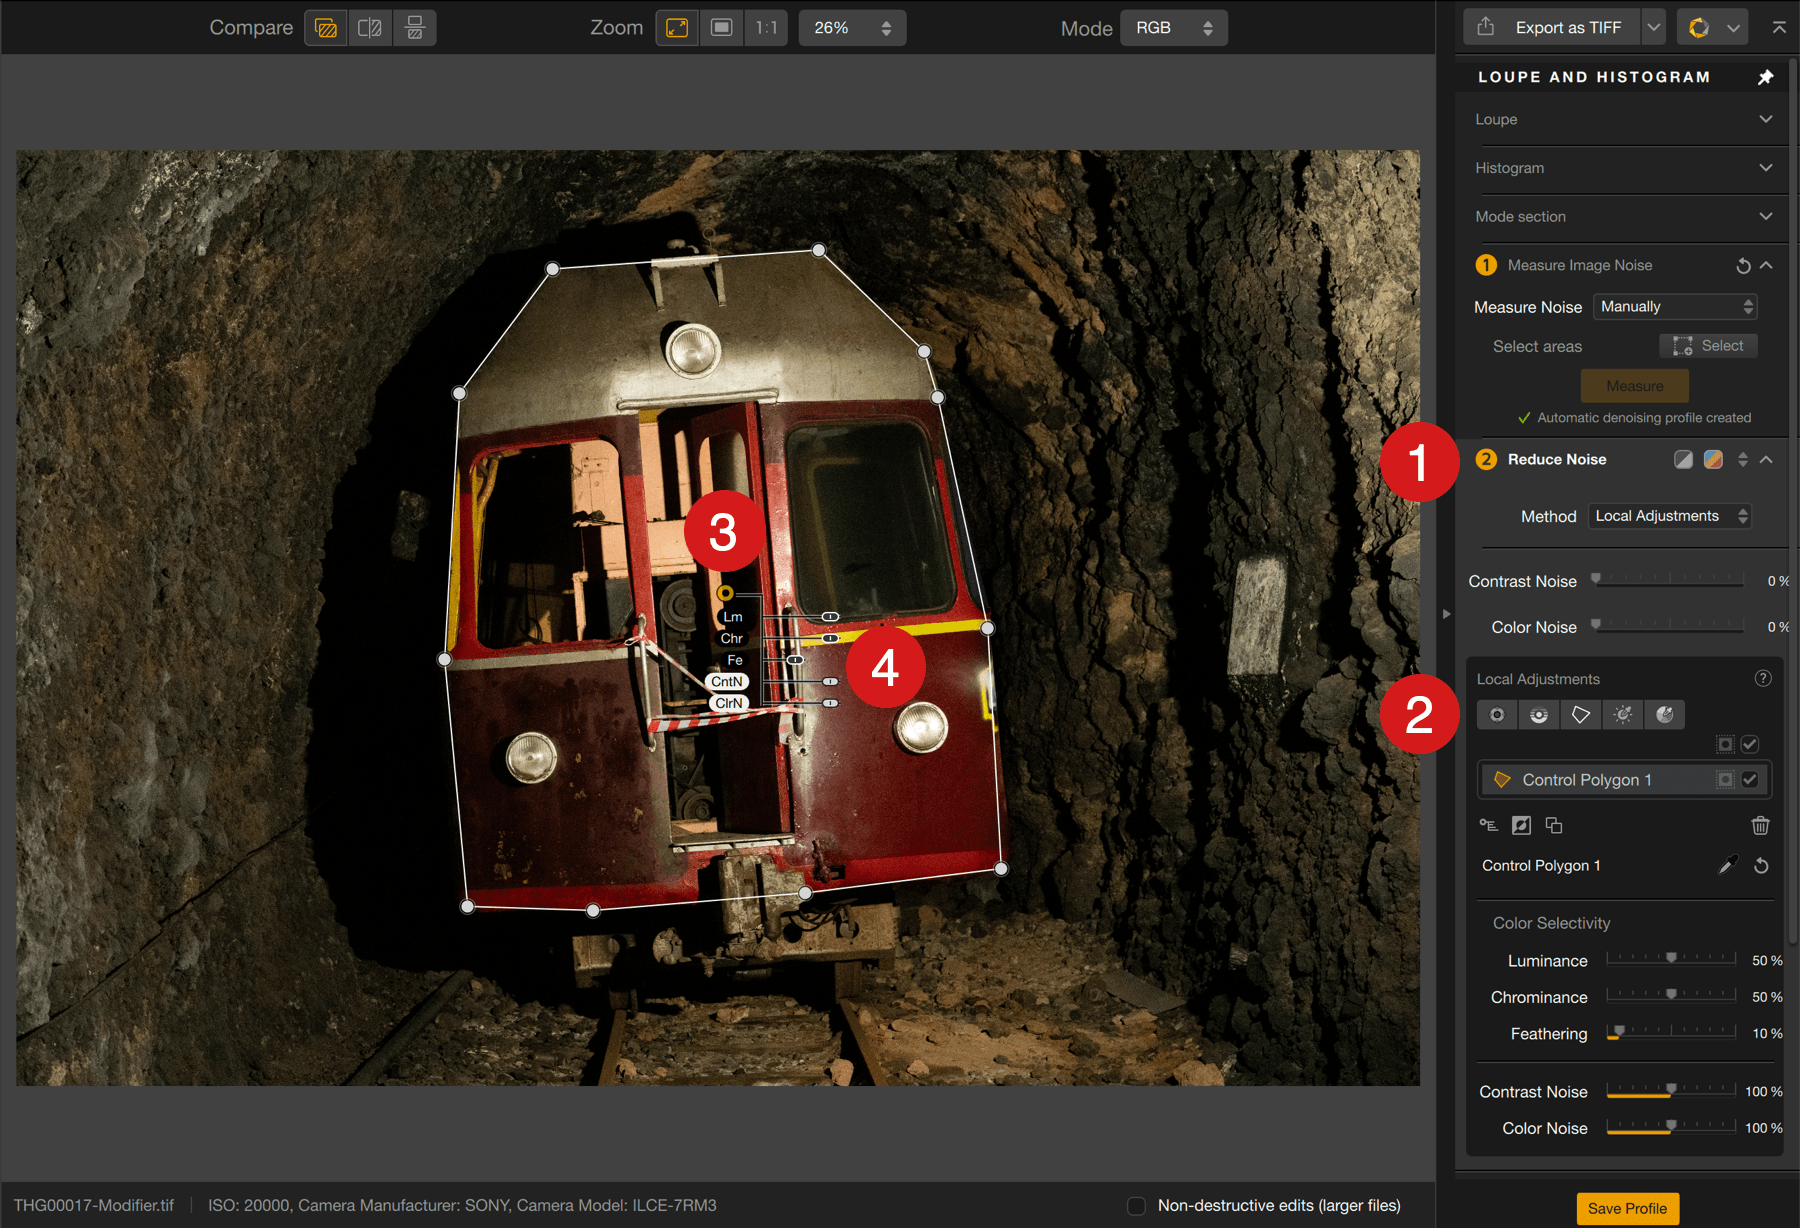
- In the Reduce panel, in the Method menu, make sure that Local adjustments is selected.
- Click on one of the local adjustment tool buttons.
- Click the place in the image where you want the local adjustment to be applied.
- Locally correct contrast and/or color noise with the sliders (default to 100%) displayed in the image or in the panel.
To preview and correct noise most efficiently zoom in to 1:1.
The local adjustment sliders are:
- Color Selectivity :
- Lm (Luminance).
- Chr (Chrominance).
- Df (Diffusion).
- Correction sliders:
- CntN (Contrast Noise).
- ClrN (Color Noise).
Protecting with a neutral local adjustment
Nik Dfine offers a perfect example of the use of neutral local adjustments to protect a portion of an image from the application of denoising:
- Select a local adjustment tool.
- Click in the image to place it.
- Depending on the tool used, adjust the radius (control point), the size (control line or control polygon) or the luminoisity range to cover the area to protect.
- With the sliders set to 0, no noise reduction will be applied.
Zoom in on the image and use the display masks to help judge the effect of the noise reduction protection.
Reducing noise with color ranges
Another method of noise reduction is color-dependent: select Color Ranges from the Method menu. By default, Nik Dfine offers three ranges: red, orange, and blue, represented by tiles with an eyedropper, which lets you select colors directly from the image:
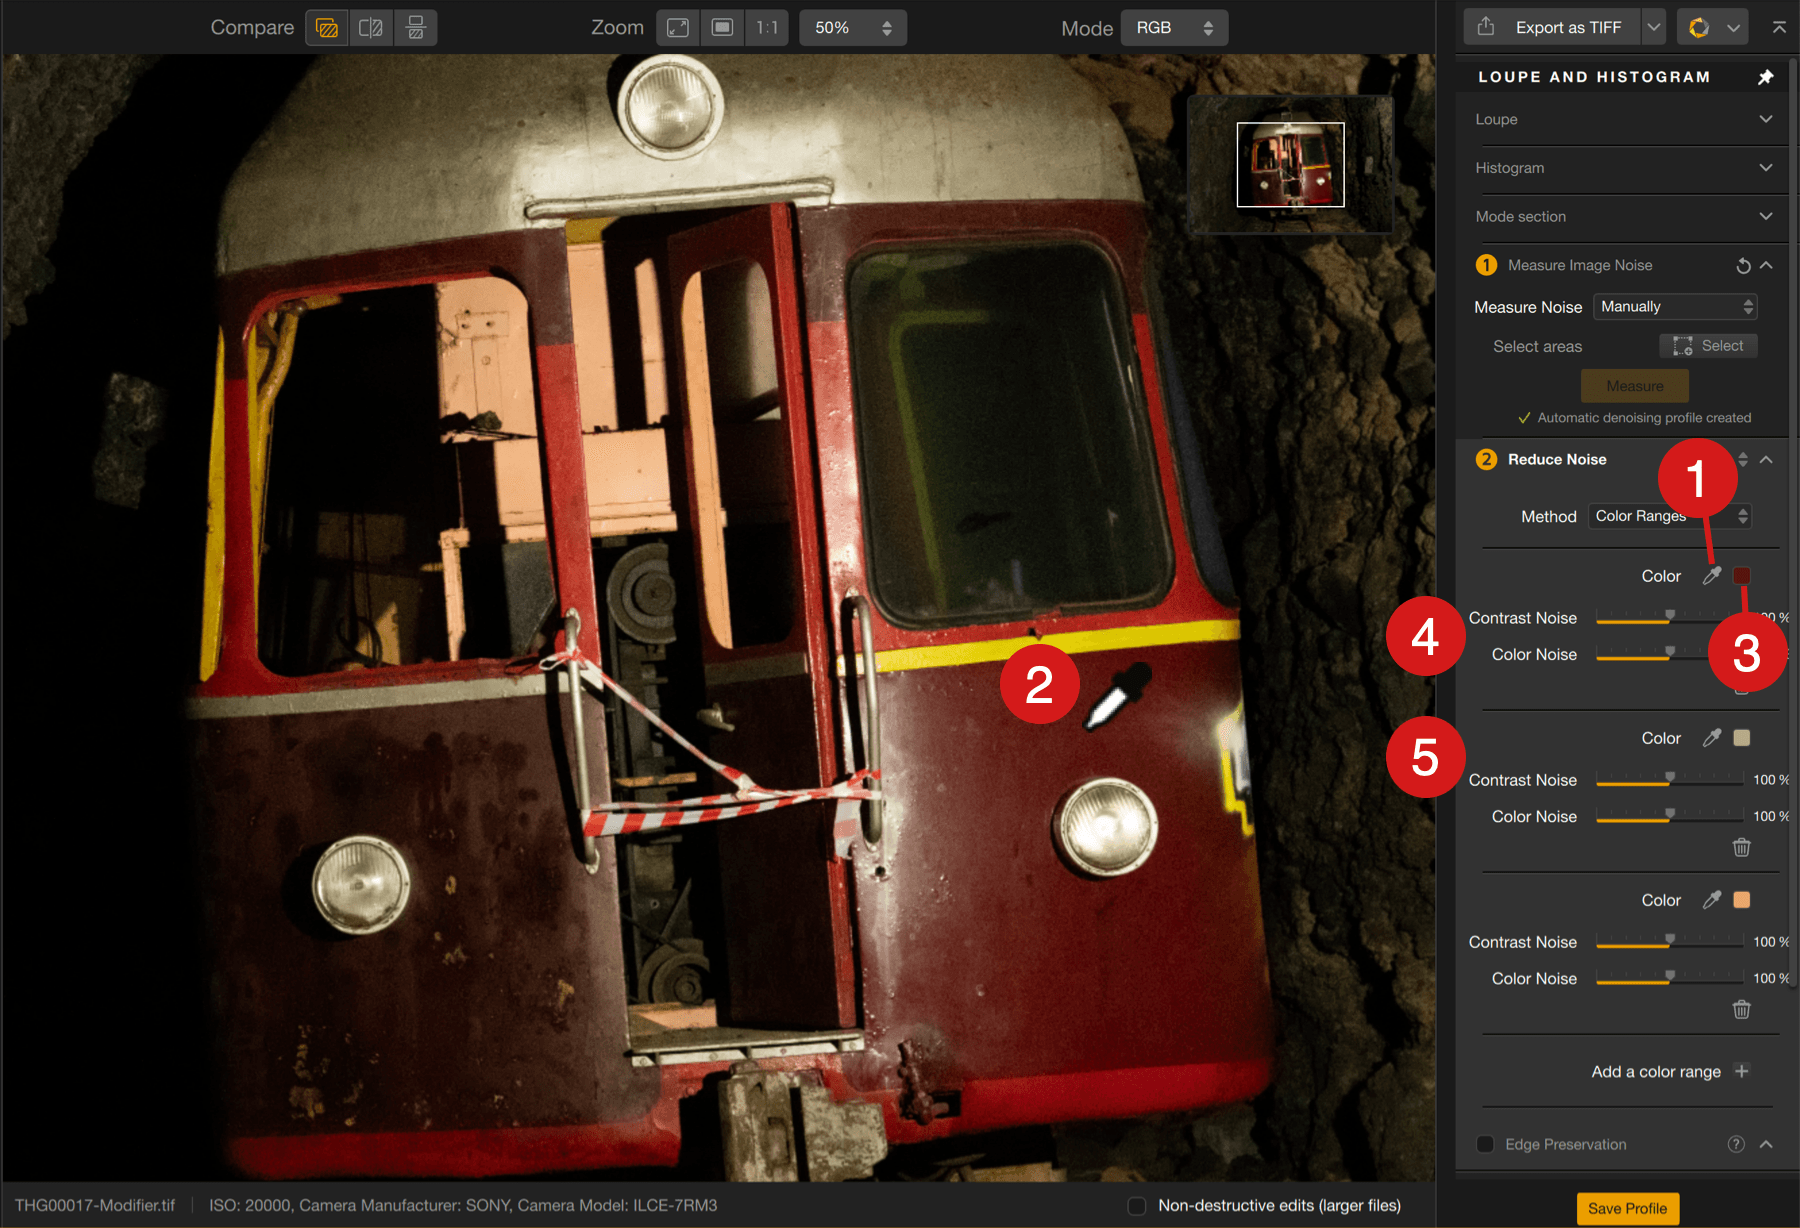
- Click on an eyedropper to activate it.
- Place it in the image, then click.
- The corresponding color is sampled and indicated in the small tile.
- Adjust the Contrast Noise and/or Color Noise sliders (set to 100% by default).
- For another color, click on another eyedropper and repeat the previous steps.
To add a range of colors, click on the “+” button below the list, which will display the tile (in gray), the eyedropper, and associated sliders. You can add as many ranges as you wish, and you can remove them individually by clicking on their “-” (minus sign) button.
Note that the local adjustments can be combined with color range corrections.
Edge Preservation
The Preservation slider lets you preserve the sharpness of edges, in connection with the algorithms for reducing contrast noise, and avoid excessive smoothing. Check the box to activate the tool, and then use the slider (set to 50% by default) to sharpen (to the right) or soften (to the left) the edges.
Other tools
Nik Dfine also offers tools to deal with specific noise issues:
- JPEG Artifact Reduction: JPEG compression tends to amplify noise reduction artifacts, which take the form of horizontal and vertical structures at the pixel level. Checking this box activates algorithms that attenuate the presence of such artifacts.
- Debanding: this tool, once enabled, lets you reduce a camera sensor noise type, banding. This is seen in flat, dark or solid areas of the image, either with a horizontal or vertical banding effect. Check the box, click Horizontal or Vertical and, if necessary, change the setting of the strength slider (100% by default).
Creating and using noise reduction profiles
Although it is best to use automatic noise measurement and correction, Nik Dfine lets you save this as a profile that you can assign to a particular camera model and ISO.

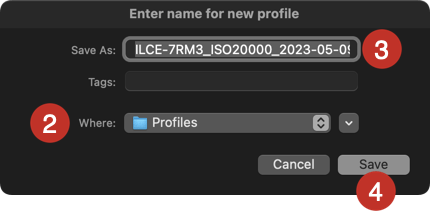
- To do so, click on Save after measuring.
- The first time you use Dfine 2, a dialog box prompts you to create a folder in which to place your profiles. In the next dialog box, a Profiles folder is suggested but you can change this as you wish. You can also create sub-folders for each of your devices, for example.
- The profile is automatically named with the camera model and sensitivity, retrieved in the EXIF metadata of the image, as well as the date of creation of the profile. Of course, you can change the suggested name.
- Click Save.
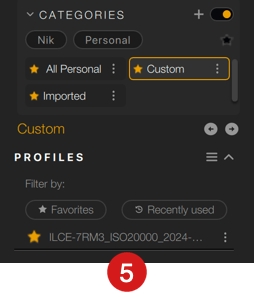
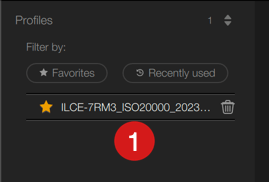
- The profile appears in the left panel of Nik Dfine, in the Profiles section.
You can mark a favorite profile by clicking the star on the left. Displaying favorite and/or recently used profiles can be done using the Filter By section buttons. You can also delete a profile by hovering over it and clicking the trash icon to the right.
To load and apply a profile:
- In the left panel, click the desired profile.
- The selected profile will replace the active profile in the right panel.