

DxO PureRAW 3 offers three ways to process your photos:
- In standalone mode, which then exports processed images to your regular photo editing program.
- With the program in standalone mode, using queues.
- Via the Lightroom Classic plug-in.
- Using the controls included in the right-click menu of the file explorer window on your PC or Mac.
Workflow in standalone mode
The first step in the workflow when using DxO PureRAW 3 in standalone mode is to do the following:
- Add photos.
- Installing and managing DxO Optics Modules.
- Select photos.
- Process photos.
- Verifying and comparing photos.
- Export to an external program.
Preferences
DxO PureRAW 3 does not allow you to import images directly from a camera or memory card. To do so, you’ll need to transfer the images to your hard drive using your choice of software or device. Once they’ve been added to your hard drive, DxO PureRAW 3 allows you to add photos either by navigating to the folder where they’re saved, or by dragging and dropping them onto the program’s screen from a Finder (Mac) or File Explorer (PC) window.
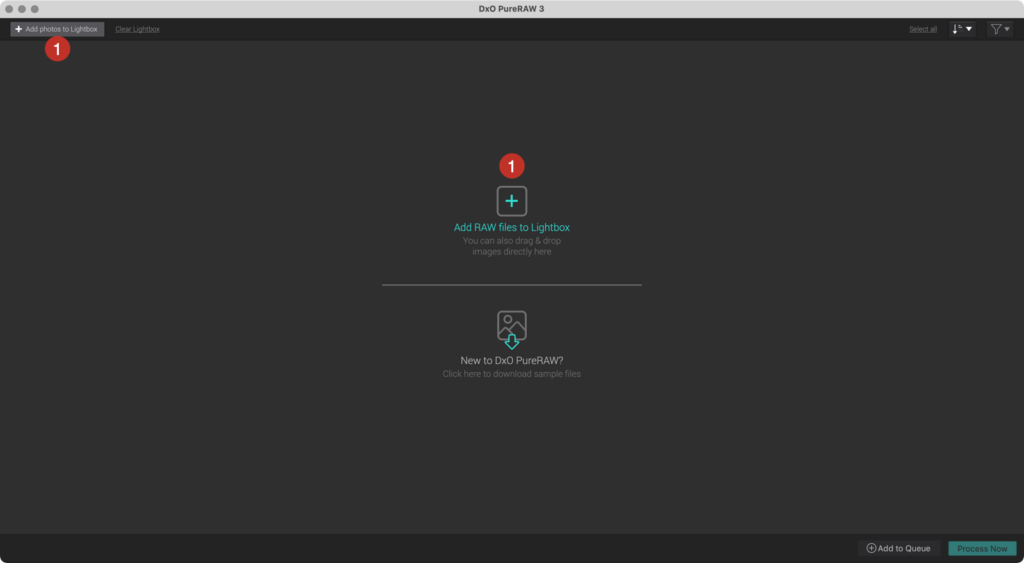
The first time you use DxO PureRAW 3, the view that allows you to add photos is empty and instead suggests the following buttons and explanations:
1. Add RAW files to process.
2. Drag and drop RAW files.
3. Download sample RAW images (provided by DxO to try out the software).
4. Add photos to the Lightbox (button in the upper toolbar).
Adding RAW files to process
First method for adding photos:
- Click on Add RAW files to process in the center, or click Add to Lightbox in the upper toolbar. If you do not have RAW files, or if you would like to run tests on images other than your own, you can use the samples by clicking Download the sample RAW files.
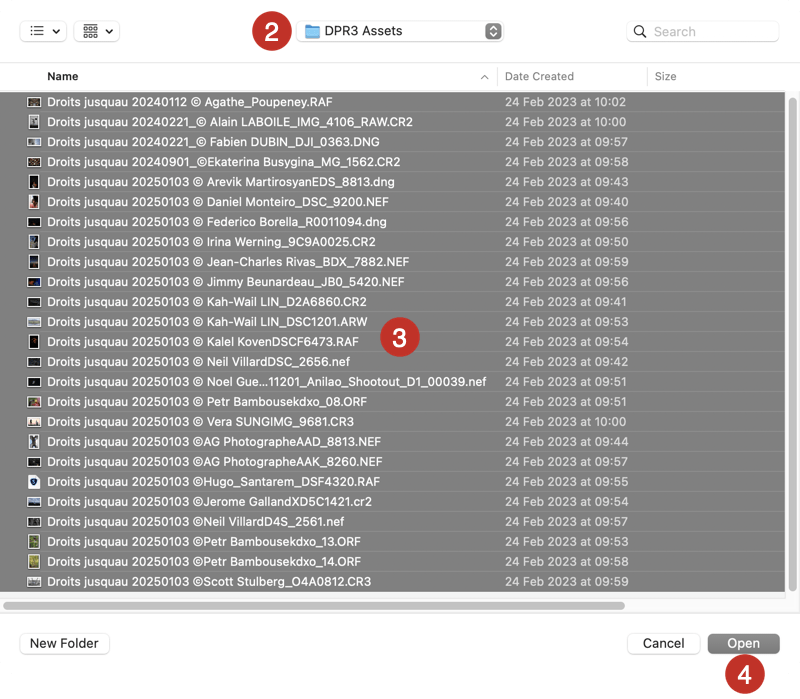
- A system window will open: Locate the number and folder of photos you would like to add.
- Select the images from the folder.
- Click on the Open button.*
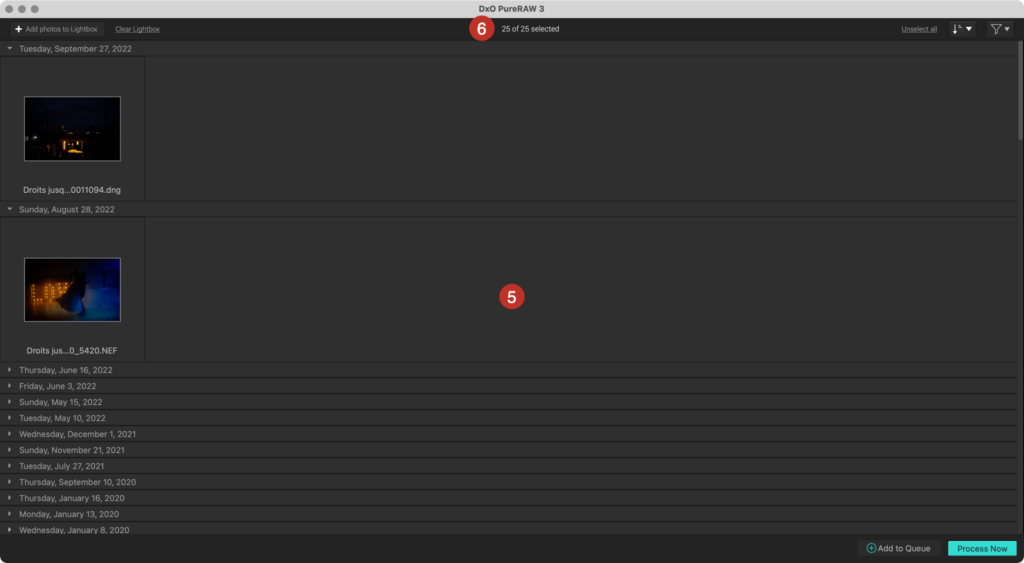
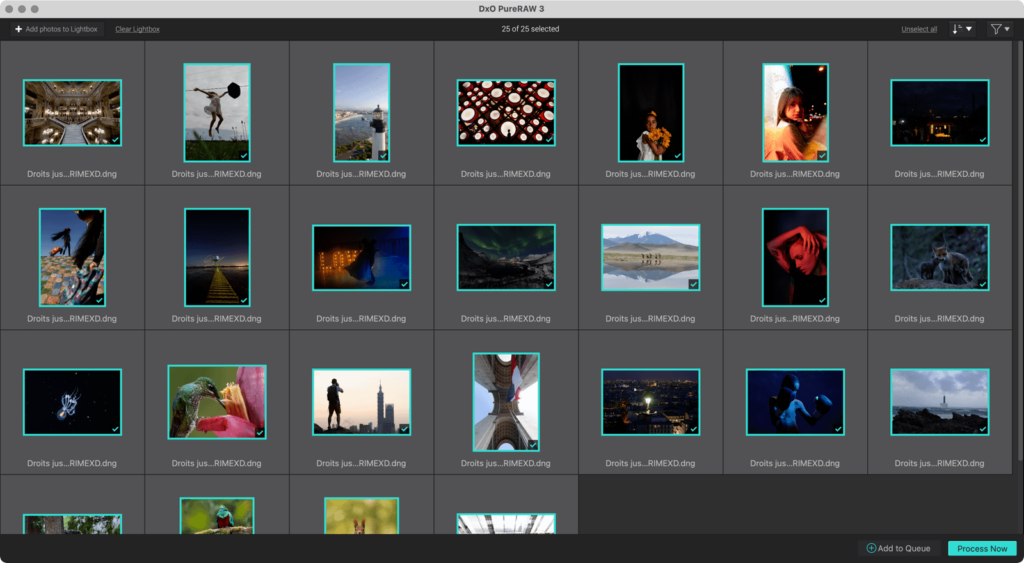
- The selected images are displayed as thumbnails. Default order is by date.
- The upper toolbar shows the number of images displayed.
*As soon as DxO PureRAW 3 opens the images, the Optics Modules dialog box opens (see the paragraph on Installing and managing DxO Optics Modules below).
Second method for adding photos:

- Open an image folder in an operating system window (Finder on Mac, File Explorer on PC).
- Select a folder or a selection of images, then drag and drop the item to the DxO PureRAW 3 window. You can use this method even if there are already thumbnails present in the DxO PureRAW 3 window.
- The remaining steps are the same as with the first method.
Third method for adding photos:
- Mac: Drag and drop one or several images to the DxO PureRAW 3 icon in the Dock. This action will open the program and display the images.
- PC: Drag and drop one or several images onto the DxO PureRAW 3 icon on the desktop. This action will open the program and display the images.
Fourth method for adding photos:
Using Finder (Mac) or File Explorer (PC), right-click on an image or a selection of images. Then, in the context menu, select Open with DxO PureRAW 3.
Help
When you add images to DxO PureRAW 3 for the first time, the program will automatically ask you to download and install the DxO Optics Module(s) that match the equipment used to take the images. This information is included in the EXIF metadata of the images.
This step will also happen when you process images from Lightroom Classic or as part of the File Explorer (PC) or Finder (Mac) workflow. For more information on these particular workflows, see the sections on these topics in the user guide.
DxO Optics Modules improve lens performance and correct the following lens flaws:
- Vignetting: corrects darkening around the edges of the image, generally due to a large aperture or related to flaws in the design and quality of the lens.
- Distortion: deformation of straight lines, particularly with shorter focal lengths. Two types of distortion are identified: barrel (lines are curved towards the outside of the image) and pincushion (lines are curved towards the center of the image).
- Chromatic aberration: colored fringing shows along high contrast outlines, for example on tree branches against a bright sky. Colored fringing is generally most visible at the edges of an image, but it can also appear throughout the image.
- Lens sharpness: Homogenization and optimization of the entire image.
Downloading and installing DxO Optics Modules
Once images have been added, if no DxO optical module has been installed or if the modules are missing, a window will automatically open and offer to download and install the DxO optical module(s) that correspond to your equipment, the camera body and lens.
To do so, you will need to be connected to the Internet. This screen is made up of the following sections:

- DxO Optics Module detected and ready to download.*
- None of the above (correction will not be applied): if the DxO optics module offered does not match the equipment, you can check this option to prevent any optical corrections being made.
- Save: Start downloading the DxO optics module(s). If you do not use them immediately, they will be suggested again the next time you add photos taken with the same camera-lens combination. The modules are installed immediately so you do not need to restart the program.
- Cancel: Closes the window without downloading or installing any modules.
*In the event of any ambiguity, for example if the EXIF metadata do not allow the program to determine which lens was used because there are multiple versions or generations available, the window will suggest several possible choices so you can select the correct DxO Optics Module manually.
You can use the DxO Optics Modules in one of three ways:
- To download and apply the DxO Optics Module, click Save.
- To download but not to apply a DxO Optics Module: select none of the above (correction will not be applied) for each module concerned and then click Save.
- To not download any DxO Optics Modules click on Cancel.

If you try to process an image without downloading or installing a DxO Optics Module for the equipment used, the processing options window will show an alert. When you click on the yellow alert the dialog box for downloading optics modules will appear to enable you to install the missing module(s).
If you want to display the list of installed optics modules and those awaiting download, go to the DxO Optics Modules menu and select the DxO Optics Modules option.
The same window that appears during the downloading stage will open showing the status of the DxO Optics Modules:
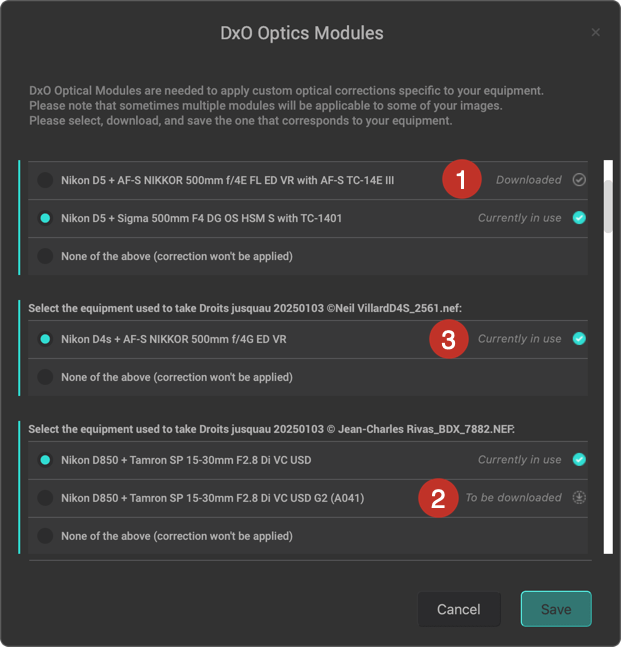
- Downloaded: The DxO Optics Module is downloaded and installed.
- Download available: The DxO Optics Module can now be downloaded.
- In use: Indicates the DxO Optics Module currently in use.
Selecting photos
Selecting your images means picking the photos you want to process. You can select a single photo, multiple photos, or all photos in a folder.
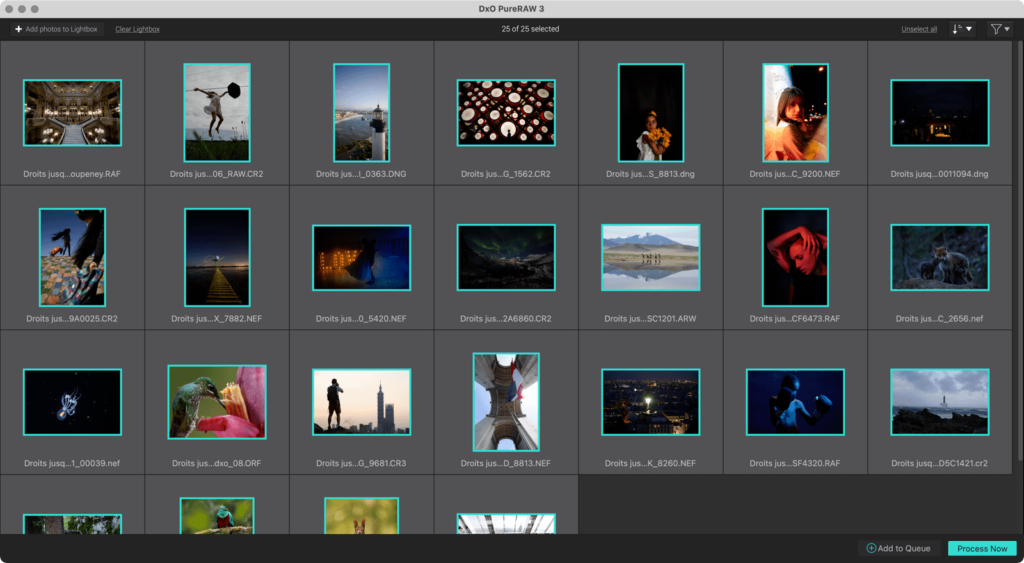
Selected images have lighter grey frame and a cyan border around the thumbnail. To select photos:
- One image: Click on the image.
- Multiple non-consecutive images: Click on each image you want to select while holding down the Cmd (Mac) or Ctrl (PC) key.
- Multiple consecutive images: Click on the first image in the series, then click on the last in the series while holding down the Shift key.
To instantly select all images displayed by DxO PureRAW 3 click on Select all, on the right of the upper toolbar. When images are selected, the option becomes Unselect all. By clicking on it, you will deselect all selected images.
If you want to deselect specific images, click on the thumbnails with the cyan border and checkmark. However, it is faster to click the Deselect button.
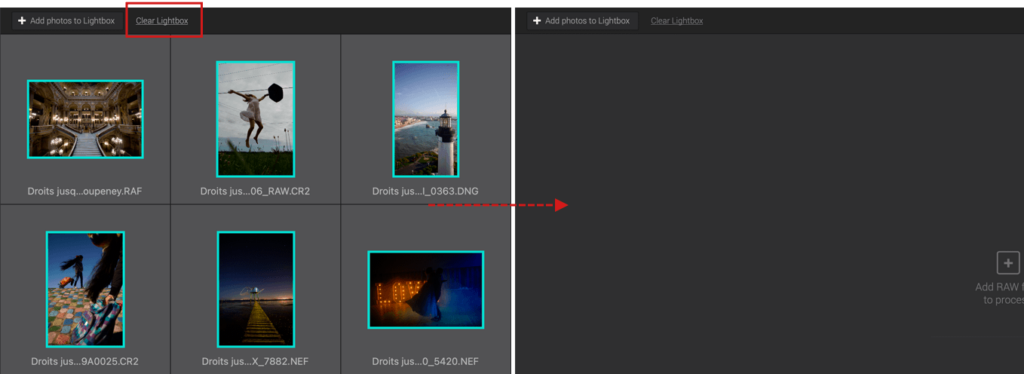
Clear Lightbox
The Clear Lightbox option in the upper toolbar lets you purge all images from DxO PureRAW 3. This feature is useful if you regularly edit large quantities of photos and want to start afresh with a blank screen when you’re ready to process a new batch. Note that:
- The original and optimized images are only removed from DxO PureRAW 3 and not from the original hard disk or folder.
- Installed DxO Optics Modules are kept.
Processing photos (standalone mode)
After having chosen and selected the photos, you are ready to process them. This involves applying optical corrections, using the DxO Optics Modules, and then partial demosaicing with noise processing to generate either: a linear DNG file (which retains RAW file latitude) to finish processing in your preferred program, a TIFF file (which you can also correct and retouch with your usual photo software), or a JPEG file for immediate use to send or share.
To do this, follow these steps:
- Select the RAW processing and noise reduction technology.
- Choosing optical corrections.
- Choosing the output format.
- Choose the destination folder and renaming convention of the output images.
- Export the processed images to the software of your choice (optional).
- Start processing.
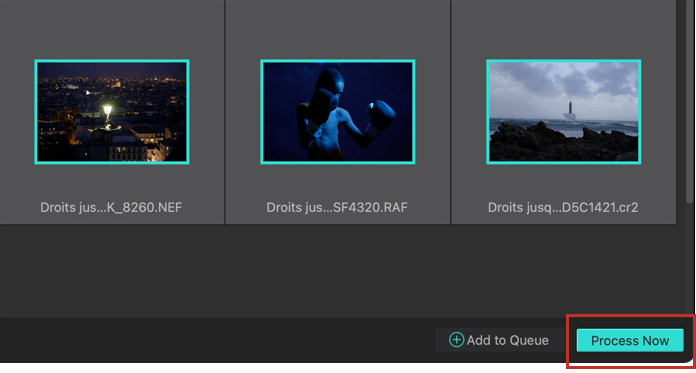
To start processing, you can:
- Click on Process now, in the bottom right-hand corner.
- Right-click on the image selection and then choose Process file(s).

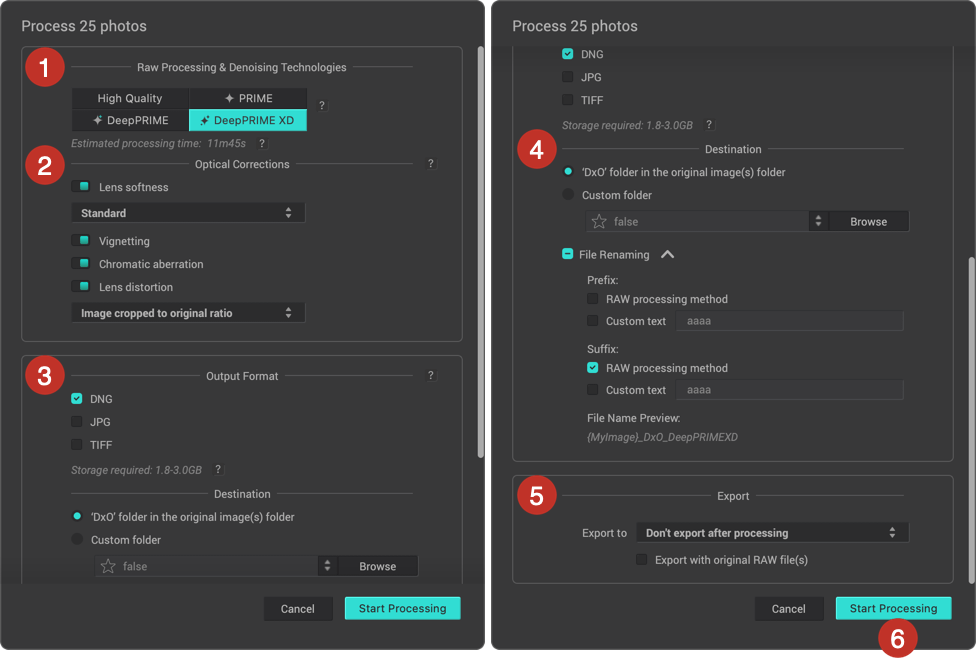
Next, select your optimization options:
- Select the RAW noise reduction processing technology
In this section you choose how DxO PureRAW 3 will process and denoise your RAW files, using one of 4 options:
- HQ: High-quality denoising method, preferred for combining speed and quality.
- PRIME: method using a deep analysis of the image for optimal preservation of details and colors. The computational demand is more intensive so processing will take longer than for standard High Quality denoising.
- DeepPRIME: This method is based on artificial intelligence and produces higher-quality results than the other two methods.
- DeepPRIME XD: an advanced version of DeepPRIME that offers greater fine detail extraction.
HQ and PRIME methods are only visible if you have opted to display them in Preferences.
After choosing one of the RAW processing and noise reduction technologies DxO PureRAW displays the Estimated processing time immediately below the buttons.
2. Choosing optical corrections:
DxO PureRAW 3 lets you define the optical corrections you want to apply to your images. Choose all of them to take full advantage of DxO Labs’ technologies, or just some of them if you want to entrust these corrections to your usual software. You have the following options. Each correction can be activated or deactivated by clicking on the corresponding switch:
- Lens softness: Defaults to Standard (which is equivalent to the DxO PhotoLab Lens Sharpness setting, with the global slider set at +1), you can also opt for a soft, strong or hard intensity. Optical sharpness improves image detail and overall image sharpness from the center to the edge of the frame.
- Vignetting: compensates for a darker edge to the frame.
- Chromatic Aberration: removes color fringing found on high contrast contours.
- Lens Distortion: Corrects distorted lines. This involves choosing a preferred level of cropping; there are 3 options:
- Image cropped to original ratio: the image is cropped with the width and height proportions of the original. The bleeding edge of the corrected distortion is no longer visible.
- Maximum Rectangle: the image is cropped so that just the bleed is eliminated, regardless of the proportions of the original.
- Complete image area: the image is not cropped at all retaining the bleed, visible as black zones around the edge. This option lets you leave the task of cropping to your usual image processing program.
3. Choosing the output format
The best output format for your processed images will depend on how you want to use them. There are 3 options, though you can select all of them to create different format versions of your image all at once:
- DNG: Generates a Linear DNG file that retains the characteristics and reversibility of the original RAW file, allowing it to be further edited in a third-party program such as Lightroom Classic, or Camera Raw.
- JPG: generates a JPEG file for immediate use or distribution. If you select this format, a slider lets you adjust the compression, and therefore the quality, of the output file; the default setting is 90, on a scale of 10 to 100.
- TIFF: generate a high quality TIFF file for retouching work in another application such as Photoshop. When you select this format, you can choose from one of the following options:
- 8-bit, for a lighter weight TIFF file.
- 8-bit compressed – the TIFF file is compressed to save on storage space.
- 16-bit, for a maximum quality file that can be corrected and retouch further, although without the flexibility and reversibility of DNG.
When you select an output format, DxO PureRAW 3 calculates the required storage space and displays it immediately below the format options. This information is particularly important if you are dealing with several image batches.
4. Choosing the destination folder
In the Destination section, you have two options:
- ‘DxO’ folder in the original image(s) folder: processed images are automatically sent to a subfolder named DxO in the original images’ folder(s).
- Custom folder: Lets you choose and/or create a destination folder after clicking on the Browse button, which opens a file browser window. By default, DxO PureRAW proposes the operating system’s Images folder.
If you click on the double-arrow to the left of the Browse button, a floating window pops up with a list of favorite paths and recently used folders. You can mark a folder as a favorite by clicking on the star to the left of the folder path.
The Destination section also lets you rename the processed files with a prefix or a suffix and a custom name. RAW Processing Method simply adds the name of the technology selected in the “RAW Processing & Denoising Technologies” section.
Prefixes, suffixes and custom texts can be combined. Just below the rename options you will see a preview of the file name in real time.
5. Exporting to an application
DxO PureRAW 3 lets you open the processed images in the program of your choice. In the Export section, you will find the following options:
- DxO PureRAW 3 lets you open the processed images in the program of your choice. In the Export section, you will find the following options:
- Don’t export after processing: no processed image transfer is launched. Use this option if you want to check the processed images directly in DxO PureRAW 3 or if you want to postpone reviewing or using of the processed images in your preferred software until another time.
- Adobe Lightroom Classic/Adobe Photoshop: these options only appear if they are installed on your computer. In the case of Lightroom Classic, images will be opened via the Import option, and in the case of Photoshop, the images will be opened directly. DNG will be opened in Camera Raw, as well as JPEG and/or TIFF if Photoshop and Camera Raw are set to open them.
- Select software: this option opens the programs folder of your operating system. You can choose whichever program you like and it will appear in the drop-down menu, even after you quit DxO PureRAW 3. You can add as many programs as you like.
The Export with original RAW file(s) checkbox lets you attach the original images to the processed images and open them in the destination program too, where applicable.
6. Start processing
Once you have chosen your options, you can start optimizing the selected photos:
- Click on the Start Processing button (the dialog will close).
- A progress bar with the number of images already processed and the estimated time remaining are displayed in the lower bar of DxO PureRAW 3.
- A progress bar also appears in the image thumbnails.
- When you click on Show Queue, the list of images being processed is displayed. Finished images are checked and grayed, images still being processed are indicated by a rotating icon, and images awaiting processing are indicated by a timer icon. Finally, each thumbnail is accompanied by its filename, destination path and name of the processed file. To return to the Lightbox, click on Hide Queue in the bottom left-hand corner.
- If an image has been processed, the thumbnail is marked with a cyan checkmark.
- The image displayed in the Lightbox is now the optimized image, instead of the original.
- The name of the original is replaced by the name of the processed photo.
- A floating window tells you that processing is complete and asks if you would like to: export your processed photos to an external program; see the results in DxO PureRAW 3; or open the Images folder in a system window (Finder on Mac or File Explorer on PC). If you don’t want to see the images immediately, click on X in the upper-left corner of the window.


Please note:
- During processing, the metadata from the original photos are kept with the processed images as well as the camera’s EXIF data (shooting parameters, GPS coordinates, etc.), creator and copyright information, star rating, keywords, and any information added to the IPTC fields (title, location, etc.) in your photo management software.
- If you opted for Linear DNG format, the size of generated files may increase by a factor of 2 or even 3 compared to the original RAW file.
- In the processing options window, click on the “?” to learn more about the RAW processing methods and formats.
Canceling or interrupting optimization

- A Pause button lets you momentarily interrupt image processing. To resume, click the Play button.
- If you click Cancel all batches, a dialog box will ask you to confirm your request.
Verifying and comparing photos
After processing your photos, and before proceeding with further corrections with your preferred editing software, DxO PureRAW 3 lets you quickly check the results and compare them with the original files.
- Filtering photos
- Display, check, and compare photos
Filtering photos
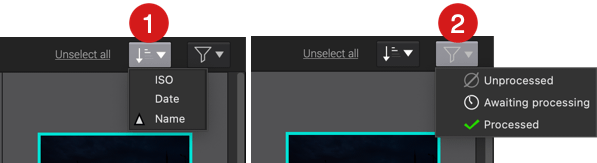
The Lightbox displays all of the images, whether processed or not. You can filter them using the sort and filter buttons in the top right-hand corner:
- Image sorting (left button): You can sort images using one of the following criteria:
- ISO : arranges photos by ISO range, represented by collapsable sections in the Lightbox. The ranges are <400, 400-1600 and >1600.
- Date: arranges photos by date-taken in collapsable sections in the lightbox. You can reverse the display order by clicking on the arrow to the left of Date; by default, the most recent image appears at the top of the screen.
- Name: displays photos alphabetically. Names that start with a number appear at the top of the screen, there are no collapsable sections.
- Image Filtering (right button): You can filter images using any of the following criteria, and combine them by checking them in the list:
- Unprocessed: displays only unprocessed images.
- Awaiting processing: displays only queued images that have not yet been processed.
- Processed: displays only processed images.
Note that you can combine image sorting and filtering (e.g. by date + not optimized).
Display, check, and compare photos
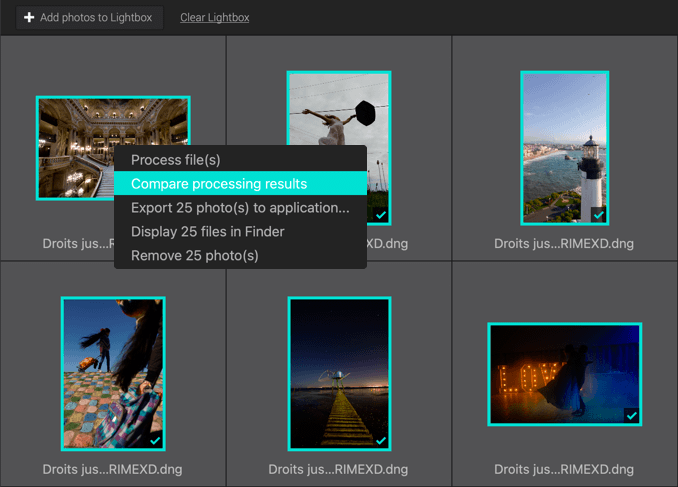
Once the photos are processed, you can check them in the Viewer in two ways:
- Double-click on a thumbnail.
- Right-click on a thumbnail and select Compare processing results in the context menu.

Thanks to the split screen Viewer, you can easily compare the processed image with its original. Inspect the effect of the corrections made by the DxO Optics Module, and judge the improvements in sharpness and denoising. You can zoom into the image at 1:1 (that is, 100%) or you can use the mouse wheel to magnify the image up to 1600% to see the finest details.
You can use the left and right arrows on your keyboard to scroll through the images in the filmstrip. The checkboxes in the square thumbnails of the filmstrip let you select the images, even when you return to the Add photo screen (by clicking on the X button at the top right of the image), thus allowing you to immediately start exporting the selected images to your image editing program (see Working with processed images).
For more information about display and comparison modes, see the User Interface page.