

In this section you will discover the user interface of DxO PureRAW in standalone mode. This interface is divided into different screens:
- The Lightbox, for adding and selecting photos.
- The Viewer, to display enlarged processed images for checking.
- The Process settings and the Process with Preview windows.
Adding and selecting photos
The Lightbox
The photo addition and selection screen, the Lightbox, is divided into 4 sections (from top to bottom):

- Menu bar: contains DxO PureRAW, DxO Optics Modules, and Help (on Mac), or File, DxO Optics Modules and Help (on PC).
- Upper toolbar: lets you add, remove, select, select all, or empty the Lightbox of photos, as well as sort and filter your images. In the center, the number selected is shown over the total number displayed (for example, 2 out of 10).
- Image thumbnail display area: Shows thumbnails of added images sorted by date of capture. When the area is empty of thumbnails, it displays the options for adding files to process (via a system window, or by dragging and dropping into the window) as well as an option to download sample RAW images.
- Lower toolbar: lets you start image processing and displays the image processing progress bar.
Thumbnails
When you add images to process in DxO PureRAW, they are displayed in the Lightbox as fixed-size thumbnails and sorted by default into collapsable sections, by capture date (day DD month YYYY format), the most recent date is always displayed at the top of the screen.
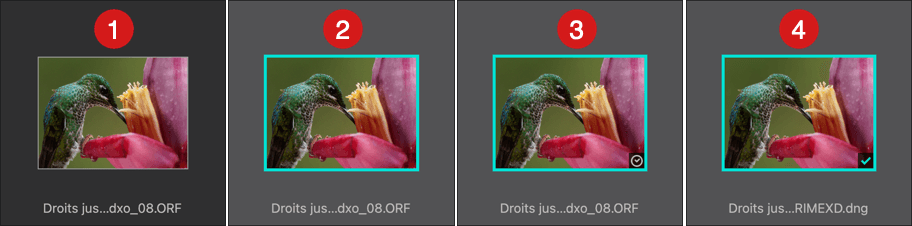
The program displays thumbnails in four ways:
- Image not selected: a dark frame containing the name and extension of the file with a thin white border around the image thumbnail.
- Selected image: light frame containing the filename with a thick, cyan border around the image thumbnail.
- Image awaiting processing: clock icon in the bottom right corner of the thumbnail.
- Processed image: cyan tick in checkbox, filename, DxO processing suffix and the processed file extension. When you are hovering over the thumbnail with your pointer, a magnifying glass is displayed in the bottom right which lets you open the processed image in enlarge mode.
You can select thumbnails individually by clicking on the images, and deselect them in the same way. To select a continuous series of images, click on the first and then on the last while holding down the Shift key.
Double-clicking on an image lets you display them in the Viewer, regardless of whether they are processed or not.
When optimizing, a progress bar is displayed in the relevant thumbnail(s), in addition to the progress bar in the bottom bar.
Right-click menu
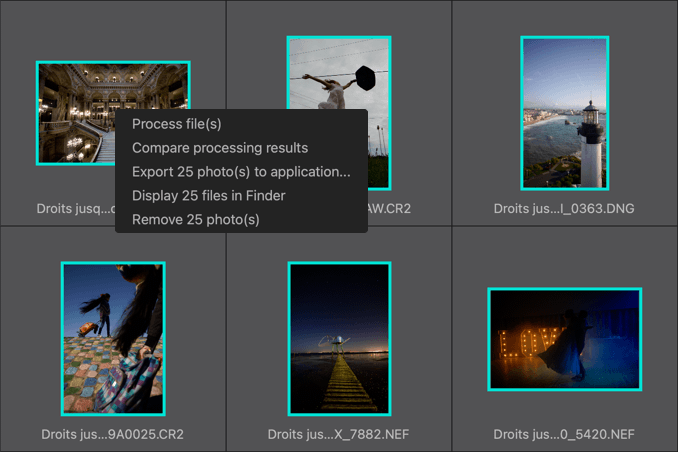
Right-clicking on a thumbnail or a selection of thumbnails displays a context menu that offers the following commands:
- Process the file(s): immediately runs optimization on the selected image or images.
- Compare results of optimization: opens the optimized image in the Viewer.
- Export to application: Opens the dialog box for exporting to a third-party application.
- Show: Allows access to the selected files and destination folder in an operating system window (Finder for Mac, Windows Explorer for PC).
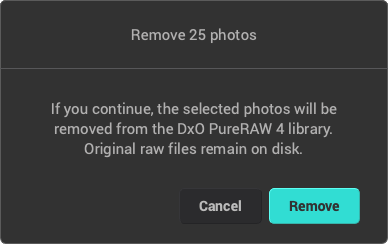
- Remove 1 photo/Remove {n} photos: Selected photos are removed from DxO PureRAW, but your original files will remain on the disk and are not sent to the trash.
The Viewer
There are four ways to access the Viewer:
- After optimizing the images, a dialog box asks if you want to see the results; click Yes.
- By double-clicking on a thumbnail, whether the image is optimized or not.
- By pressing the Space bar.
- By clicking on the magnifying glass when you move the mouse over a thumbnail.
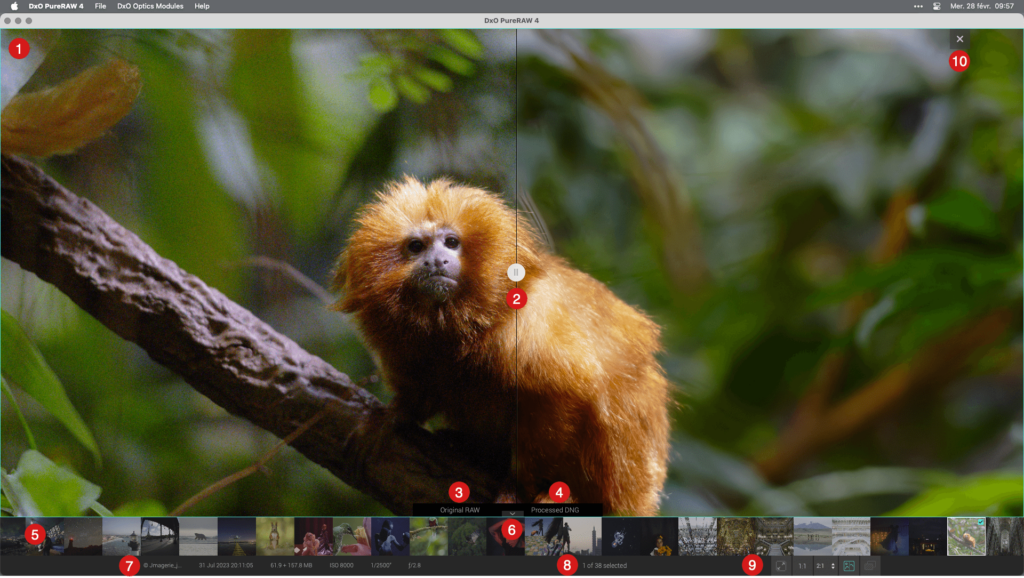
The Viewer lets you check the optimization results and gives you the option to compare with the original. To do this, the Viewer displays the following elements:
- Image display area.
- Split frame separator, which you can move freely to the left or right.
- The left-hand section displays the original RAW file.
- The right-hand section displays the latest optimized image.
- The banner of images displays square thumbnails extracted from the existing images in the Lightbox (use the mouse wheel to scroll from side to side).
- You can show or hide the filmstrip by clicking on the chevron at the bottom of the image that is currently displayed.
- The left part of the lower bar displays information related to the selected image (format, name, date and time of capture, size in MB, and shooting parameters: ISO sensitivity, speed, aperture).
- The lower bar also shows the number of images selected in the filmstrip out of the total displayed.
- Buttons for the different display modes (Zoom to fit, Zoom 1:1, Before/after Split view, and Toggle view).
- Button to close and return to the Add and select photos screen.
Display modes
At the bottom right in the lower banner, you will find the buttons for the different display modes:
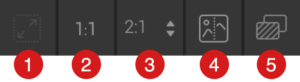
- Zoom to fit: The entire image is displayed.
- Zoom 1:1: The image is displayed at 100% (1:1 — that is, one pixel of the image is equal to one pixel on the screen).
- Zoom 2:1: By default, the image is shown at 200%, and the associated menu lets you check it at various levels of zoom (from 2:1 to 16:1).
- Before/after Split view:* Displays the image with a movable vertical separator. The original image is shown on the left while the optimized image is on the right.
- Before/after Toggle view:* Displays an alternating view of the optimized image and the original image. Click and hold the mouse button to see the original image, release to return to the optimized image.
* Split and Toggle comparison views are available only when you have selected an optimized image.
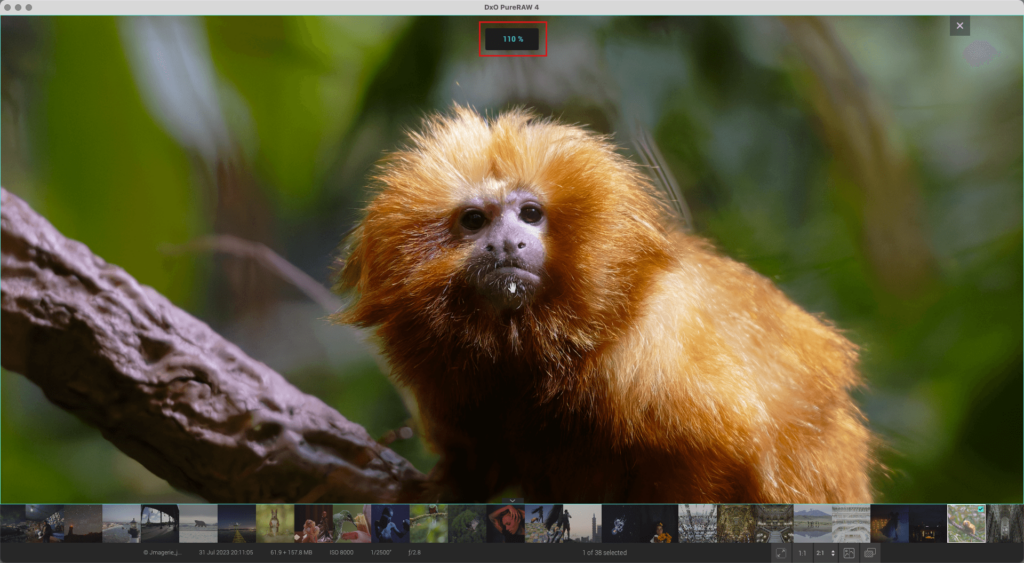
Progressive zoom and navigation
From the Zoom to fit view, you can zoom in and out using the mouse wheel to a maximum of 1600% magnification. The zoom value is temporarily displayed at the top of the image. After zooming, you can move around the image in any direction by clicking and dragging with the mouse.
The zoom works with both original and optimized images, including when you are using the split view or the comparison view.
Process Settings and Process with Preview windows
This section presents only the user interface features. If you look for a description of all the process settings, please consult the Processing tools and settings page of this user guide.
Depending on your choice, both windows are available in the following workflows:
- As a standalone program, including when exporting to a third party photo editor.
- As a Lightroom Classic plug-in.
These windows will NOT appear in the Finder (Mac) or Windows Explorer (PC) workflow.
Process Settings window
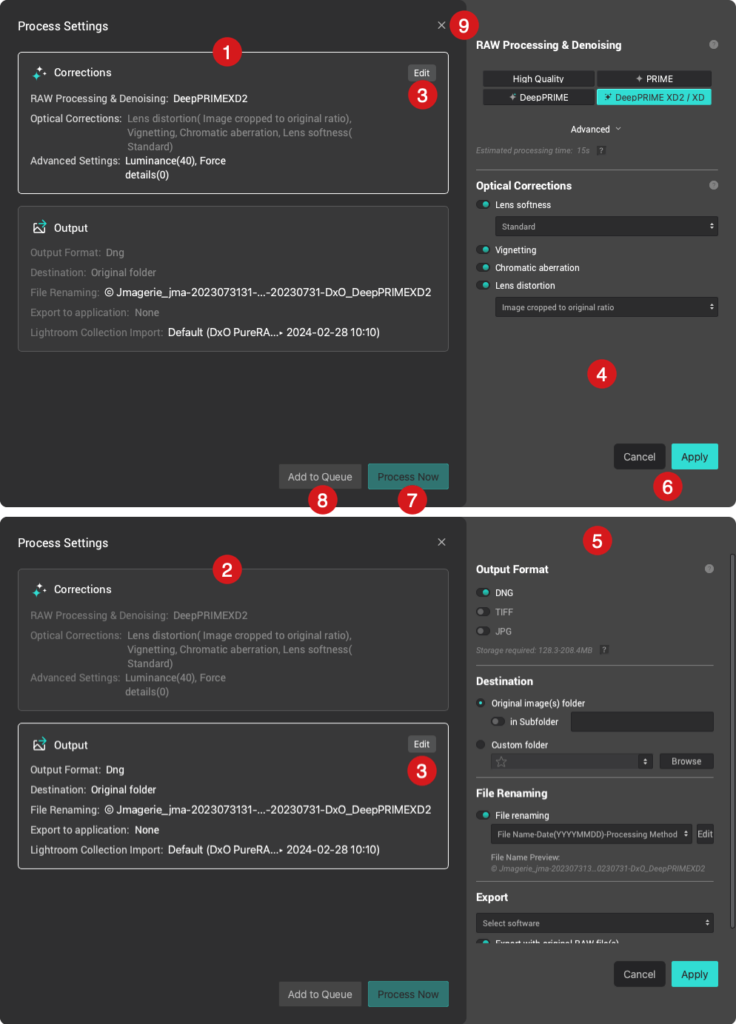
The Process Settings window is a quick way to check the settings, change them on the fly and launch processing, but without seeing the updated image beforehand. It shows up when you click the Process button:
- The Corrections section presents a recap of all chosen image processing options as plain text, plus the values in brackets.
- The Output section presents all the information related to file format, destination folder, file renaming, export to application status and, if applicable, Lightroom Collections import.
- If you hover the mouse over one of the sections, an Edit button will appear.
- In the Corrections section, clicking on Edit will pop out a side panel, where you can modify all the processing settings at will.
- In the Output section, clicking on Edit will also pop out a side panel, where you will be able to change all the relevant settings.
- When you are done editing the settings, click on Apply. Click on Cancel if you change your mind. In both cases, the right panel will hide.
- If you want to start processing with the actual settings and options, click on Process.
- If you want to postpone processing, in a batch workflow, click on Add to Queue.
- If you click on X, the window will close and no processing will start.
Process with Preview window
The Process with Preview window lets you see and check your image with all your settings in full detail, in real time, and compare it with the original, unprocessed RAW file.
Preview calculation
Before using the Process with Preview mode, and if your computer is recent and quite powerful, you can enable the automatic preview calculation, so you can see all the settings and the changes in real time, including when zooming, panning and using the comparison modes.
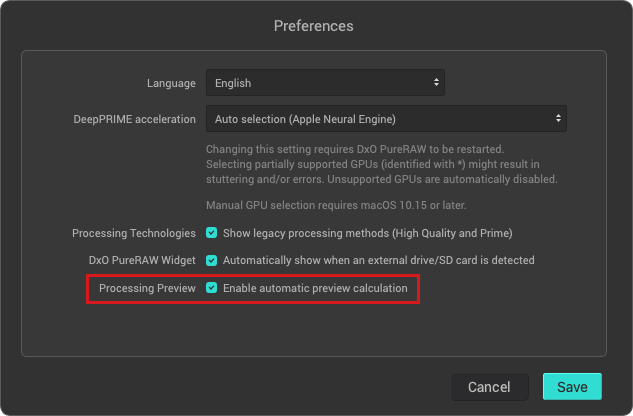
For that, you need to check the Processing Preview: Enable automatic preview calculation option as follows:
- Mac: Go to DxO PureRAW menu > Preferences.
- PC: go to File menu > Preferences.
The window informs you that your preview is updated with the following indications:
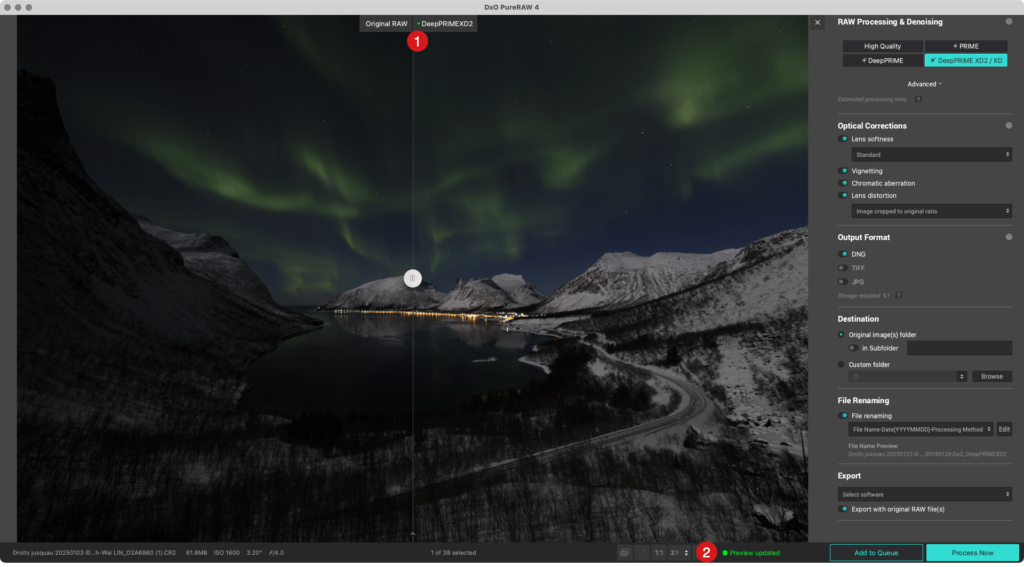
- Green dot and green “Preview updated” label in the bottom bar.
- Green dot in the process mode indication, on top of the image.
If you can’t benefit from the automatic preview calculation, you will have to click on the Update label, in the bottom bar, each time you make changes, zoom, pan or use the comparison modes. In order to inform you that the preview is not updated, the window informs you with the following indications:
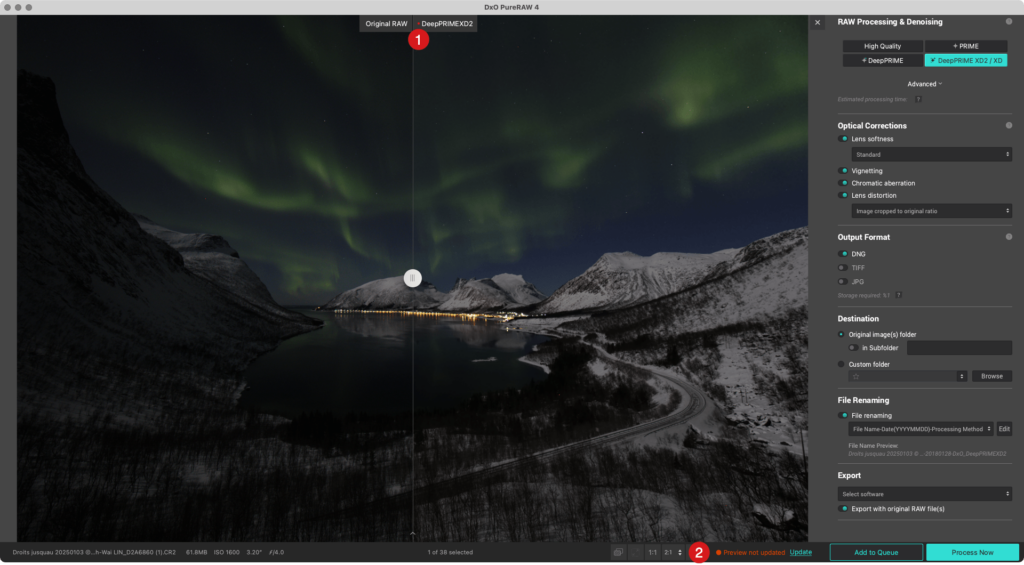
- Red dot and red “Preview not updated” label in the bottom bar, next to the Update label.
- Red dot in the process mode indication, on top of the image.
Preview interface
Most of the window has the same display and information features as the Viewer described in the relevant section of this page.
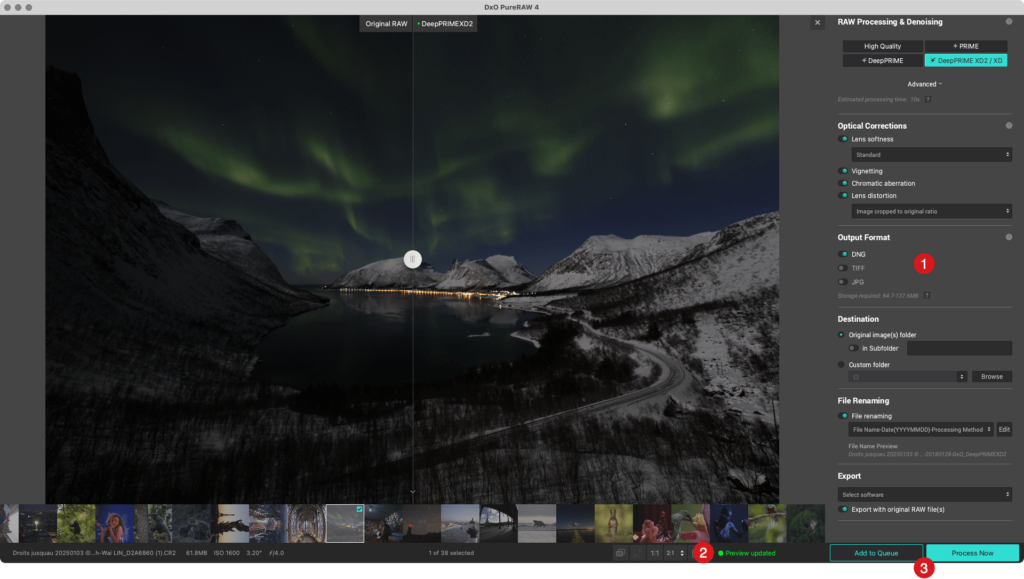
In addition, the Process with Preview window features the following items:
- The right panel, with all the processing and output settings and options.
- The preview update indications.
- The Process Now and the Add to Queue buttons.
To quit the window, click on the X button, in the top right corner of the image.
Keyboard shortcuts
| Action | PC | Mac |
| Full screen viewer | – | Cmd + Ctrl + F |
| Exit full screen mode | – | Esc |
| Preferences | Shift + Ctrl + P | Cmd + , |
| Display in Zoom to fit mode | F3 | Cmd + 0 |
| Display at 1:1 (100%) | F4 | Cmd + 1 |
| Before/after Toggle view | Ctrl + D | D |
| Move from one thumbnail to another (filmstrip) | Left / right arrows | Left / right arrows |
| Show / hide filmstrip | Up / down arrows | Up / down arrows |
| Delete thumbnails | Remove | Cmd + Delete |
| Select thumbnails one by one | Shift + left / right / up / down arrows | Shift + left / right / up / down arrows |
| Select all thumbnails | Ctrl + A | Cmd + A |
| Exit results display mode | – | Esc |