

In this section you will discover the user interface of DxO PureRAW in standalone mode. This interface is divided into different screens:
- The Lightbox, for adding and selecting photos.
- The Viewer, to display enlarged processed images for checking.
- The Process settings and the Process with Preview windows.
Adding and selecting photos
The Lightbox
The photo addition and selection screen, the Lightbox, is divided into 4 sections (from top to bottom):
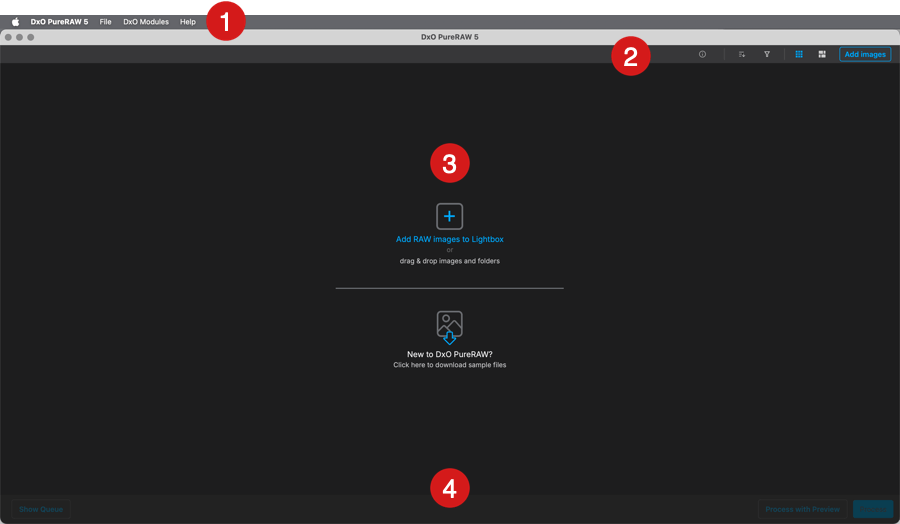
- Menu bar: contains DxO PureRAW, DxO Modules, and Help menus (on Mac), or File, DxO Modules and Help menus (on PC).
- Upper toolbar (from right to left):
- Add images button.
- Display modes.
- Apply filter to Lightbox.
- Sort images.
- View file’s metadata.
- Number of selected images over the total number displayed.
- Image thumbnail display area: Shows thumbnails of added images sorted by date of capture (default setting). When the area is empty of thumbnails, it displays the options for adding files to process (via a system window, or by dragging and dropping into the window) as well as an option to download sample RAW images.
- Lower toolbar: lets you start image processing and displays the image processing indication. You can also access the processing queue by clicking the Show Queue button in the bottom left corner.
Lightbox display modes
Images can be displayed as a grid of square, fixed-size thumbnails, or as a mosaic. Both display modes can be selected in the upper toolbar.
When you add images to process in DxO PureRAW, they are displayed in the Lightbox and sorted by default into collapsible sections, by capture date (Day, Month DD, YYYY format: Wednesday, January 1, 2025), the most recent date is always displayed at the top of the screen. In each date section, images are ordered by number (1, 2, 3, 4, 5, etc.).
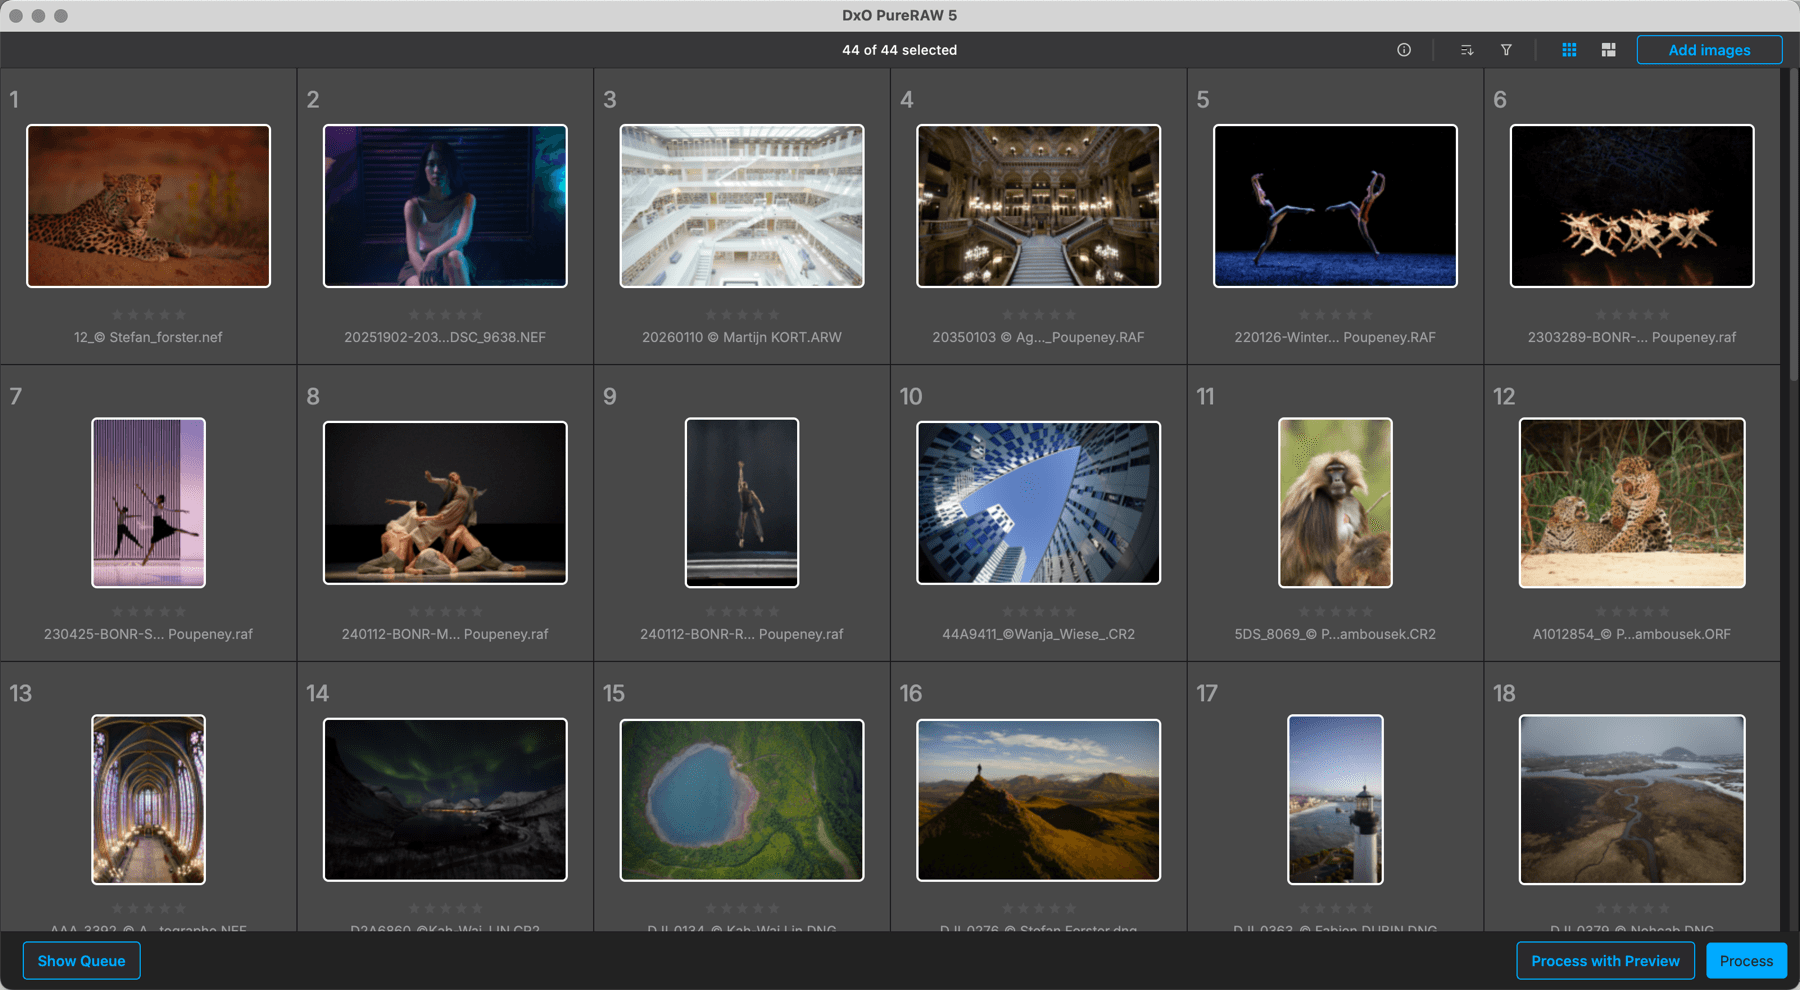
If you use square thumbnails, they are displayed in four ways:
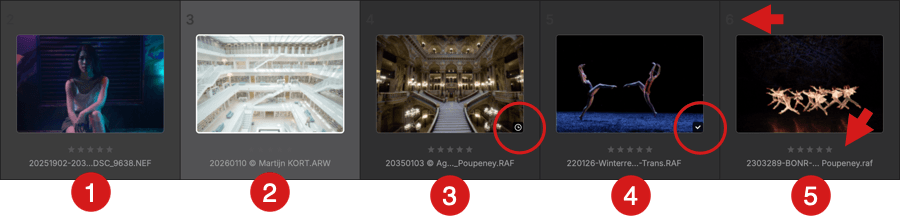
- Image not selected: a dark frame containing a subdued sequence number, the name and the extension of the file.
- Selected image: lighter frame, thick white border around the image thumbnail and white sequence number.
- Image awaiting processing: clock icon in the bottom right corner of the thumbnail.
- Processed image: white tick in black checkbox, filename as per file renaming settings, and the processed file extension (.dng).
- Thumbnails display the following information:
- Filename (always the original name, even when processed).
- Star rating.
- Sequence number in the strip (#1, 2, 3, 4, etc.).
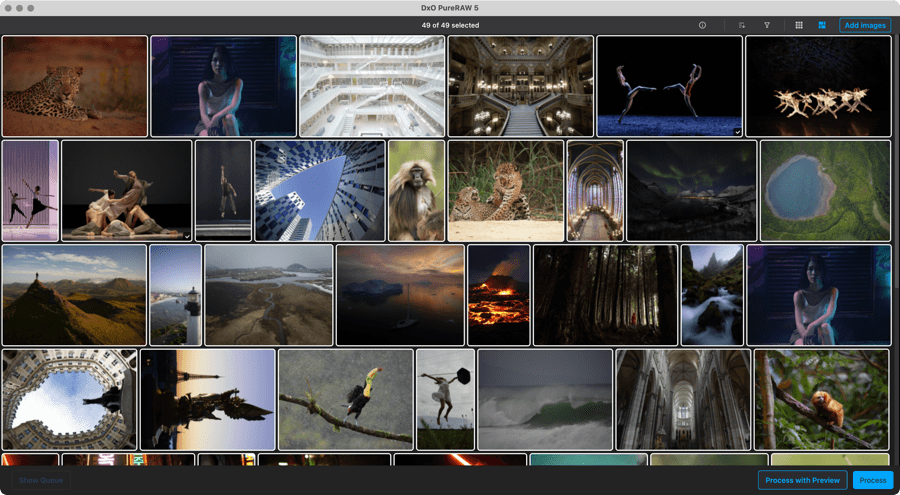

If you use the mosaic mode, image are displayed as follows:
- Image not selected: no frame, no info.
- Selected image: thick white border.
- Image awaiting processing: clock icon in the bottom right corner of the thumbnail.
- Processed image: white tick in black checkbox.
- Hovering a thumbnail with the mouse triggers a pop-up with the original file name.
You can select thumbnails individually by clicking on the images, and if a thumbnail is selected, clicking on another thumbnail will deselect it. You can select multiple thumbnails with Cmd+click (Mac) or Ctrl+click (PC), and deselect them in the same way. To select a continuous series of images, click on the first and then on the last while holding down the Shift key.
Double-clicking on an image lets you display them in the Viewer, regardless of whether they are processed or not.
When processing, a progress bar is displayed in the relevant thumbnail(s), in addition to the animated dots in the bottom bar.
Image information
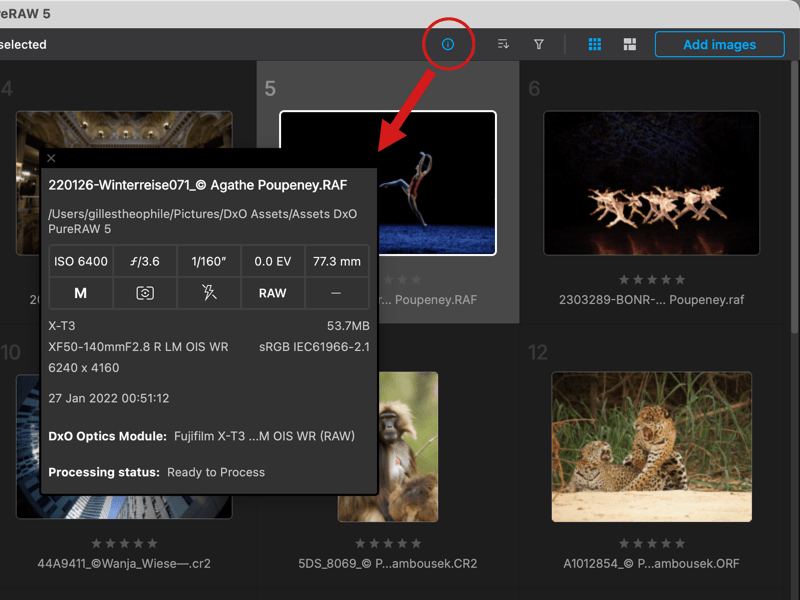
By clicking the Information button, a floating window displays the main and EXIF data of the selected image (from top to bottom):
- Filename and extension.
- Folder path to where the image is located.
- A table with the main shooting data (ISO, f-stop, speed, exposure compensation, focal length, file type, etc.).
- Camera model and file size.
- Lens and in-camera color space.
- Image size in pixels (length x height).
- Capture date and time.
- DxO Module reference number.
- Processing status.
- Keywords, as embedded in the image metadata.
To close the Information floating window, click on the X (top left).
Sort by*
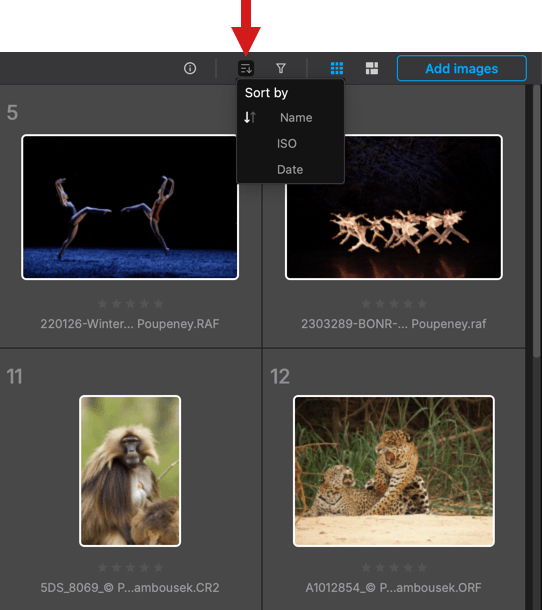
You can sort images using one of the following criteria:
- Name: displays photos alphabetically. Names that start with a number appear at the top of the screen, there are no collapsible sections.
- ISO: arranges photos dynamically by ISO range, represented by collapsible sections in the Lightbox.
- Date: arranges photos by date-taken in collapsible sections in the Lightbox. You can reverse the display order by clicking on the arrow to the left of Date; by default, the most recent image appears at the top of the screen.
Filter by*
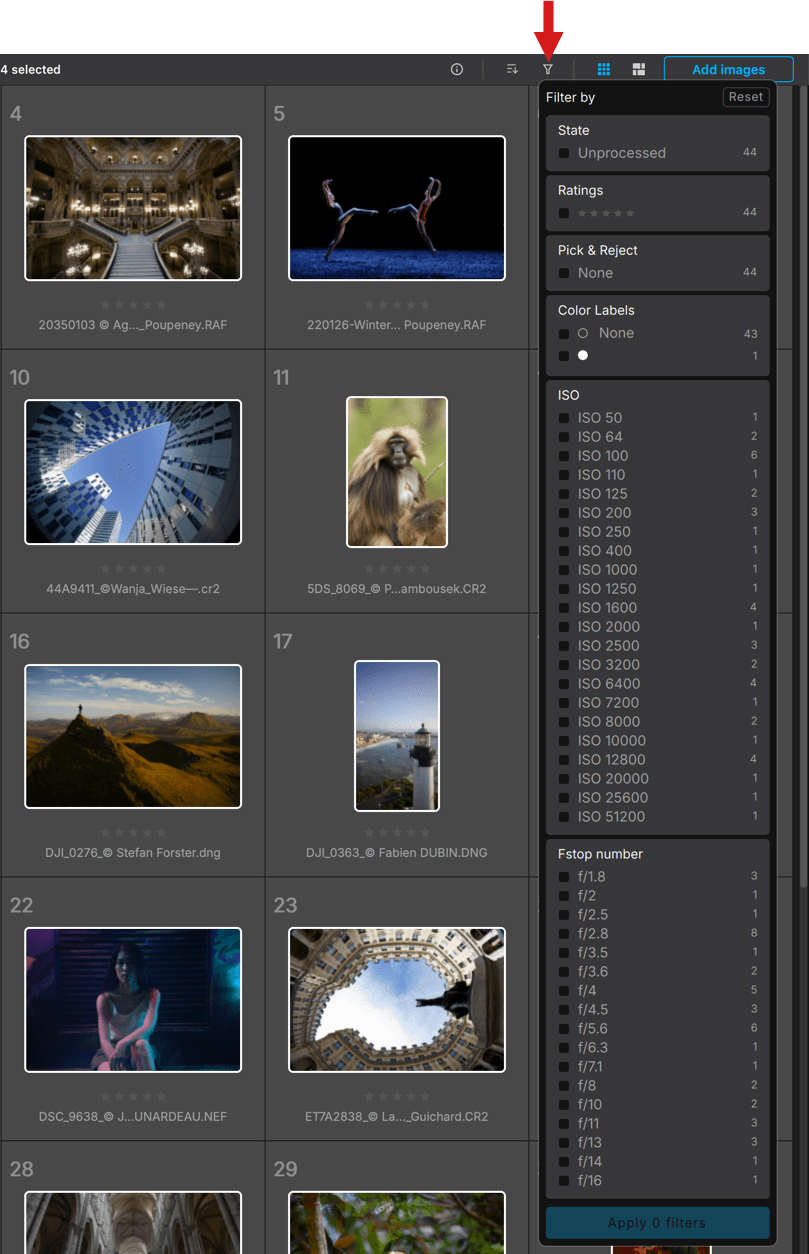
Images can be filtered using any of the following criteria, and combine them by checking them in the list:
- State:
- Unprocessed: displays only unprocessed images.
- Awaiting processing: displays only queued images that have not yet been processed.
- Processed: displays only processed images.
- Ratings: by number of stars (set with other software or with the camera).
- Pick & Reject: by pick, reject or undefined selection flags (set with other software).
- Color Labels: by color labels (set with other software).
- ISO:
- None checked: all images are displayed, whatever their ISO setting.
- Checked: displays images according to the checked ISO settings.
- Fstop number:
- None checked: all images are displayed, whatever their f-stop.
- Checked: displays images according to the checked f-stop.
- Other: any other f-stop settings than f/1.4 to f/22.
The right side shows the number of images per setting. Clicking on Reset (upper right) will uncheck all selected items, and clicking on Apply 0 filters will deactivate all filters.
*Note that you can combine image sorting and filtering (for example: by date + ISO settings).
Right-click menu

Right-clicking on a thumbnail or a selection of thumbnails displays a context menu that offers the following commands:
- Process the file(s): immediately runs optimization on the selected image or images.
- Compare results of optimization: opens the optimized image in the Viewer.
- Export to application: Opens the dialog box for exporting to a third-party application.
- Show: Allows access to the selected files and destination folder in an operating system window (Finder for Mac, Windows Explorer for PC).
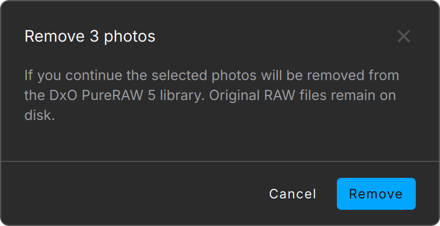
- Remove 1 photo/Remove {n} photos: Selected photos are removed from DxO PureRAW, but your original files will remain on the disk and are not sent to the trash.
- Rename Original RAW file(s): Allows individual or batch renaming of the original RAW files.
- Clear Lightbox: Removes all photos (selected and unselected) from the Lightbox in one go.
The Viewer
There are four ways to access the Viewer:
- After optimizing the images, a dialog box asks if you want to see the results; click Yes.
- By double-clicking on a thumbnail, whether the image is optimized or not.
- By pressing the space bar when you are in the Lightbox.
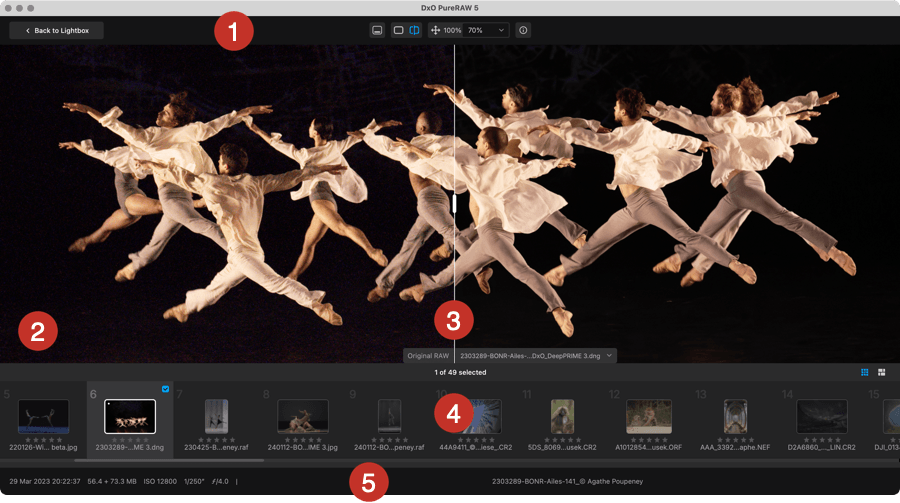
The Viewer lets you check the optimization results and gives you the option to compare with the original. To do this, the Viewer displays the following elements:
- Upper toolbar with the following buttons (from left to right):
- Back to Lightbox: Clicking on the button sends you back to the Lightbox, where you can select other images.
- Show or hide the filmstrip.
- Toggle view button*: click and release to compare the processed image (after) to the original (before).
- Split view button*: splits the image vertically to compare the original to the processed image (see point 5 for more details).
- Fit and zoom button: contains the following items (from left to right):
- Zoom to fit icon, displays the complete image after zooming.
- The current zoom factor (default is 100%, meaning 1 pixel of the screen equals 1 pixel in the image).
- The zoom menu, where you can select values up to 1600%. It will also indicate the values when you zoom with the mouse wheel, and the zoom to fit value, which depends on your monitor size and resolution, and wether the DxO PureRAW window size.
- “i” button: Image information, a floating window displays the main and EXIF data of the selected image (see Image information, sort order and filtering images paragraph for more infos).
- Image display area (single image display). Hovering the mouse over the image, whatever the display mode, will show up the left and right navigation arrows, to go to the previous or next image.
- Split frame vertical separator, which you can move freely to the left or right.
- The left-hand section displays the original, non-processed RAW file.
- The right-hand section displays the latest optimized image.
- The filmstrip displays the images as found in the Lightbox (use the mouse wheel to scroll from side to side). The filmstrip upper toolbar contains (from left to right):
- The number of images selected in the filmstrip out of the total displayed.
- The square thumbnails mode and the mosaïc display modes (the setting here can be different from the Lightbox).
- The left part of the footer displays information related to the selected image (from left to right: date and time of capture, size in MB, ISO speed, shutter speed, f-stop value and after the vertical separator, the name of the selected file, without extension).
- The Show only selected switch toggles the display of images in the filmstrip as follows:
- Off (default): all images, selected and unselected, are shown.
- On: only the selected image(s) are shown.
* Split and Toggle comparison views are available only when you have selected a processed image.
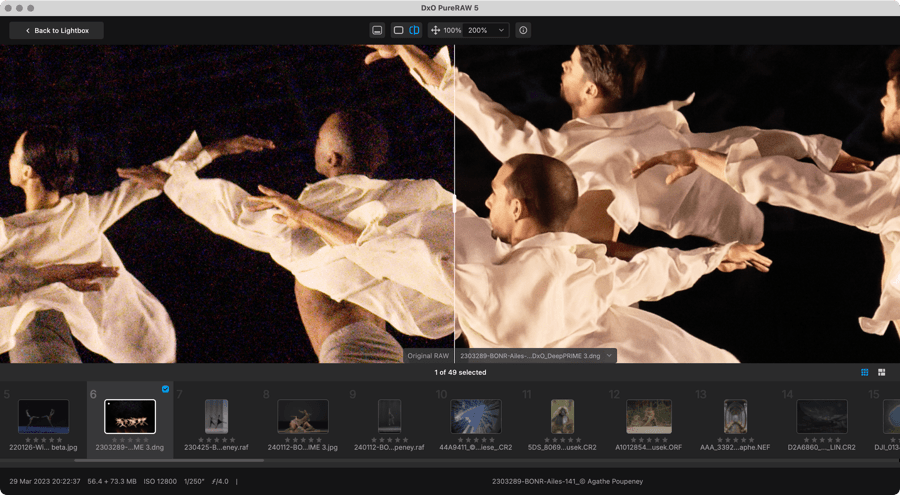
Progressive zoom and navigation
From the Zoom to fit view, you can zoom in and out using the mouse wheel to a maximum of 1600% magnification. After zooming, you can move around the image in any direction by clicking and dragging with the mouse.
The zoom works with both original and optimized images, including when you are using the split view or the comparison view.
Process Settings and Process with Preview windows
This section presents only the user interface features. If you look for a description of all the process settings, please consult the Processing tools and settings page of this user guide.
Depending on your choice, both windows are available in the following workflows:
- As a standalone program, including when exporting to a third party photo editor.
- As a Lightroom Classic plug-in.
These windows will NOT appear in the Finder (Mac) or Windows Explorer (PC) workflow.
Process Settings window
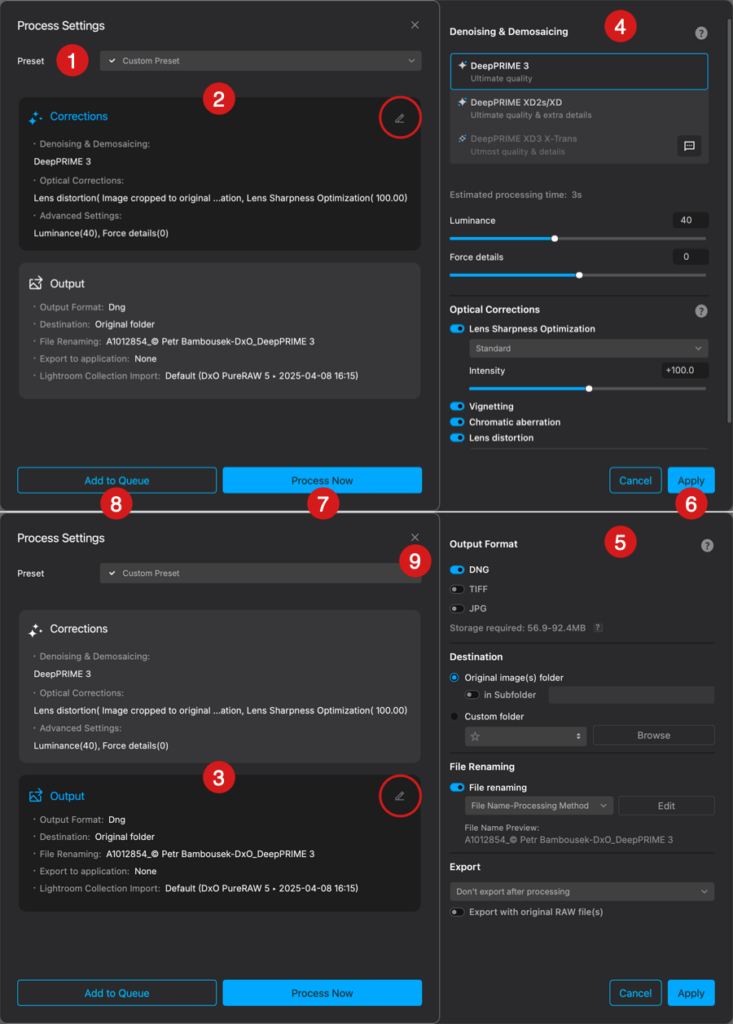
The Process Settings window is a quick way to check the settings, change them on the fly and launch processing, but without seeing the updated image beforehand. It shows up when you click the Process button:
- The Preset menu lets you select, apply, create, rename, update and delete processing presets.
- The Corrections section presents a recap of all chosen image processing options as plain text, plus the values in brackets.
- The Output section presents all the information related to file format, destination folder, file renaming, export to application status and, if applicable, Lightroom Collections import.
- In the Corrections section, clicking on the pen icon (top right corner) will pop out a side panel, where you can modify all the processing settings at will.
- In the Output section, clicking on the pen icon (top right corner) will also pop out a side panel, where you will be able to change all the relevant settings.
- When you are done editing the settings, click on Apply. Click on Cancel if you change your mind. In both cases, the right panel will hide.
- If you want to start processing with the actual settings and options, click on Process Now.
- If you want to postpone processing, in a batch workflow, click on Add to Queue.
- If you click on X (top right corner), the window will close and no processing will start.
Process with Preview window
The Process with Preview window lets you see and check your image with all your settings in full detail, in real time, and compare it with the original, unprocessed RAW file.
Preview calculation
Before using the Process with Preview mode, and if your computer is recent and quite powerful, you can enable the automatic preview calculation, so you can see all the settings and the changes in real time, including when zooming, panning and using the comparison modes.
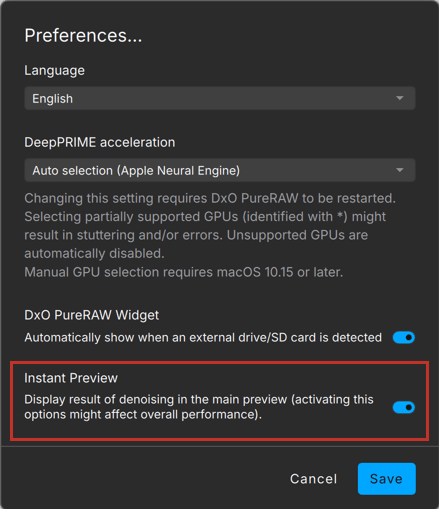
For that, you need to check the Instant Preview option as follows:
- Mac: Go to DxO PureRAW menu > Preferences.
- PC: go to File menu > Preferences.
When you’re done, click on Save to record the changes and close the Preferences window.
The window informs you that your preview is updated with a green dot in the process mode indication, bottom of the image.
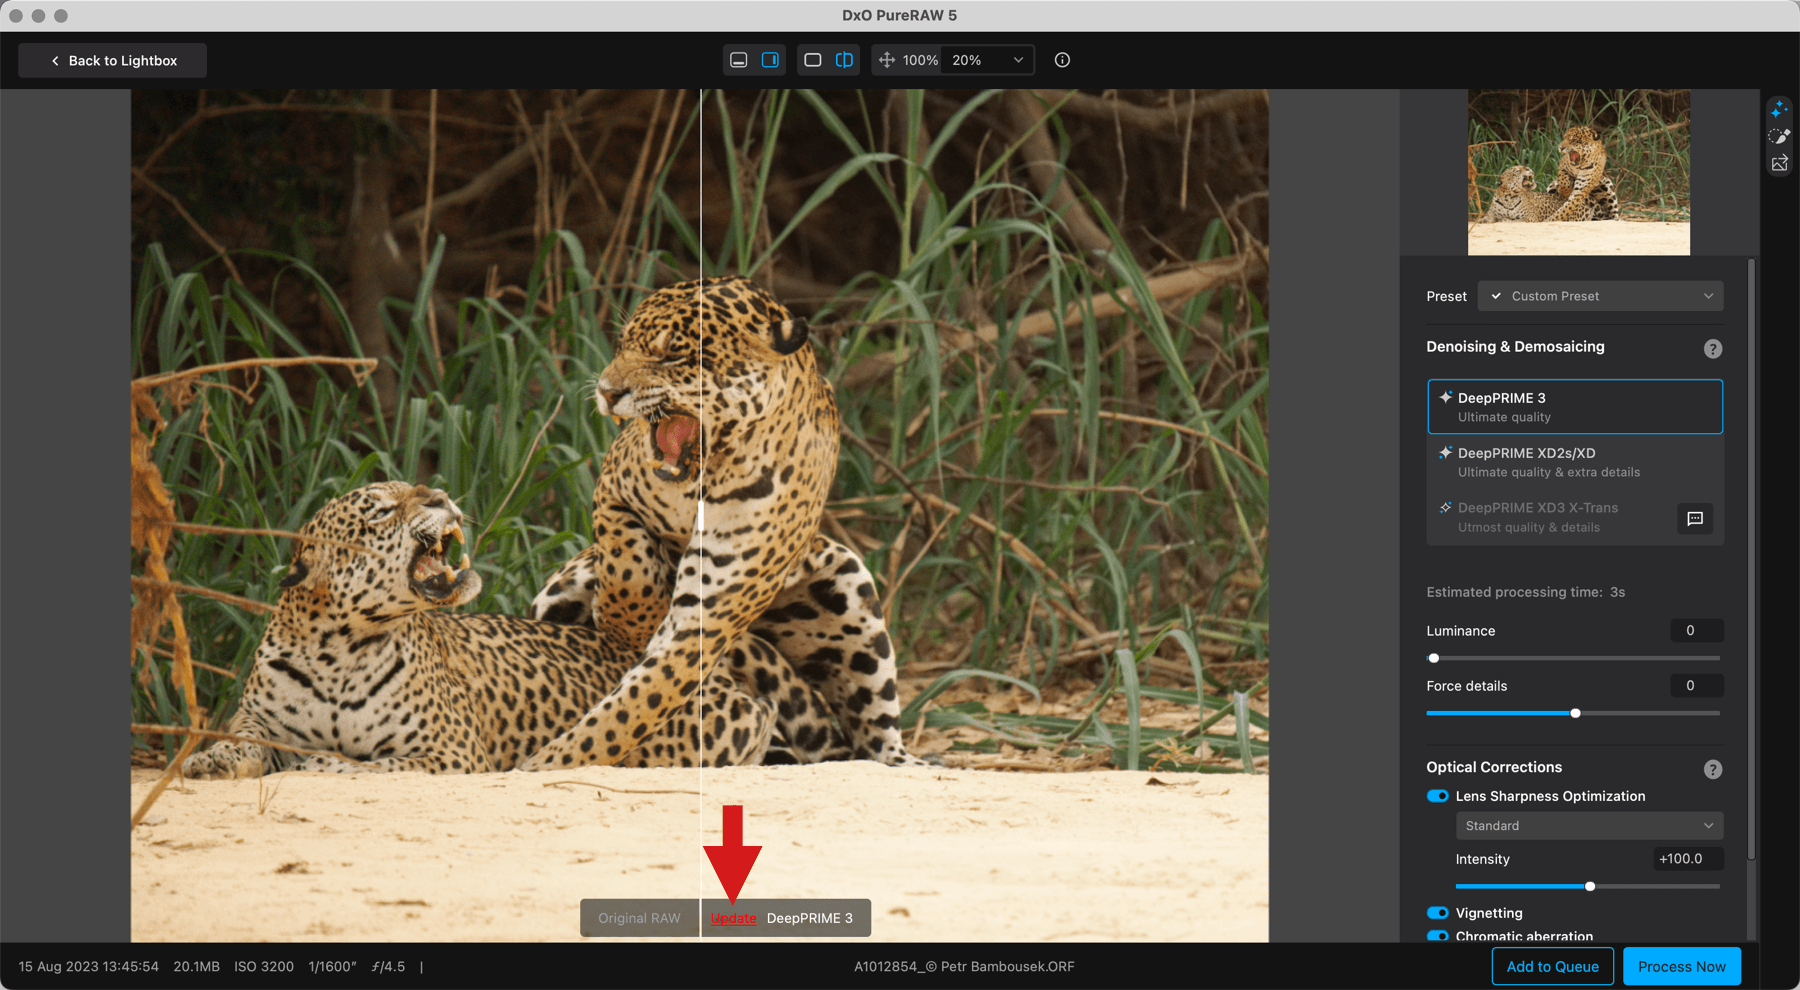
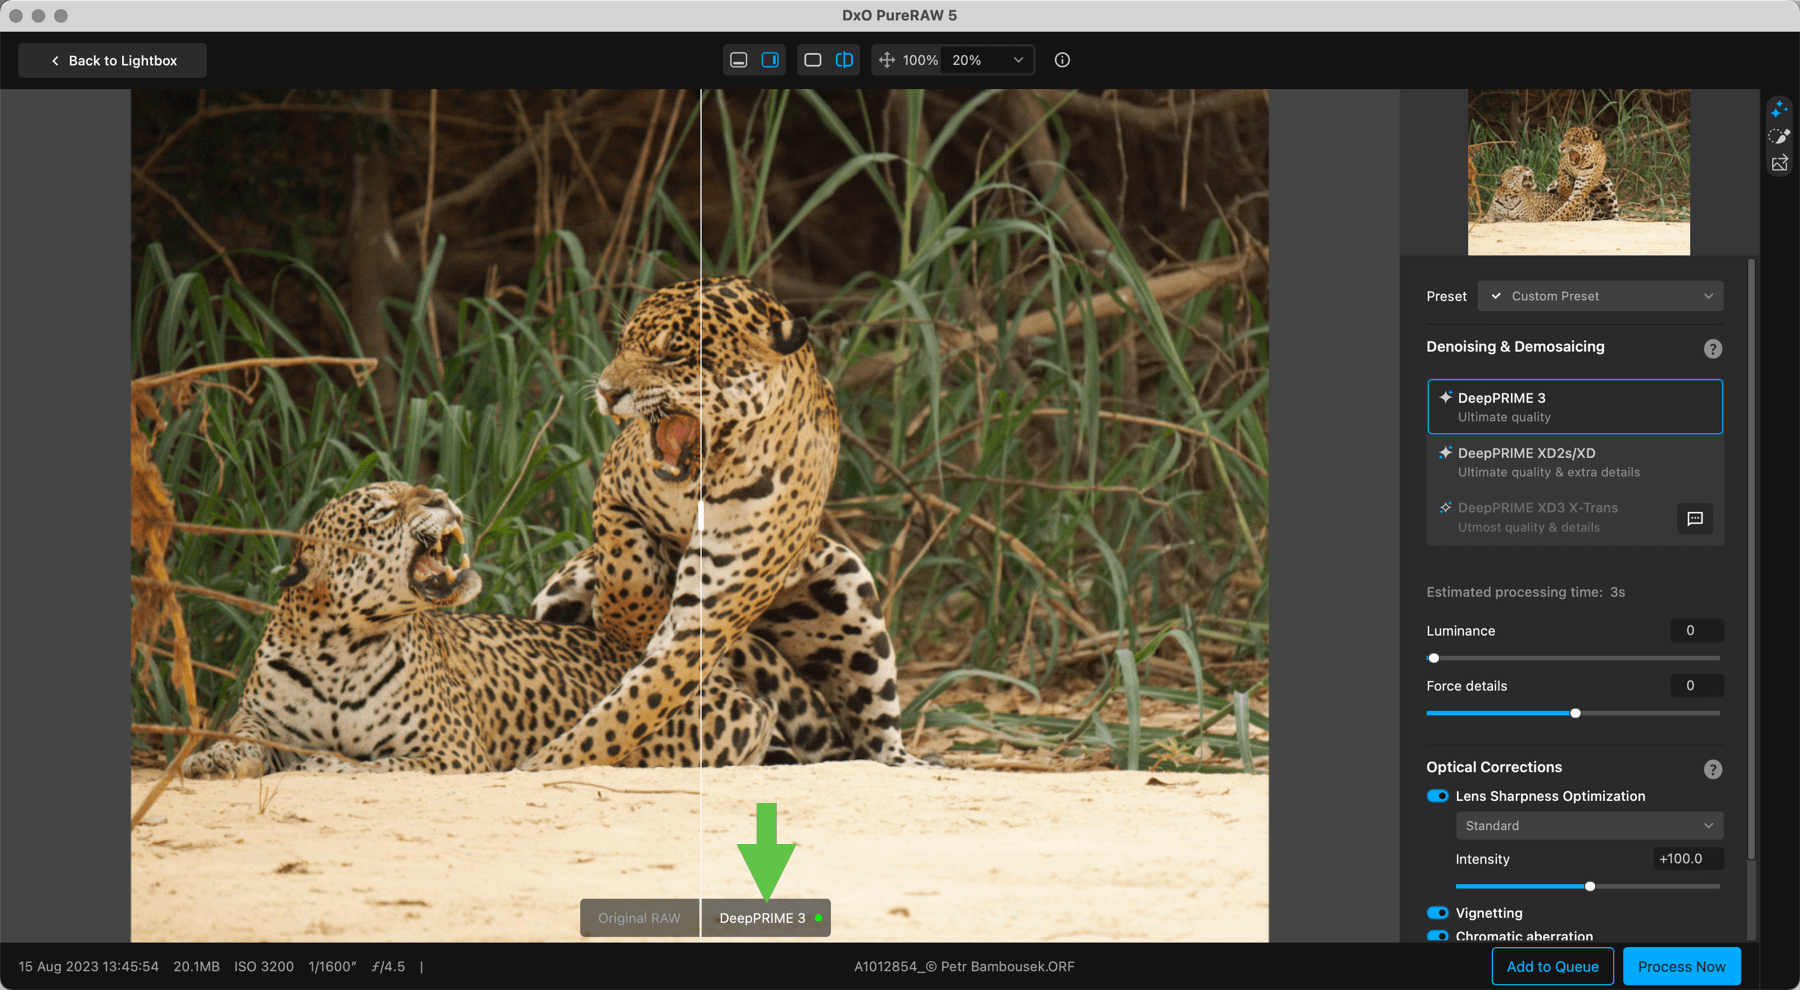
If you can’t benefit from the automatic preview calculation, you will have to click on the red Update label, bottom of the image. As soon as the preview is updated, a green dot will show instead. Be aware that you will have to update the preview each time you zoom, dezoom and navigate in the image, as well as changing the display mode (for example, going to the split view).
Process with preview interface
The Process with preview window has the same display and information features as the Viewer described previously in this page.
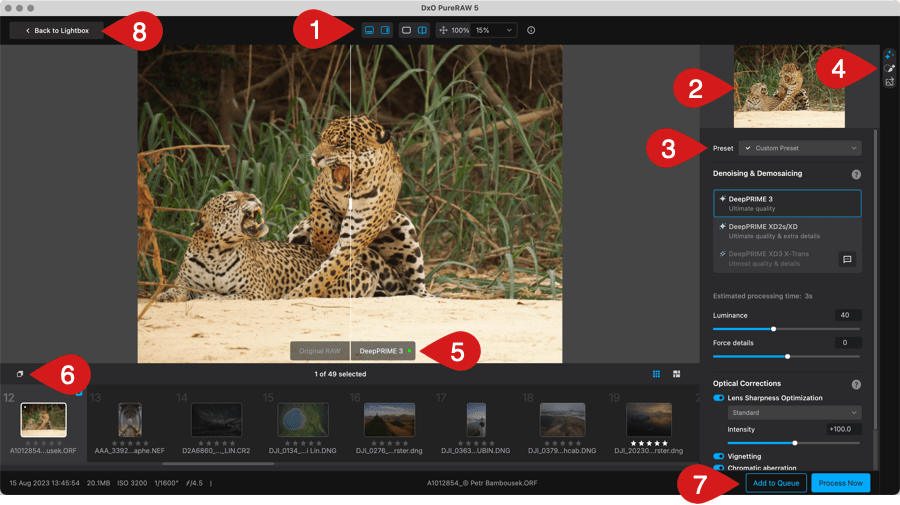
In addition, the Process with Preview window features the following items:
- In the upper bar, buttons to show/hide the filmstrip and the right panel, plus the split view and the zoom controls.
- A navigation preview: When you zoom in the image, you can navigate by moving the white square with the mouse.
- The Preset menu lets you select, apply, create, rename, update and delete processing presets.
- All the processing and output settings and options, split into 3 sections you can display with the 3 buttons located in the top right corner (from top to bottom):
- Denoising & Demosaicing section, to select the settings for the global processing/denoising eand optical corrections.
- Local Adjustments section, for selective denoising & demosaicing and optical corrections with a brush.
- Output section, to set the output format(s), destination, file renaming and export modes.
- The preview update indications.
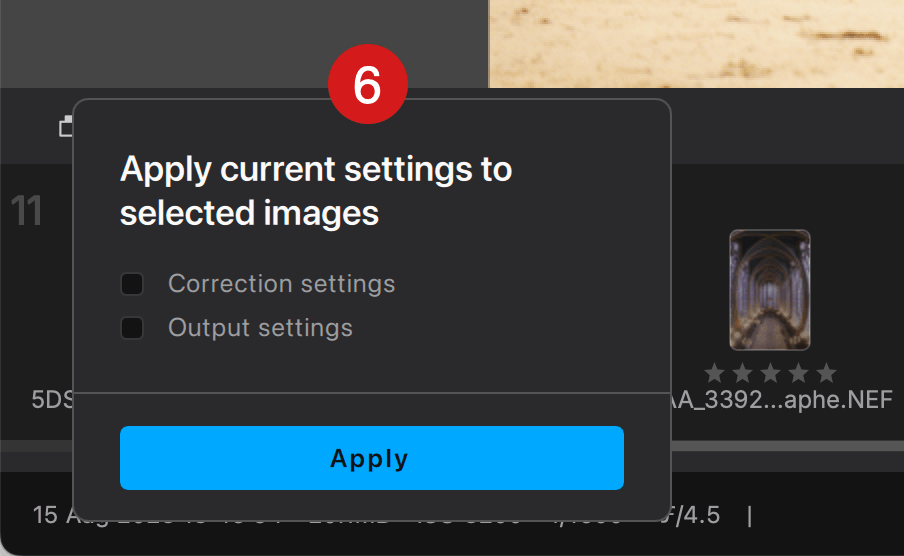
- A paste button, which allows you to paste the current settings to the selected images in the filmstrip. The submenu allows to check separately Correction and Output settings. You can also right click in the filmstrip to get a submenu, where you can copy then paste all settings.
- The Process Now and the Add to Queue buttons.
- To quit the Process Preview window, click on Back to Lightbox, in the upper left corner.
Keyboard shortcuts
| Action | PC | Mac |
| Full screen viewer | – | Cmd + Ctrl + F |
| Exit full screen mode | – | Esc |
| Preferences | Shift + Ctrl + P | Cmd + , |
| Display in Zoom to fit mode | F3 | Cmd + 0 |
| Display at 1:1 (100%) | F4 | Cmd + 1 |
| Before/after Toggle view | Ctrl + D | D |
| Move from one thumbnail to another (filmstrip) | Left / right arrows | Left / right arrows |
| Show / hide filmstrip | Up / down arrows | Up / down arrows |
| Delete thumbnails | Remove | Cmd + Delete |
| Select thumbnails one by one | Shift + left / right / up / down arrows | Shift + left / right / up / down arrows |
| Select all thumbnails | Ctrl + A | Cmd + A |
| Exit results display mode | – | Esc |
| Undo/Redo brush strokes | Ctrl + Z / Shift + Ctrl + Z | Cmd + Z / Shift + Cmd + Z |
| Toggle brush/eraser (press and release) | Alt | Option |