

Minimum system configuration
Microsoft® Windows®
- Intel® Core™ or AMD Ryzen™ with 4 cores
- 8 GB RAM
- 4 GB available disk space
- 1280 x 768 display
- Microsoft® Windows® 10 version 21H2 or 11 (64-bit)
- For DeepPRIME, DeepPRIME XD and DeepPRIME XD2:
- Nvidia RTX with 4GB of VRAM with the latest drivers
- Nvidia GTX with 8GB of VRAM with the latest drivers
- AMD Radeon RX6000 series with 4GB of VRAM with latest drivers
- Intel ARC with 8GB of VRAM with the latest drivers
Apple® macOS®
- Any CPU
- 8 GB RAM
- 4 GB available disk space
- 1280 x 768 display
- macOS 13 (Ventura)
- For DeepPRIME, DeepPRIME XD and DeepPRIME XD2:
- M1 or Intel® Mac with AMD Radeon™ Pro RX5700
Recommended system configuration
Microsoft® Windows®
- Intel® Core™ processor or AMD Ryzen™ with 8 cores
- 16 GB RAM
- 4 GB available disk space
- 1920 x 1080 display
- Microsoft® Windows® 10 version 21H2 or 11 (64-bit)
- For DeepPRIME, DeepPRIME XD and DeepPRIME XD2:
- NVIDIA RTX™ 2080, AMD Radeon™ RX 6700 with latest drivers with 8GB of VRAM
Apple® macOS®
- M1
- 16 GB RAM
- 4 GB available disk space
- 1920 x 1080 display
- macOS 13 (Ventura)
- For DeepPRIME, DeepPRIME XD and DeepPRIME XD2:
- M1 or Intel® Mac with AMD Radeon™ Pro RX5700
Supported image formats
Supported formats and cameras will continue to evolve as DxO PureRAW is updated.
- DxO PureRAW supports common RAW files, including images from Fujifilm X-Trans** sensor.
- Original DNG files from cameras using this format.
- DNG* files from RAW formats supported by DxO and converted with Adobe Lightroom Classic, Lightroom, Camera Raw, or Adobe DNG Converter
*Compressed DNG files, DNG files from merged pictures done in Adobe Lightroom Classic, or Lightroom and Camera Raw, and DNG files from smartphone cameras are not supported.
**DeepPRIME XD2 doesn’t support Fujifilm RAW files yet. If you use such files, DxO PureRAW will apply DeepPRIME XD instead.
Installation of DxO PureRAW
On this page you will find instructions for:
- Downloading
- Installing
- Activating
- About the external modules for Adobe Lightroom Classic.
- Uninstalling
Downloading
DxO PureRAW 4 can be downloaded here. The downloaded file saves to your Downloads folder.
To access this folder on macOS, open the Finder and click on the Downloads folder, usually displayed in the list on the left. The installation file has the extension “.dmg.”
To access this folder on a Windows PC, click on the Start button, then on your user name. In the window that opens, double-click on the “Downloads” folder. The installation file has the extension “.exe”.
Installation
To install DxO PureRAW on Mac:
- Find the installation disk image file (.dmg) that you have downloaded and double-click on it.
- In the window that opens, double-click on the DxO PureRAW icon.
- Follow the steps indicated by the series of windows that follows, including approval of the license agreement and component selection (external Lightroom module and Finder extension).
- Once DxO PureRAW has been installed, it will appear in the Applications folder on your Mac. After you launch the program, you can add it to your Dock (right-click on the icon and choose Options).
- When you open Adobe Lightroom Classic, a dialog box will confirm that the external DxO PureRAW modules have been successfully installed.
- If the DxO PureRAW controls don’t appear in the Finder window’s context menu when you right-click on a RAW file, open System Preferences (macOS) > Extensions, and make sure that DxO PureRAW has a checkmark next to its name in the list. If the issue persists, restart your Mac.
Installing DxO PureRAW on a PC:
- Find the installation file (.exe) you downloaded and double-click on it.
- You will be guided through the installation steps, including approving the license agreement, the default location (C:\Program Files\DxO), and the choice of components (Lightroom plugin).
- After the installation of DxO PureRAW is complete, you can access it via the Programs > DxO > DxO PureRAW folder (create a shortcut on your desktop or pin the program to your taskbar).
- When you open Adobe Lightroom Classic, a dialog box will confirm that the external DxO PureRAW modules have been successfully installed.
Activation
The first time you launch the program after installation, you will be prompted to enter your registration key. This window will appear at each launch as long as you have not entered the key (you have a 14-day trial period, however).
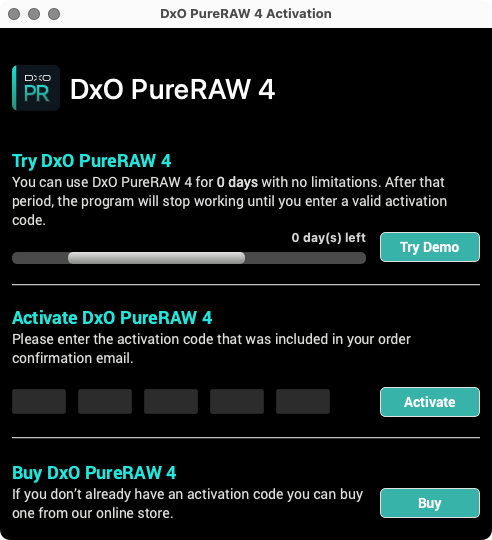
The activation window also allows you to purchase your license from the DxO online store.
Practical information
- You can activate your DxO PureRAW software on up to 2 computers.
- An internet connection is required to use the software and specifically for its activation.
- After online activation, DxO PureRAW can be used offline for 37 days before a connection to DxO’s servers is required.
- Notifications advising that a connection is needed will be displayed after 30 days.
About the external DxO PureRAW module for Adobe Lightroom Classic.
You can check the status of the external DxO PureRAW module by opening the External Modules Manager in Lightroom Classic from the File menu.
The external module is made up of two parts:
- DxO PureRAW.
- DxO PureRAW Import.
The green light indicates that the module has been installed and is working properly. The right-hand side shows the location and version, along with options to deactivate/activate and reload the external module.
Uninstalling
To uninstall DxO PureRAW:
- Mac: Open the DMG disk image you used to install the program. Next, in the window, click on Uninstall and follow the steps.
- PC: Use the Windows application uninstaller or relaunch the DxO PureRAW installer and follow the steps.
Preferences
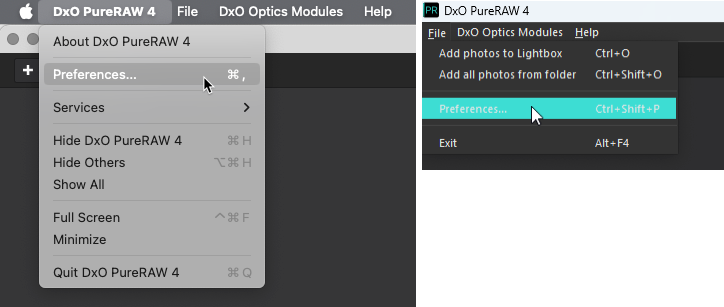
To open Preferences on Mac, go to the PureRAW menu. On a PC, go to the File menu. In both cases, the following general options will appear:
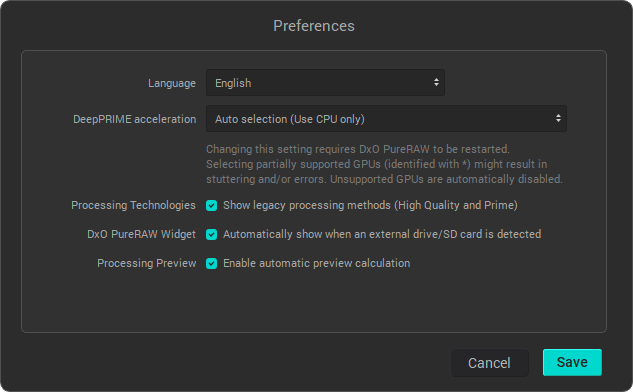
- Language menu: Allows you to select one of the available languages (English, French, German, Japanese, Chinese and Spanish). Any changes will be applied after you restart the program.
- DeepPRIME acceleration Menu (Mac Intel and PC):
- Automatic selection: This mode is automatically selected if it is compatible with your graphics card.
- Use CPU only: forces DeepPRIME and DeepPRIME XD2/XD to use the CPU rather than the graphics card, in case there are issues with it.
- Graphics card model: This option shows your computer’s graphics card model and lets you choose which graphics card you want to use if several are available.
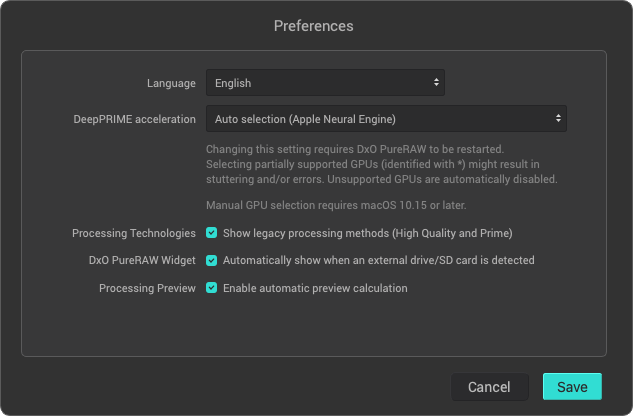
- DeepPRIME Acceleration Menu (Mac with Silicon processor):
- Automatic selection (Apple Neural Engine)*: uses Apple’s neural engine for calculations.
- Apple Neural Engine* : Manual selection of Apple Neural Engine.
- Apple M1 GPU : Manual selection of the graphics card.
- Use CPU only: forces DeepPRIME and DeepPRIME XD2/XD to use the CPU rather than the graphics card, in case there are issues with it.
- Processing technologies: Check this option to display the DxO High Quality and PRIME noise reduction processing methods in the window.
- DxO PureRAW Widget: Check this option if you want to activate the Widget, which will show as soon as you connect a memory card or an external volume. The Widget is also located in the menu bar (Mac) or the task bar (PC) and displays the status of the ongoing processing tasks.
- Processing Preview: When activated, this option refreshes the preview window in real-time, when you select or modify processing options and settings.
- Save: records your settings and closes the Preferences window.
To view the different types of graphics cards that are supported, see the System Requirements page.
Important:
- Changing the DeepPRIME acceleration option requires the program to be restarted.
- The graphics cards that are partially supported are indicated by an asterisk (*). In this case, you might encounter errors or problems with the program running smoothly.
Help
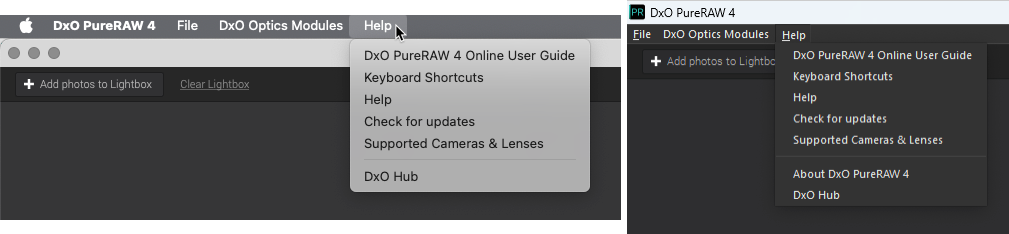
The Help menu, both on Mac and PC, contains the following:
- DxO PureRAW Online User Guide*: Access the current version of DxO PureRAW online user guide homepage. You can download the previous versions user guide as a PDF.
- Keyboard shortcuts*: Open the list of keyboard shortcuts.
- Help*: Opens the online DxO Support page.
- Check for Updates*: Looks for any potential updates available on the DxO website.
- Supported Cameras and Lenses*: Opens a DxO webpage that lists the devices and lenses supported by the program.
- About DxO PureRAW (PC): Opens the start-up screen with the name and version of the program as well as the legal notices.
- DxO Hub: displays a presentation of DxO PureRAW, its functionalities, new features and links to DxO web resources.
*Internet connection required.