

Managing & searching images
The Source Browser
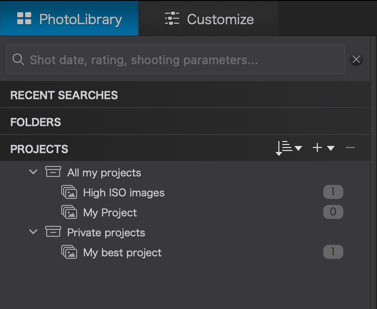
The Source Browser, available in the PhotoLibrary tab, lets you explore the folders on your storage devices as well as the projects stored in your DxO PhotoLab database.
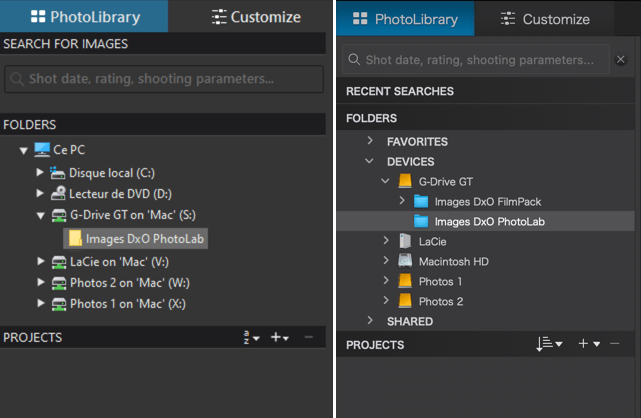
On PC the Source Browser is divided into these sections:
- Search for images: search input field, search results, recent searches, and the Index a folder option.
- Folders: Displays a tree hierarchy of the files and folders as they are on your computer storage.
- Projects: displays a tree hierarchy of projects and project groups.
On Mac, it is divided into the following sections:
- Search for images: search input field, search results, and the Index a folder option.
- Recent Searches: displays a list of recent searches.
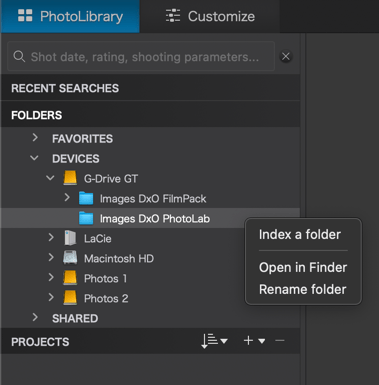
- Folders: is divided into Favorites (favorite folders on macOS), Devices (drives and folders), and Shared (storage and folders shared with macOS).
- Projects: displays a tree hierarchy of projects and project groups.
On Mac, the Source Browser can be hidden, displayed, or adjusted in the following way:
- Double-click on the mid-point of the right edge of the panel.
- In the View menu: Show/hide the Source Browser.
- You can adjust the width by dragging the right edge (which will also hide it, if you drag left).
On PC, the Source Browser can be hidden, displayed, or adjusted in the following way:
- You can adjust the width by dragging the right edge (which will also hide it, if you drag left).
- In the View menu: Show/hide the Source Browser.
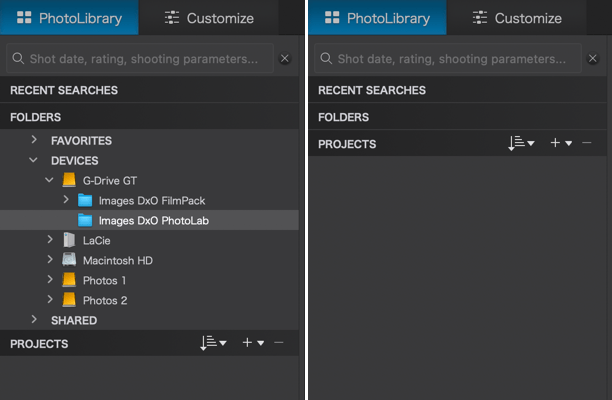
On both Mac and PC, you can expand or collapse each section of the Source Browser by clicking on the black banners.
Browsing folders and content
To display the contents of a folder, select it in the Source Browser to immediately display it in the Image Browser.
Note that DxO PhotoLab only displays the contents of a folder if it contains images at root level. As such, if you select a parent folder that contains only folders, you will not see the contents of any subfolder until you have selected one (you cannot see the contents of multiple folders at the same time).
On Mac, when you display the contents of a folder or project and you hover your mouse pointer over the image, a floating palette appears (the palette does not appear for thumbnails in the Image Browser).
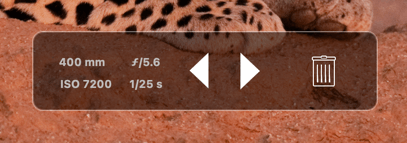
The floating palette, which is only visible in the PhotoLibrary tab, contains the following elements:
- Basic camera settings: focal length, aperture, ISO rating, shutter speed.
- Back/forward arrows to move between images.
- Trash can: to delete the image from the disk, if you are in a folder, or remove from the project you are browsing.
Creating and renaming a folder
Mac
On the Mac version of DxO PhotoLab, you cannot create folders in the Source Browser. You will have to do this in the Finder, your changes will subsequently appear in the DxO PhotoLab Source Browser.
However, it is possible to rename any folder in the Source Browser, the name change will show up in the Finder too. To rename a folder, just click on its name and type in.
PC
On PC, you have the option of creating and renaming folders directly within the DxO PhotoLab Source Browser.
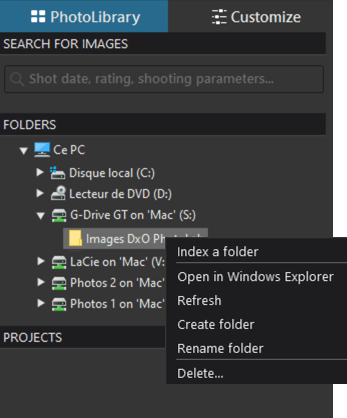
Right-clicking on a folder reveals a context menu with the following options:
- Create folder: Creates a new folder inside an existing folder.
- Rename folder: lets you edit the folder name (you can also double-click on the name).
The new folder or folder name will be visible in Windows Explorer.
The context menu has two other options:
- Open in Windows Explorer: Displays the contents of the folder in Windows Explorer.
- Refresh: Updates the Source Browser with any changes made outside of DxO PhotoLab (for example, renaming a folder in Windows Explorer).
Moving or copying images
Mac
- To move an image from one folder to another: select it in Image Browser then drag and drop it into the destination folder. A progress bar appears at the bottom of the Source Browser whenever images are moved from a source folder to a destination folder.
- To copy an image from one folder into another: select it in Image Browser then drag and drop it into the destination folder. The image will be duplicated and exist in both the source and destination folders.
PC
- To move an image from one folder to another folder: select it in Image Browser then drag and drop it into the destination folder, holding down the Shift key. Images will be moved from the source folder to the destination folder, and a dialog box will appear to track its progress.
- To copy an image from one folder to another: select it in Image Browser then drag and drop it into the destination folder. The image will be duplicated and exist in both the source and destination folders.
Of course, you can add images to an existing project by dragging and dropping from a folder.
Search functions
DxO PhotoLab makes it easy to find images using searches that you can base on multiple criteria (which you can combine). This search is made possible by the file content indexing tool, which transcribes all the information into the application database and speeds up the search process.
DxO PhotoLab indexing is internal to the program and generated from its database. It is independent from the indexing of Windows and macOS operating systems.
Indexing folder contents
To take advantage of its search functions, you must allow DxO PhotoLab to index the content of your image folders. To do this, you have two methods at your disposal:
- Indexing occurs automatically each time that you open and work in a folder.
- You can start an indexing process by using the Analysis feature. (This is particularly helpful if you are a novice user of DxO PhotoLab).
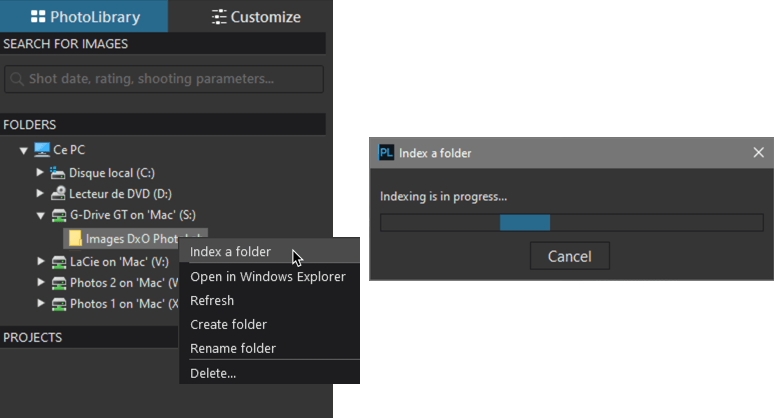
To manually index your folders :
- Right-click on any folder you need to index.
- In the contextual menu, select Index a folder.
- Folder indexing starts immediately and “in progress” indication is shown under the search field, at the top of the Source Browser (Mac), or in a floating window (PC).
- When indexing is done, the “in progress” indication (Mac) or the floating window (PC) are simply gone.
- Mac: to cancel indexing, you need to quit DxO PhotoLab. A dialog box warns you that indexing is in progress, and will prompt you to acknowledge or deny.
- PC: (click Cancel in the floating window (PC).

IMPORTANT: Indexing and searching only work on folders and subfolders, therefore the content of projects is excluded.
After you have finished indexing, you can start a search using the method and criteria detailed further below.
You can search using the following criteria:
Shot parameters
- Camera Brand
- Camera Model
- Lens
- Aperture
- Shutter Speed
- ISO sensitivity
- Exposure compensation
- Focal length
- Metering mode
- Shot date
Metadata and other information
- Star rating
- Color label
- Keywords
- Information entered into IPTC fields
- File name
- File Format
- Folder name
To perform a search, enter a keyword into the Search for images field. If you enter 100, for example (1), the program will offer you a list of criteria that include the number 100, such as ISO sensitivity (100 ISO), focal length (100 mm) or shutter speed (1/100s), with the corresponding number of images (2). Click on the desired criterion (and if it does not indicate 0) to validate it (3), then load and display the resulting images in the Source Browser (4), which will allow you to create a project from your selection. A reminder of the search criterion you used in the Source Browser toolbar will also appear (5).
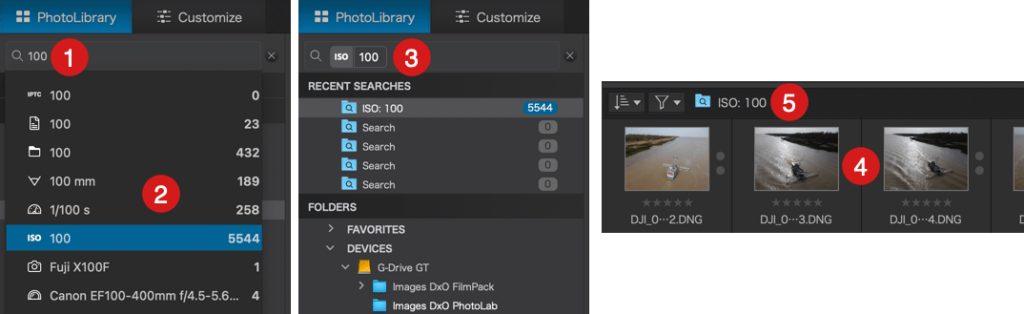
You can add several criteria to your search: after you have validated the first criterion, enter a second criterion (6) and then validate it, and so on. After validation, the multiple criteria are displayed in list form under the input field.
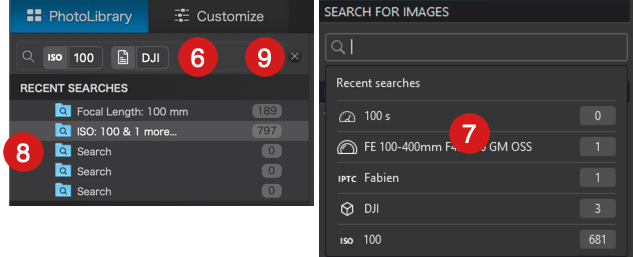
DxO PhotoLab stores up to 5 search results in the Last searches (7) menu, which appears on the PC by clicking in the input field, or in the Recent searches (8) section on the Mac. New stored searches are automatically added to the list, and the oldest one (above 5 searches) is deleted.
To delete a criterion, click in the input field and press the Return key on the keyboard. To completely reset the input field, click and press the Back button as many times as necessary.
The X button to the right of the input field also resets its contents, but on a PC, it also validates and stores the last search (9).
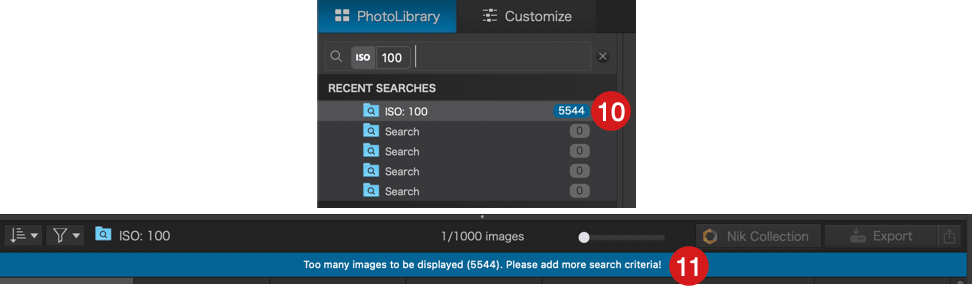
Finally, when the number of images that can be displayed exceeds the maximum limit (1000), the number is displayed on a blue background (10) in the search list, and a message is also displayed in the Image Browser (11). In this case, you can refine the search by multiplying the criteria, which will reduce the number of images to display.
Searching for and collating images using keywords
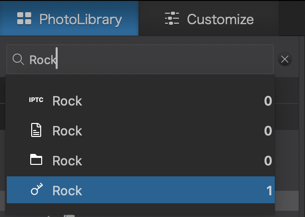
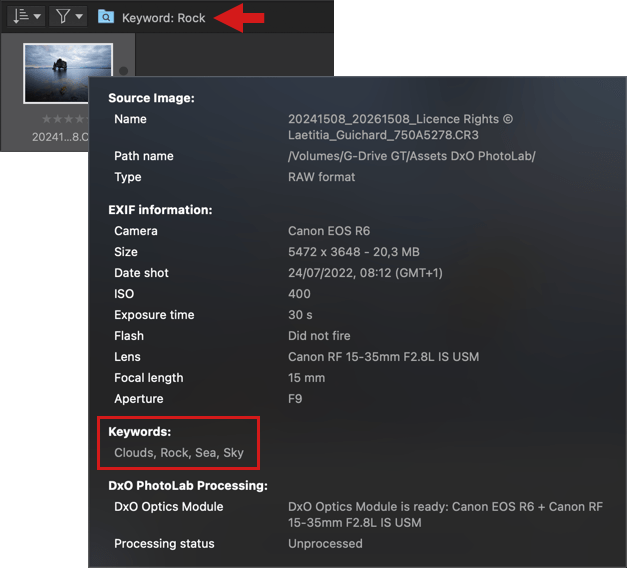
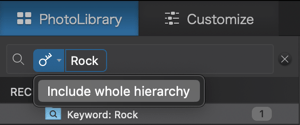
To find images using keywords, enter a keyword in the field. As you begin typing, the search field will suggest matching keywords; make your selection and hit Enter to confirm. The Image Browser will then display the images that have this assigned keyword. You can search for both child and parent keywords, although parent keywords are not visible in the Metadata palette.
Searching using the complete Keyword Hierarchy is also possible:
- Mac: After entering a keyword, click on the key icon and then, in the tooltip, click on Include Hierarchy. The checked option turns the keyword box blue.
- PC: After entering a keyword, right-click on the key icon, and then, in the floating menu, select Include Hierarchy. The checked option turns the keyword box blue.
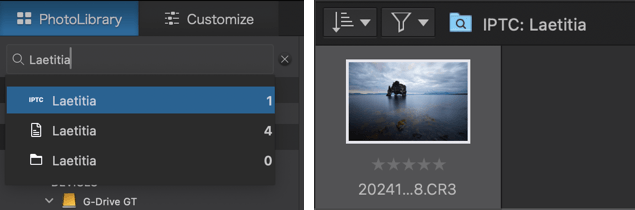
The search also works by entering several keywords. If the list of suggestions includes other information, such as folder names, navigate to the keyword with the up or down arrows on the keyboard and confirm with the Enter key. In the list, the keywords are indicated by a pictogram representing a key.
After you have collated your images, you can put them in a project.
If you want to reset the search field, click on X.
You can also get a quick overview of the keywords contained in the images by placing the mouse pointer over a thumbnail in the Image Browser.
Searching, collecting, and viewing images with IPTC metadata
IPTC metadata fields allow you to enter a wide range of information, including natural language descriptions of images, copyright information, terms of use for photos, and contact information for the author of the images. You can enter this information, or portions of text or words in the metadata fields to find the associated images.
Displaying and working on images
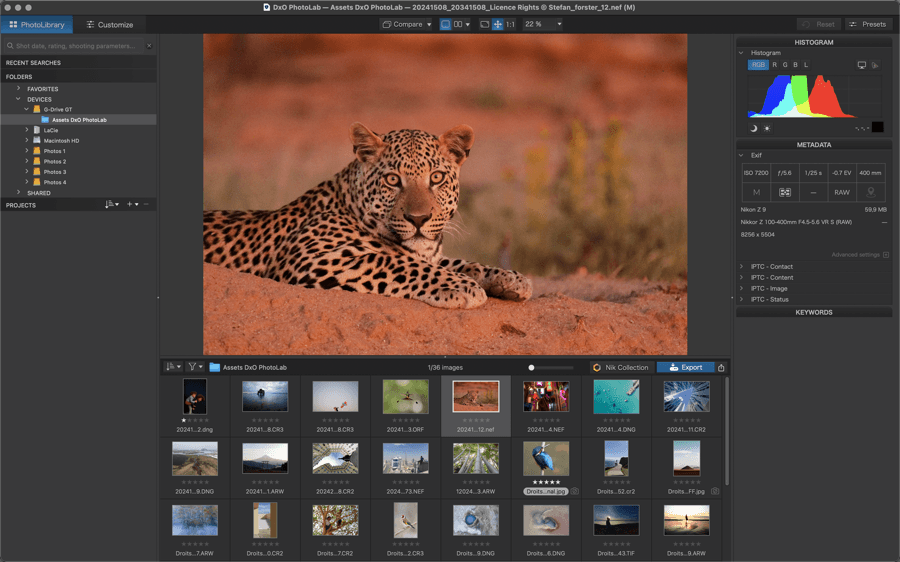
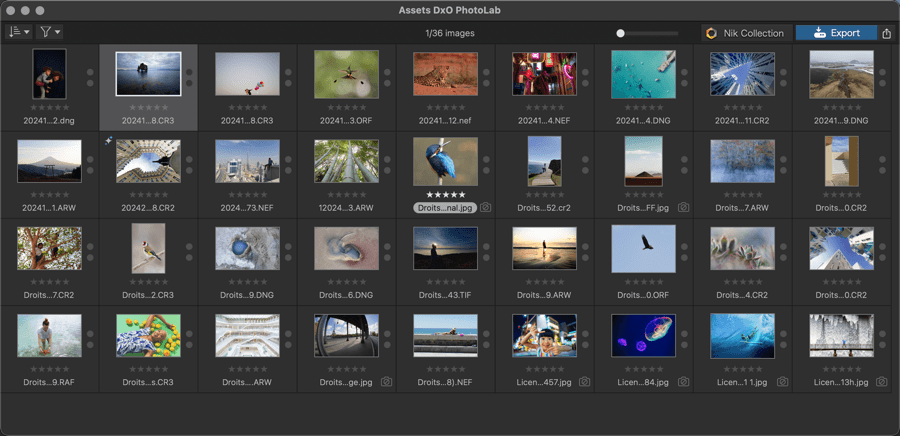
Image Browser
The Image Browser displays the contents of a folder or project that you have selected in the Source Browser (left panel). The VIewer will display the thumbnail that you selected in the Image Browser.
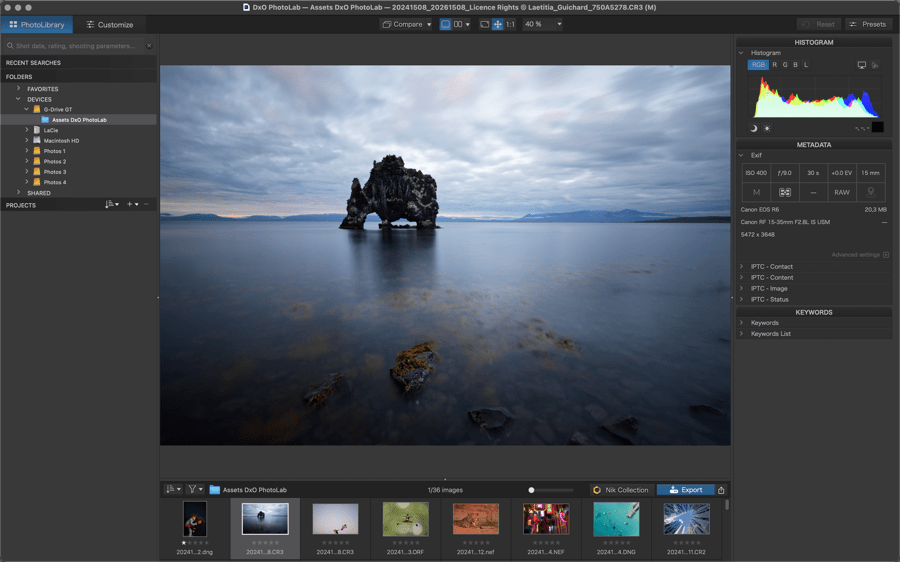
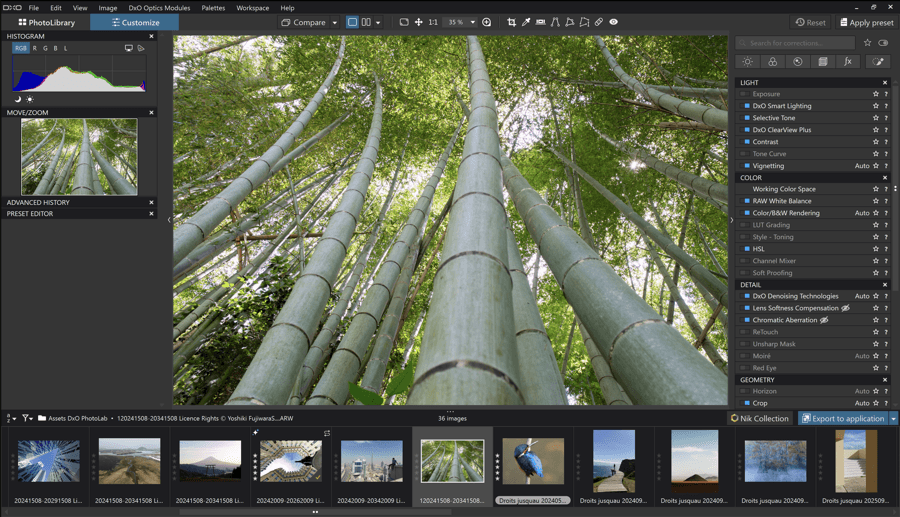
The docked Image Browser
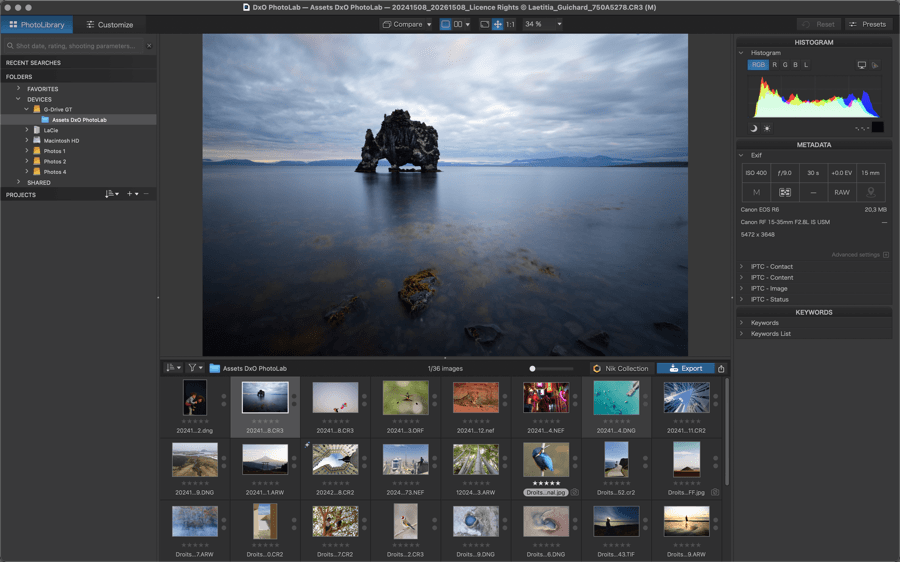
By default, the content of the Image Browser is displayed as a single row of thumbnails in the PhotoLibrary tab. However, if you move the separation line between the Viewer and Image Browser, the thumbnails will enlarge; if you continue to drag the line up, the thumbnails will be displayed in several rows, and the size of the image in the Viewer will automatically adjust to the available space. As soon as the thumbnails are displayed in several rows, a thumbnail size adjustment slider is displayed in the control bar, and you can scroll the thumbnail grid vertically with the mouse wheel.
To return to the single-line thumbnail display, drag the separation line downwards.
The display of thumbnails in grid form is available only in the PhotoLibrary tab.

The detached Image Browser
The detached Image Browser is particularly advantageous if you use a second screen.
- To detach the Image Browser, go to Display > Detach Image Browser (or Ctrl/Cmd+U).
- To reattach the Image Browser, go to Display > Attach Image Browser (or Ctrl/Cmd+U).
The detached Image Browser is a floating window that you can freely move or position on a secondary screen, thereby providing the Viewer with much more space in the vertical direction. You can freely resize the Detached Image Browser window; the vertical scroll bar is located on the right side by default. Navigation buttons are available and you can change the size of the thumbnails with the slider, also located in the top bar.
Image Browser toolbar

- Sorting and filtering options:
- Image sorting: Photos in the Image Browser can be sorted according to different criteria (more details in the “Sorting images” section below).
- Image filtering: this button acts as a display filter (see the “Filtering Images” section below).
- Name of the folder or active project, or reminder of the criterion used during a search, and name of the image selected or hovered over by the mouse pointer.
- Number of images selected: The number of images selected in the Image Browser and the total number of images in the selected folder or project (Mac); or the total number of images in the selected folder or project and the number of images selected in the Image Browser (PC).
- Thumbnail size slider: Smaller to the left, larger to the right.
- Nik Collection button for working on images using the tools in the Nik suite (displays only if activated via Preferences).
- Export to… & Export progress buttons: The Export to… button lets you select an export mode, while the progress button appears as an animated progress bar throughout the export process (clicking on it will display details of the current export status in a floating palette.) The progress button is only visible when an export is being processed.
When it is detached, the Image Browser command bar displays a slider for resizing the thumbnails.
While it is detached, the Image Browser displays a slider for resizing thumbnails in the command bar.
Image Browser information messages
When the Image Browser is empty, it will display the reason that no image or thumbnail is available:
- No image in this folder matches your filter criteria: you have activated a filter that does not match any image.
- This folder contains no images
Sorting images in the Image Browser
The first button (a/z on PC, arrow on Mac) in the Image Browser command bar allows you to sort images by the following criteria:
PC
- Image format.
- Star rating.
- Color label.
- Camera body.
- Lens.
- ISO (sensitivity).
- Date.
- Name.
- Dimensions
- Size.
- Extension.
- Virtual copy number.
- Processing status: processing error, processed, processing, awaiting processing.
Mac
- File name.
- Images by order of addition.
- Format (RAW/RGB).
- File Format.
- File Size.
- Creation date.
- Image dimensions.
- Camera body.
- Lens.
- Color label.
- Ranking (star rating).
- ISO (sensitivity).
Filtering images in the Image Browser
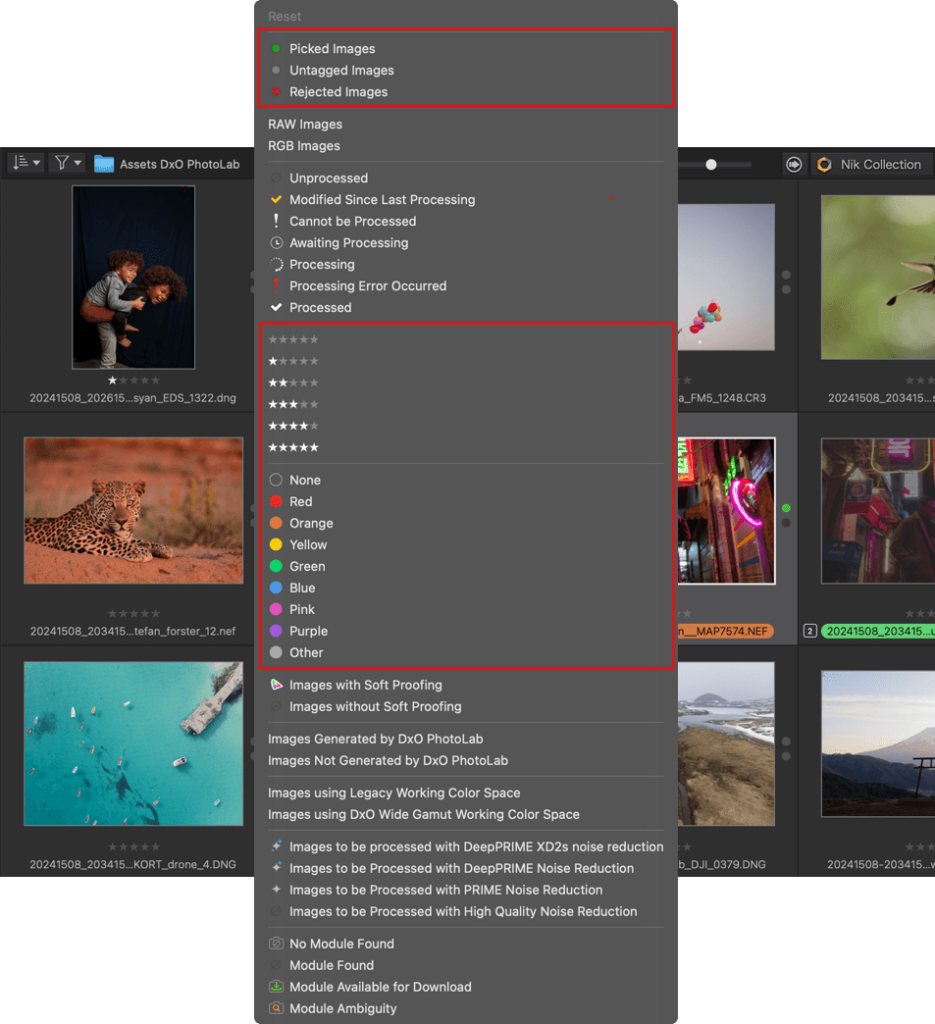
Filtering the Image Browser display: when you check one of the filters in the list only photos that match that filter will be shown(1). Filters are organized into groups, from top to bottom:
- Reset: Resets the filter (all options active).
- Types of images: RAW, RGB (supported non-RAW images), and images generated by DxO PhotoLab
- Working color space: lets you filter images by legacy (Classic) or DxO Wide Gamut color space.
- Images created / not created by DxO PhotoLab.
- Noise reduction processing: images processed with DeepPRIME XD, DeepPRIME, PRIME or High Quality.
- Processing status(2): Unprocessed, Cannot be processed, Awaiting processing, Processing, Processing error occurred, Processed, and Modified since last export.
- DxO Module status: no module found, module found, available to download, or module ambiguity.
- Sorting criteria: images picked, rejected, or without a status.
- Images with/without soft proofing.
- Color label.
- Rating(2) : based on a star rating, from 0 to 5.
– (1) This behavior was introduced in DxO PhotoLab 5.1. Previously, you had to uncheck the filters.
– (2) Only displayed in the list if enabled in Preferences >Display > “Image browser” section.
– An active filter will still be active when the software is restarted.
Thumbnail icons
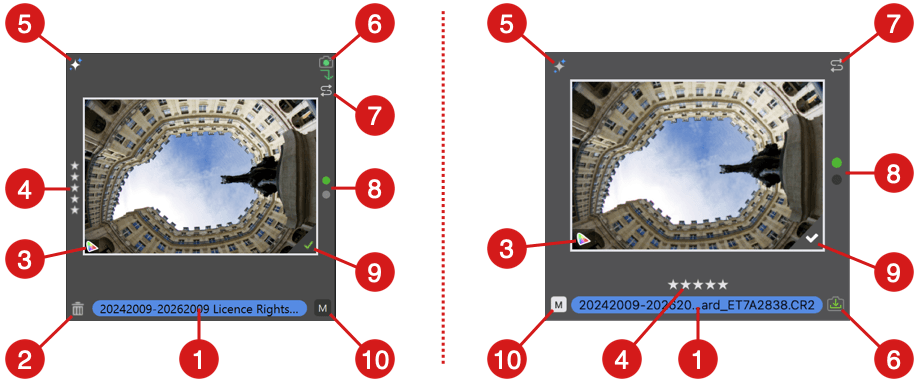
Normally, the thumbnails in the Image Browser do not display anything other than the file names or the icon of an image being exported. Other icons to inform you of problems may also be displayed.
- File name.
- Delete icon (PC): allows you to delete images from the hard disk or remove them from a project.
- Soft proofing icon (details below).
- Rating / evaluation of the image in stars (0 to 5).
- Noise processing (details below): the icon indicates the applied type of noise processing (PRIME, DeepPRIME or DeepPRIME XD).
- Status of the DxO Module (see details below): indicates, according to the icon, whether a module is available, downloaded or ambiguous. When the module is installed and functional, there is no indication.
- Metadata synchronization conflict (see details below).
- Selection icon. This icon is inactive by default. It displays the images to be kept (green dot) and the rejected images (red dot). When neither selection marker has been assigned, the dots are gray.
- Status of image processing (see details below).
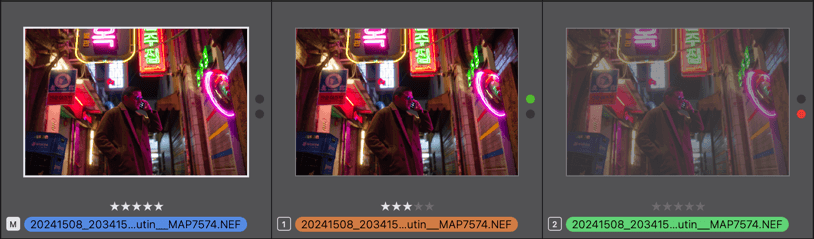
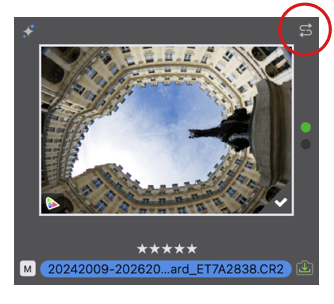
- When creating a virtual copy (details below), this icon indicates whether the image is the original (M = Master) or a virtual copy (N° of the copy: 1, 2, 3, etc.).
The DxO Module icons in detail (no icon for when a module is installed and in use), from left to right:

- Available to download (Mac).
- Available to download (PC).
- Update available.
- Ambiguity (Mac – click on the icon for a choice of body/lens configurations, for example, when there are several versions of the same lens).
- Ambiguity (PC – click on the icon for a choice of body/lens configurations, for example, when there are several versions of the same lens).
- Ambiguity resolved.
- No DxO Module available for the body/lens configuration (Mac).
- No DxO Module available for the body/lens configuration (PC).
Processing status icons in detail (displayed in the lower right corner of the thumbnail image), from left to right:

- Processed image (PC: green tick, Mac: white tick).
- Image being processed.
- Image waiting to be processed.
- Processing error.
- Image status information:
- Image correction has been modified after export (PC only).
- The image cannot be processed, either because it is too small or because the file format is not supported (such as DNG files from unsupported cameras).
Noise Processing Icons in detail (no Icon for HQ mode), from left to right:

- DxO PRIME noise processing.
- DxO DeepPRIME noise processing.
- DxO DeepPRIME XD/XD2s noise processing.
Loading Icon (PC)

- This animated icon, only on PC, appears in the center of the thumbnail image whenever a correction is being applied.
Virtual copy icons in detail, left to right:


- Master Image (M).
- Virtual copy 1 (2, 3, 4, etc.).
The soft proofing icons in detail, left to right:

- Image has been soft proofed (soft proof active, ICC profile available).
- Image has been soft proofed (soft proof active, ICC profile missing).
The metadata conflict icon in detail.

This icon appears if DxO PhotoLab detects a conflict between the metadata stored in its database and the metadata stored in the image itself (XMP attachment for Raw files, header for DNG, JPEG, and TIFF files). To resolve the metadata conflict, click on the icon (see chapter Manage Files and Metadata > section Synchronize Metadata for more information.
You can display, hide, or show these icons when mousing over a thumbnail; settings are in the Preferences.
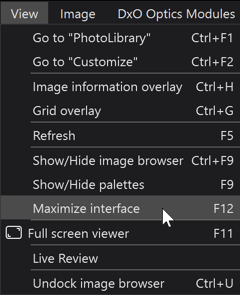
Maximizing the interface (PC)
Maximizing the interface (when in either the PhotoLibrary or the Customize tab) means using the entire screen to display DxO PhotoLab without the menu bar at the top, and by hiding the Image Browser (the Windows taskbar remains visible).
To access this mode, go to the View menu and select Maximize Interface, or press the F12 key. (Do the same to exit this display mode.)
Selection status, rating and color tag
Image management first requires sorting and selection, so DxO PhotoLab also offers you a number of tools to help you filter your photos:
- Selection status: these dots indicate whether the image was picked or rejected during sorting.
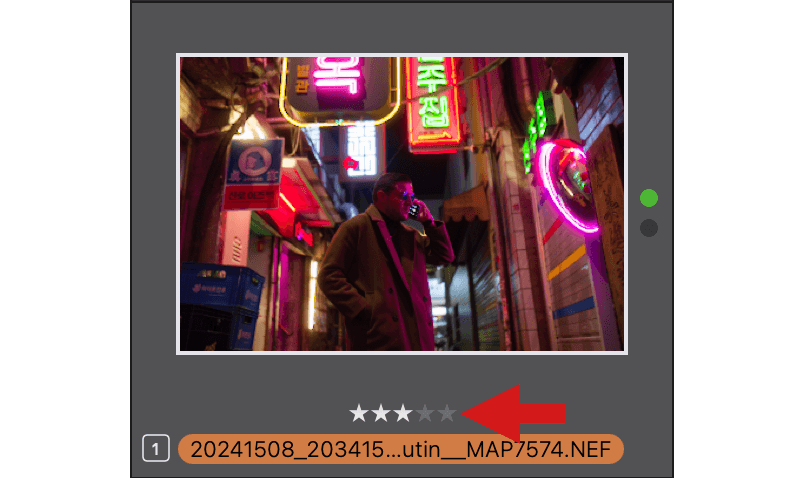
- Rating: Image scoring system from 0 to 5 stars.
- Color label: makes it possible to mark images with a color to aid further sorting according to the needs of the user.
All these markers are visible with the thumbnails, and you can filter them, in combination if required, using the Image Browser filter to help you create projects with your best images.
Selection Status
Selection status markers let you do a first-pass selection of images from your PhotoLibrary. This selection status is proprietary, only visible in DxO PhotoLab.
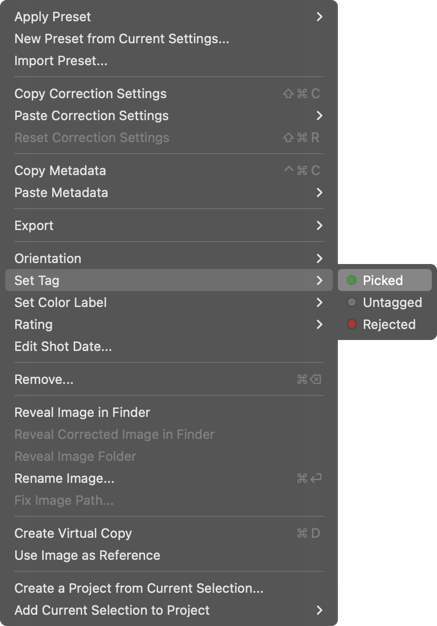
The statuses at your disposal are:
- Picked: the green dot indicates that the image has been retained.
- Rejected: the red dot indicates that the image was not selected during sorting.
- Untagged: Removes the previous choice, no dot.
To apply the statuses, you have the following options:
- Keys 7, 8, 9 (Picked, Untagged, Rejected).
- Keys P, U, X (Picked, Untagged, Rejected), following the current system for Adobe Lightroom Classic.
- Click on the green or red dots (Picked, Rejected) in the thumbnails. Clicking on a green or red dot cancels the status.
- Right-click on a thumbnail and then, in the context menu: Set tag > Picked, Untagged, Rejected.
- Image > Set tag > Picked, Untagged, Rejected.
Thumbnails with the status Rejected (red dot) are also grayed out to easily distinguish them from others in the Image Browser.
Rating
The star system ratings in DxO PhotoLab follow photo industry standards and metadata protocols (Exif). You will be able to see whether your images have already been rated outside of DxO PhotoLab.
There are no predefined rules or meanings for the given number of stars, it is up to the user to decide what they indicate. For coherence, you might want to restrict yourself to 3 image ratings, for example: 0 stars (undecided), 3 stars (good) and 5 stars (excellent). In any case, you should adopt a consistent methodology to avoid any confusion or disruption in your image management later on.
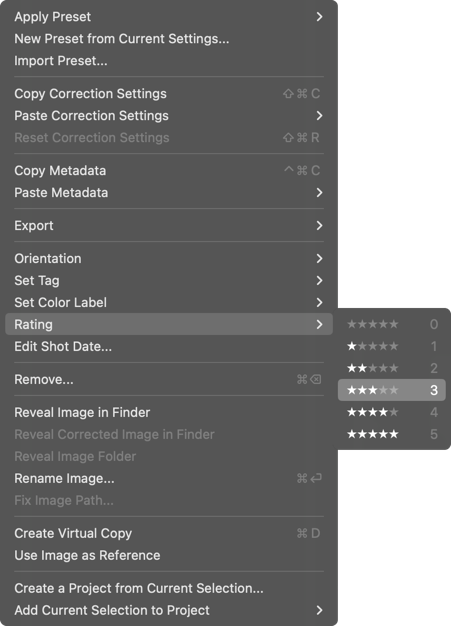
To apply a star rating:
- Keys 0 through 5.
- Up and down arrows to increase or decrease the rating.
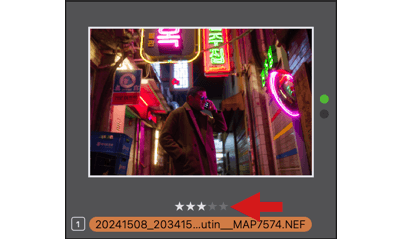
- Click on the stars next to the thumbnail.
- Right-click a thumbnail and then, in the context menu: Rating > 0 to 5.
- Image menu > Rating > 0 to 5.
To quickly reset the rating to zero, click on the last star. For example, if you assigned 3 stars, clicking on the 3rd star removes the rating.
Color label
A color label is a marker that appears as a tile behind the filename of the thumbnail. There are also no rules for assigning colors, it is up to the user to decide what they mean (e.g. red for important, green for published, blue for printing, etc.). Again, adopt a methodology and try not to change it. The color labels are unique to DxO PhotoLab and are therefore not visible in other programs.
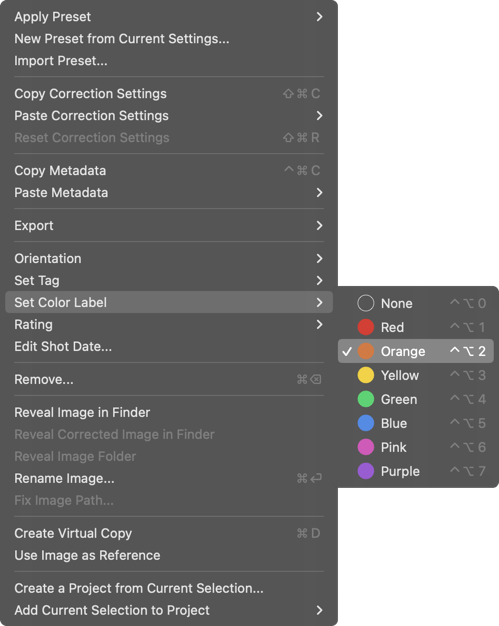
8 statuses and 7 colors are at your disposal:
- None (no color label).
- Red.
- Orange.
- Yellow.
- Green
- Blue
- Pink.
- Purple.
To assign a color label, you have the following options:
- Control keys + option + 0 to 7 (Mac) or Ctrl + Alt + 0 to 7 (PC).
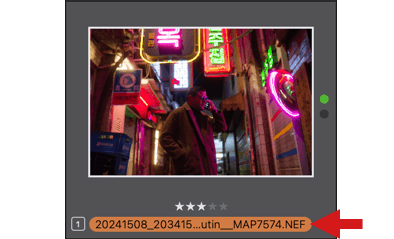
- Right-click on a thumbnail and then, in the context menu choose Set color label > select color.
- Right-click on the filename and select the color (Mac).
- Image menu > Set color label > select color.
Filtering and searching for marked images
In the Image Browser, you can filter images by tag, rating, label color, and other checked criteria in the Image Filtering menu.

Searching for images is also possible using the following criteria:
- Color label: enter the name of the color (red, blue, etc.).
- Rating: Add the number of stars (from 0 to 5).
Sorting and selecting the best images in Fullscreen mode (Viewer)
Selecting your images
Although the basic display modes in DxO PhotoLab already let you start sorting and selecting your images, fullscreen mode, also known as the viewer, offers the advantage of using the whole screen for this task, without the distraction of other interface elements.
In fullscreen mode, you can:
- Enjoy your images and admire them in large format.
- Easily check the composition and overall balance of your images.
- Check sharpness, by zooming in.
- Compare before and after correction with a reference image (image before correction or virtual copy)
- Quickly assign a selection marker, star rating, or color label.
You can activate full-screen mode by:
- Clicking on the corresponding full-screen button in the toolbar.
- Selecting Full-screen (Viewer) in the Display menu.
- Using the keyboard shortcut F11 (PC) or Cmd+Maj+F (Mac).

To exit Full Screen mode, press the Escape key (Mac or PC).
Full screen mode is available in both the PhotoLibrary and Customize tabs.
Full screen mode is available in both the PhotoLibrary and Customize tabs.
Displaying images
- To switch from one image to the next, use the left and right arrow keys on your keyboard.
- To fit the image to the screen, use the F3 key (PC) or Cmd+0 (Mac).
- To display the image at 100%, press F4 (PC) or Cmd+1 (Mac). In which case, the zoom will be centered on the image.
- To change from Fit-to-screen to 100%, or the reverse, double-click in the image. Here the zoom will be centered where you click.
Fullscreen mode has a magnifying loupe when you zoom in on the image. To enable or disable it, click the EXIF & Browse button on the bottom right. To move around the image, click and drag dotted tile in the magnifying Loupe window.
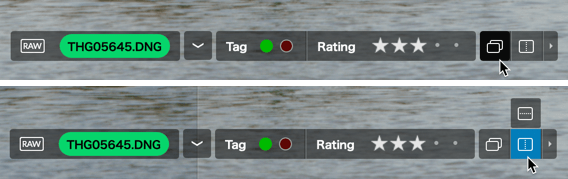
Displaying attributes and comparison modes

If you click on the middle button displaying a chevron, you will see a bar with the following elements (from left to right):
- The type (RAW or RGB) and the filename, with a color box underneath when a color label is assigned.
- The selection status (Picked or Rejected).
- The star rating.
- Quick comparison icons and split view.
- An arrow to open the menu to select the reference picture.
To hide these bars, click on the chevron.
Displaying help and information
At the bottom right of the screen, two buttons give you access to the following information and functions:

- The “?” button on the left displays the Help and Shortcuts window, with a list of all keyboard shortcuts that can be used in fullscreen mode. To display this window, you can also use the ? (Mac) or F1 (PC) key.
- The button on the right displays the EXIF Information window (shooting settings and information about the equipment) as well as the Browser window (to move around the zoomed image). The window can be displayed or closed with key I.
Selection status, star ratings and color labels
You can assign the selection status as picked (green dot) or rejected (red dot) in different ways:

- Click on the dots in the Status section: on the left, for the Picked marker or the right, for the Rejected marker.
- With keys 7 (Pick), 8 (no marker) or 9 (Reject).
- If you are an Adobe Lightroom Classic user, you can use the same keys as the sort markers: P (Pick), U (no marker) or X (Reject).
To assign a star rating:

- Click on one of the 5 dots (Mac) or one of the 5 stars (PC) in the rating section to assign a score of 1 to 5 stars.
- Press a key 1 to 5.
- You can change the rating as you go.
- To reset the rating to 0, double click on the first star or press 0.
To apply a color label:
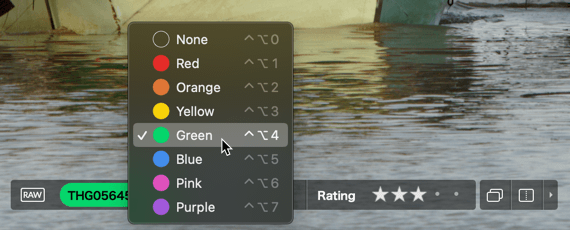
- Click on the file name and, in the floating list, select the desired color.
- With the key combination Ctrl+Option+0 to 7 (Mac) or Ctrl+Alt+0 to 7 (PC).
When leaving Full Screen mode, the status, rating and color tag will be visible in the thumbnail.
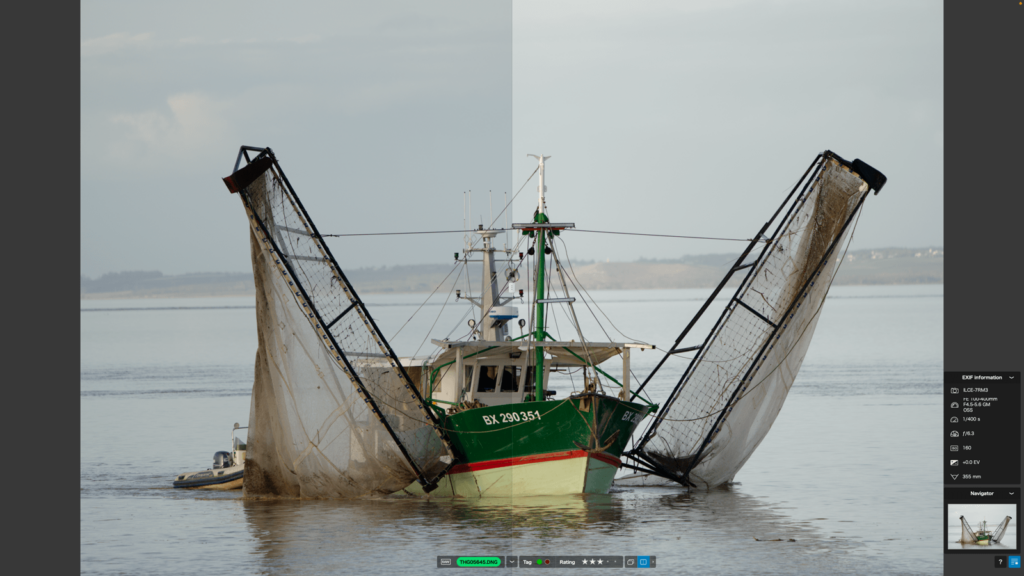
Comparing images
In Fullscreen mode, you can compare an image in two ways: with quick comparison, to alternate between two versions of the image, or via a split vertical view, with a movable separation line.
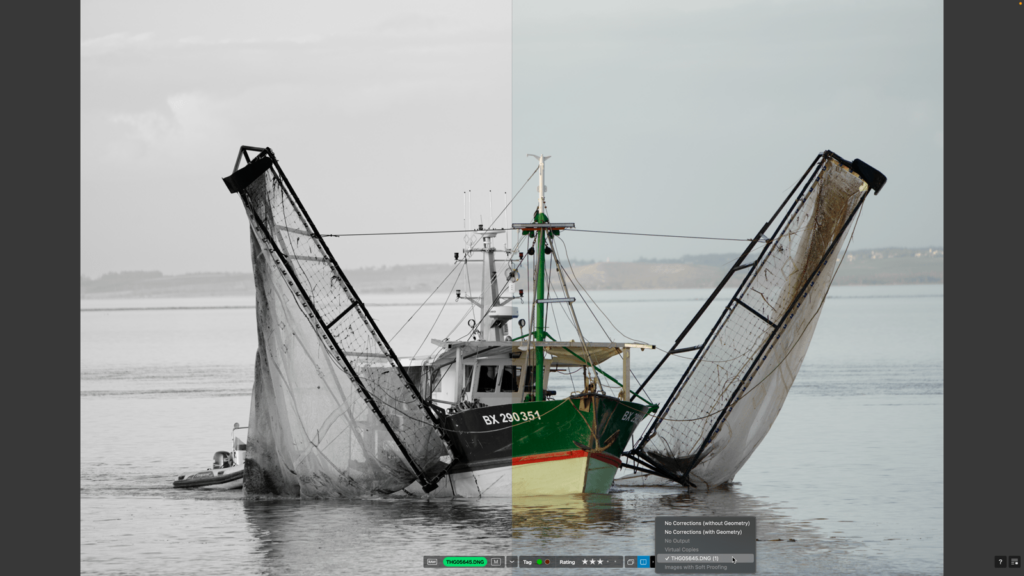
Quick Compare
To instantly compare a corrected image with the uncorrected original, click on the compare button on the right side of the toolbar. You can also use Ctrl+D (PC) or D (Mac).
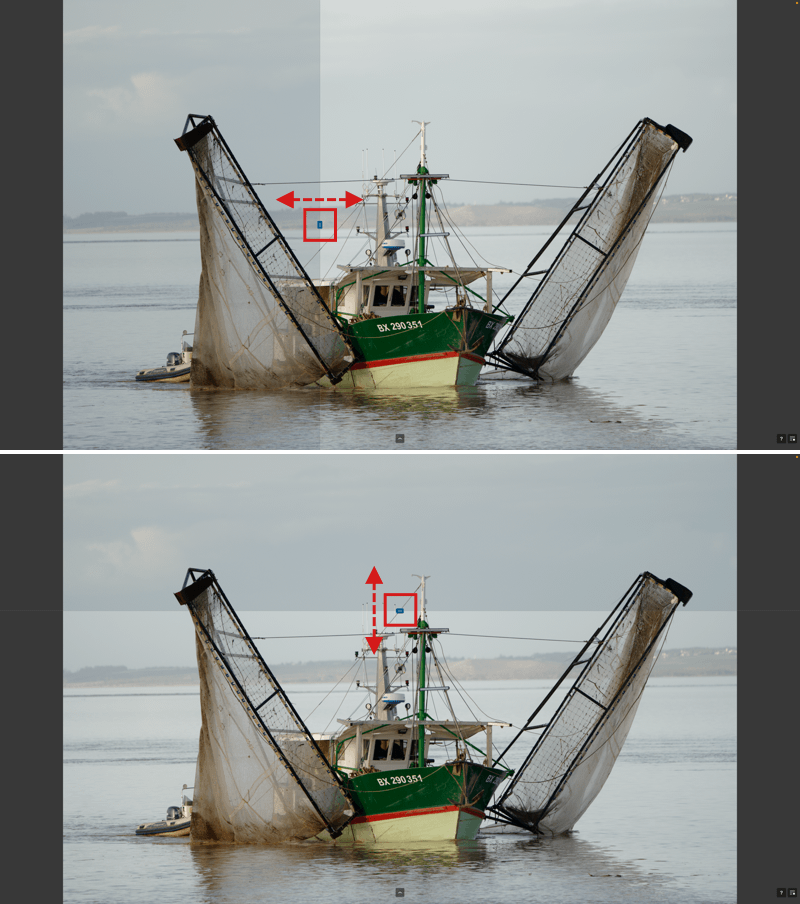
Vertical/horizontal split view
The separation line is activated by clicking the Vertical split view button, on the right of the toolbar. After it is displayed, you can move it anywhere within the image from left to right. The left half represents the image before correction while the right half is the corrected image. To enable split view mode, you can also hit the C key.
You can switch to horizontal mode by clicking the second button that appears when you roll the mouse over the Split View button, or by double-clicking on the handle in the middle of the line. In horizontal mode, the image before correction is on top, and the version after correction is below.
To exit Split View, click the button on the toolbar or hit the C key.
Zoom at 100% works with both the Quick comparison and Split view modes.
Reference image
Full-screen mode also gives you the option to compare a reference image to another version of the same image — for example, a virtual copy that was processed differently, or an exported version with corrections applied.
Click on the arrow located on the right in the toolbar, and select the image to compare from the menu.
You can use either Quick Compare or Split View, which will show the reference image on the left (or on top in horizontal mode).
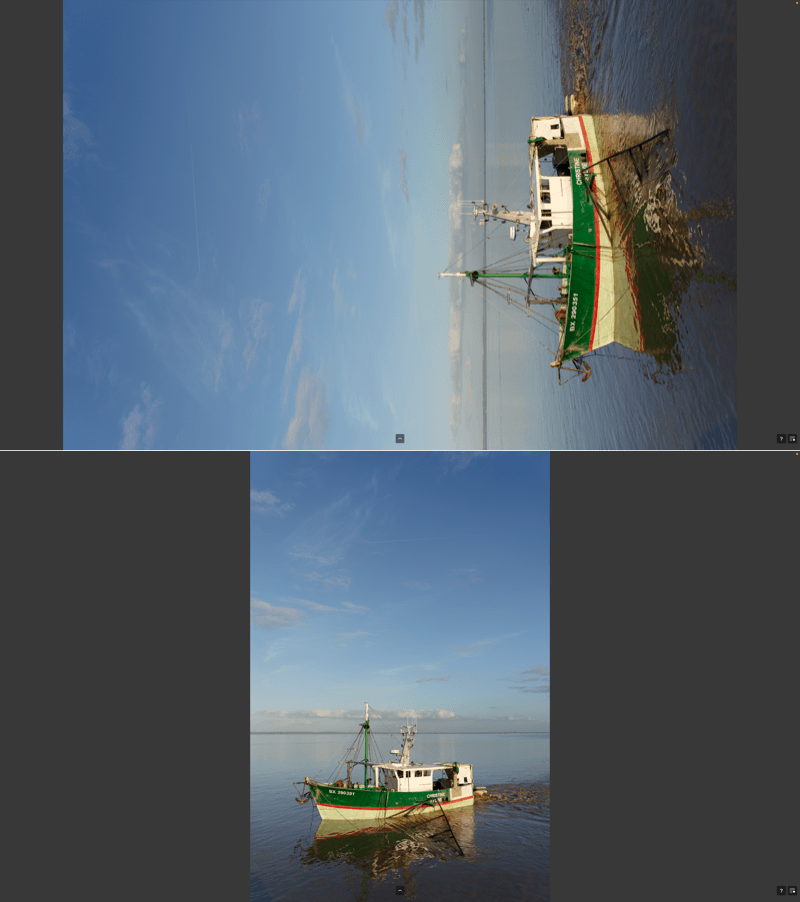
Rotating an image
If you want to change the orientation of an image being sorted, you can use the Cmd+L/Cmd+R (Mac) or Ctrl+L/Ctrl+R (PC). In which case, the image will rotate by 90° increments to the left or right.
Delete image
To delete an image, press the Delete key (PC) or Cmd+Delete (Mac). A window asks you to confirm the deletion (or cancel). If you choose to Delete, the image will be put into the trash folder of your operating system and the associated virtual copies will be deleted from DxO PhotoLab.
Sorting method
How to sort images and why? By rigorously sorting your images before processing them in DxO PhotoLab, and then exporting and distributing them, you will be able to spend more time working on your best images, and it will also help you find them again at a later date. Another advantage is that you will save storage space on your hard drive by removing the rejected photos.
Here is a sample 3-pass workflow for sorting and selecting your images as well as a few tips to help:
1st pass (initial sorting):
- After you have uploaded the contents of your camera’s memory card to your hard drive, browse to the folder from the PhotoLibrary tab.
- In the Image Browser, click to select the first image.
- Switch to Full Screen mode – Cmd+Shift+F key (Mac).
- Study your picture for exposure, composition, framing, and sharpness.
- Give it selection status: Picked (green dot) or Rejected (red dot).
- Go to the next image using the right arrow on your keyboard.
- Repeat the process until you have reached the last image.
- Exit Full Screen mode by hitting the Escape key.
2nd pass (qualitative sorting):
- In the PhotoLibrary tab, click the Image Filtering button in the Image Browser toolbar then select Picked Images (so only images with a green dot are visible).
- Click on the first image to select it and then go back to Full Screen mode.
- Zoom in on and move around the image to inspect the sharpness in more detail.
- Assign a star rating using keys 1 to 5 (tip: avoid too many ratings when you first start, for example: assign 2 different ratings such as 3 stars for images that need work, and 5 stars for outstanding images. In the long run, try to avoid changing your rating method and be consistent in how you manage the PhotoLibrary).
- If you do not want to use the star ratings, you can use a color tag instead (e.g. green for good images, purple for the best).
- Skip to the next image and so on to the end.
- Exit the Full Screen mode (Viewer).
- In the PhotoLibrary tab, return to the image filter and select the desired rating or color label. Only images with this rating or color label will be visible.
- Gather your selection of images into a Project, to facilitate faster access to your images for processing.
3rd pass (check rejected images and/or without selection status):
- Return to the folder containing all the images.
- In the image filter, select Images Rejected (and/or Images without a selection status).
- Resume steps 2-7 of the first pass, to decide whether some images might be recoverable, in which case you should assign the Picked status.
- Exit Full Screen mode and in the image filter select rejected images.
- In the Image Browser, select all the photos, right-click and then, in the context menu, select Delete.
- Confirm the deletion of images definitively rejected.
- Empty your system trash to recover some disk space.
- Go to the image filter and select Reset and disable the filters in use.
Projects
Workflow management with projects
Projects let you gather together photos with different origins. They might not just differ from a technical point of view (shooting date, equipment used, exposure settings, etc. – but they can come from different sources (folders) and volumes (drives).
A project is, to some extent, a virtual directory where you can group images according to your workflow and various other needs: processed images sorted and filtered according to certain end requirements, such as publication, exhibition, customer orders, etc. The virtual nature of the grouping allows you to assign the same image to various projects without having to actually duplicate it.
Certainly, projects can be arranged into groups to create an easy-to-manage and flexible hierarchy of tasks, since it is also possible to place groups into other project groups.
If an image is part of several projects and you make corrections and changes to it, they will apply across all projects. If you want to create different versions of the same image, according to the needs of the project, then make virtual copies.
The workflow we recommend is as follows:
- Sort your images in their original folder.
- Having assigned markers to Pick, or add a star rating to, your images, filter out the unwanted images.
- Create your project using just the sorted and filtered images, so you can focus on them.
Of course, you can create projects according to the criteria set out in the filters, or by keywords or metadata using the search field, in the image browser.
Browsing projects
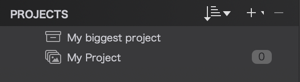
On both Mac and PC, projects are located at the bottom of the left panel (Source Browser) on the PhotoLibrary tab, in the Projects section. Once you have created a project, this section displays the following elements:
- A list of Projects.
- Groups of projects containing projects or other groups of projects.
- Project generated automatically by Lightroom Classic > DxO PhotoLab.
When you click on a project, its content is displayed in the Image Browser. This also happens if you click on a project group, provided that the option is active (which it is by default):
- Mac: DxO PhotoLab menu > Advanced > Project groups > Show images of enclosed projects.
- PC: Edit > Preferences > Display > Project Groups > Show images of enclosed projects.
The number to the right of each project indicates the total number of images within the project. Conversely, project groups do not indicate the total number of images within the group.
You can also get to the most recent projects and project groups via the File > Recent Locations menu.
Creating an empty project or project group
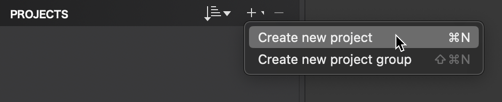

- Click the + button in the Project section bar (on PC you can also create an empty project or project group by right-clicking on an existing project group.)
- Select Create new project or Create new project group from the floating menu.
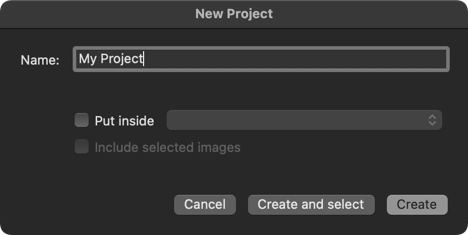
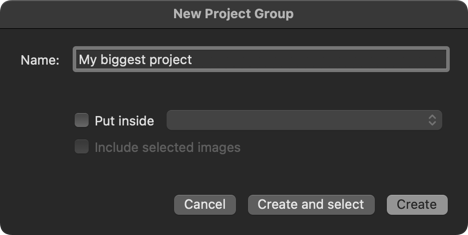
- In the New Project, or group of projects, floating window enter the Project or Group name.
- To place the project or project group within an existing project group, check Place in then select the destination project group from the list.
- To include the images you selected previously in the Image Browser check Include selected images (this option is not available when creating a project group as they cannot contain images at root level).
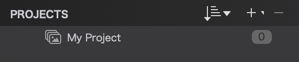
- Confirm by clicking on Create. If you want to select and display the new project or project group directly, click on Create and select.
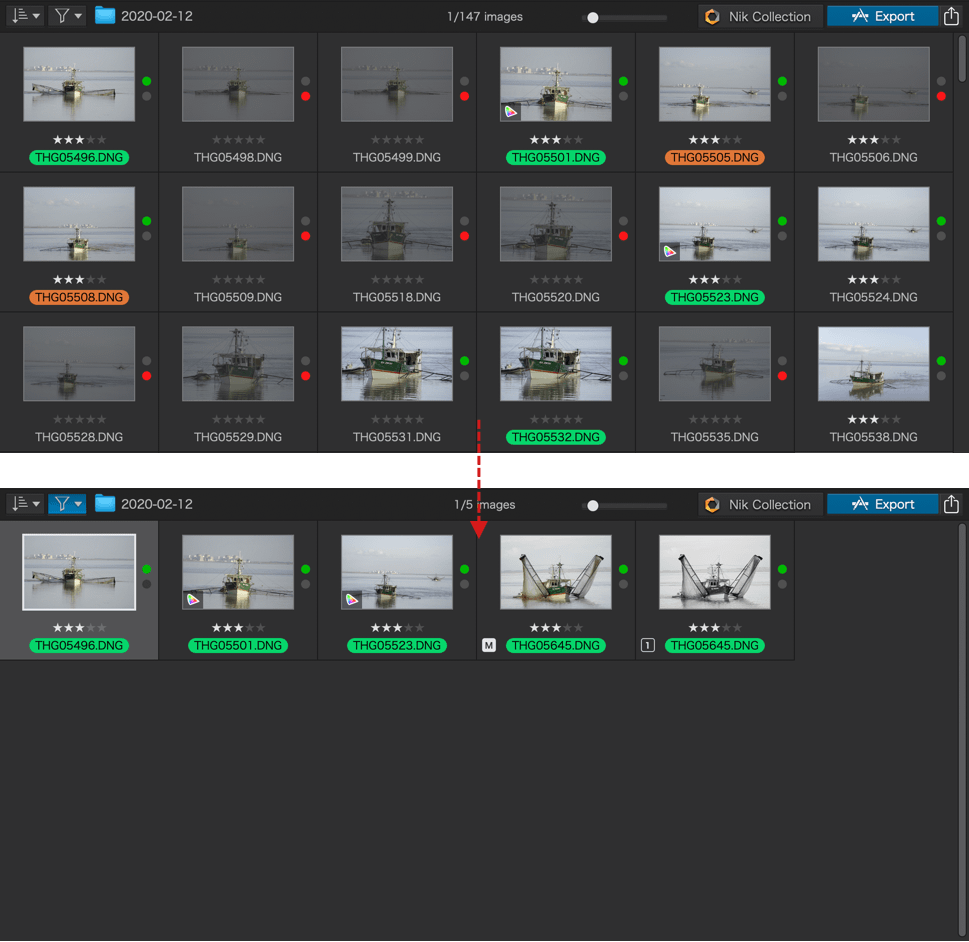
Creating a project from a selection of images
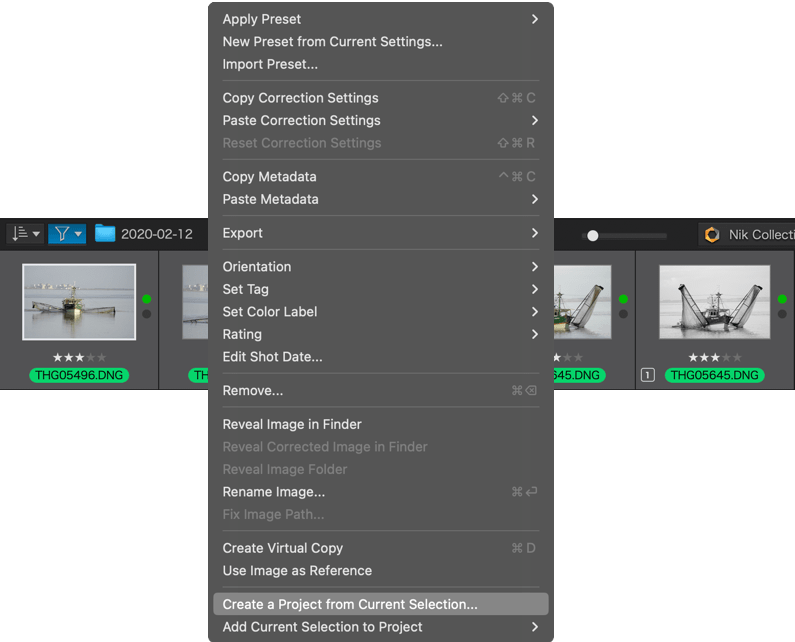
- Select the images in the Image Browser.
- Right-click and, in the context menu, choose Create project from current selection.
- In the New Project Floating window, enter the name of the Project or the Project Group.
- To place the project within an existing project group, check Place in and select the destination project group from the list.
- For images that have already been selected the Include Selected Images option is checked by default.
- Confirm by clicking on Create. If you want to select and display the new project or project group directly, click on Create and select.
The option to Create project from current selection and Add current selection to a project are accessible in both the Organize and the Customize tabs.
Organizing projects and project groups with drag and drop

You can organize and rearrange your hierarchy by simply dragging-and-dropping a project or project group into another project group, using the mouse. Similarly, you can replace the project or project group at the root level in the same way.
A helpful positioning bar appears when you move the elements, in both cases.
Adding images to an existing project
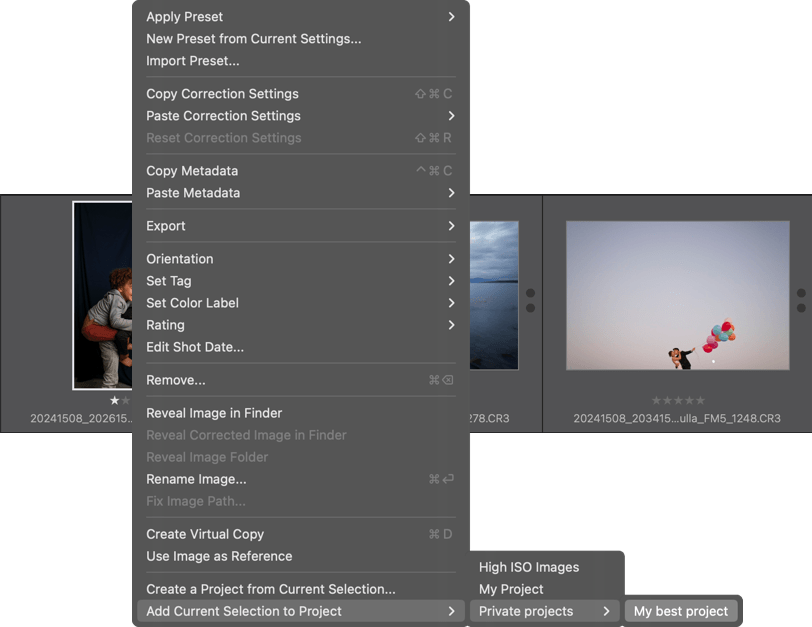
To add images to an existing project:
- Select them in the Image Browser,
- Right-click and choose Add current selection to project, from the context menu.
- Select the project from the list of projects/project groups.
You can also drag and drop images into a project:
- Select one or more thumbnails of your choice in the Image Browser.
- Drag and drop them onto the name of your project.
This is also possible to do using an external source, using your computer’s file explorer:
- PC: by dragging from Windows Explorer to a project in the project tree, or into the Image Browser of an active project.
- Mac: drag and drop from Finder into the Image Browser of an active, selected, project.
Viewing and sorting projects and project groups
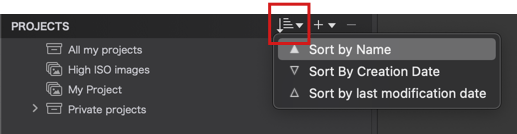
Projects and project groups are displayed in alphabetical order. However, you have the following options when you click on Select the display sort order icon (Mac) or on the A-Z icon (PC), in the Source Browser Projects bar:
- Sort by name (default selection): displays in alphanumeric order (A-Z and 1-9).
- Sort by modification date: displays projects and project groups based on the most recent activity.
- Sort by creation date: sort projects and project groups from oldest (top) to most recent (bottom).
When you select a project, the content is displayed in the Image Browser with the project name in the toolbar as well as the number of images selected/number of images in total (for example, 5/10 means 5 out of 10 images have been selected).
You can also view all the images in projects inside a project group, provided that the option is enabled in Preferences:
- Mac: Advanced > Project Groups > Show images of enclosed projects.
- PC: Display > Project Groups > Show images of enclosed projects.
Renaming a project or project group
You can rename projects or project groups at any time:
- Right-click on a project or project group. Select Rename to enable the input field.
- Alternatively, click directly on the name to activate the input field.
- After entering it, hit Enter/Return.
Deleting a project or project group
To delete a project or project group:
- Click on the project or project group to select it.
- Click on the – (minus) icon in the Source Browser Projects bar.
- Alternatively, right-click and select Delete.
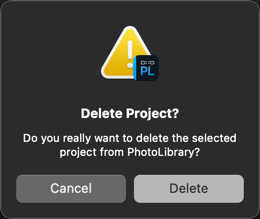
In either case, a dialog box will prompt you to confirm your choice.
IMPORTANT
– When you delete a project, the images are not deleted from their folders, hard drive, or from other projects.– If you delete a project group, all of the projects inside the group will be deleted.
Virtual copies
About virtual copies
A Virtual copy is a duplicate of a Source image which you can try out various corrections on. You can create and experiment with as many virtual copies as you wish to apply different correction settings and compare them to one another.
Creating or deleting virtual copies
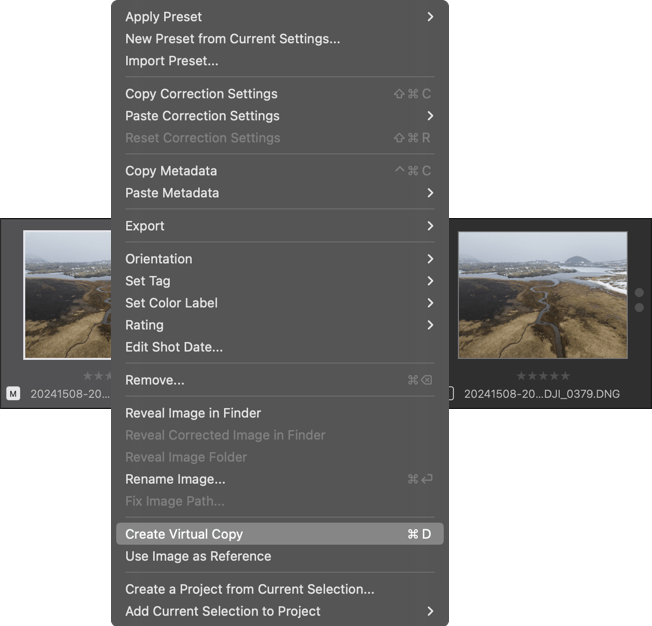
To create a virtual copy:
- Choose a reference (master) image in the Image Browser.
- Right-click on its thumbnail and select Create a virtual copy in the contextual menu. You can also choose the same option in the Image menu, or use the keyboard shortcut Ctrl + J (PC) or Cmd+D (Mac).
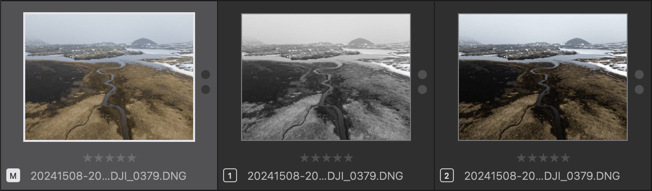
- A new thumbnail will appear in the Image Browser next to the image source. The new virtual copy is selected by default.
- The thumbnail of the reference image is marked M (for master) at the bottom left, and the sequence number 1 appears in the same place in the thumbnail of the virtual copy. Each time you add a virtual copy, a sequence number 2, 3, 4, 5, etc. will be assigned and displayed as you go along.
Virtual copies behave exactly like an original image: you can organize them in projects (along with original files), apply any correction or preset, process them by exporting, and print them.
To delete a virtual copy:
- Right-click on the copy thumbnail in the Image Browser.
- Choose Delete in the context menu.
You cannot delete a virtual copy while you are working on the project it belongs to. You can remove it from the project, but it will still exist and be visible when you open the folder containing the original image.
Using a virtual copy as a reference image
The previous steps explained how to create (unlimited) virtual copies which you can compare, one at a time, to the source or original image. But it is also possible to compare virtual copies with each other using the following steps:
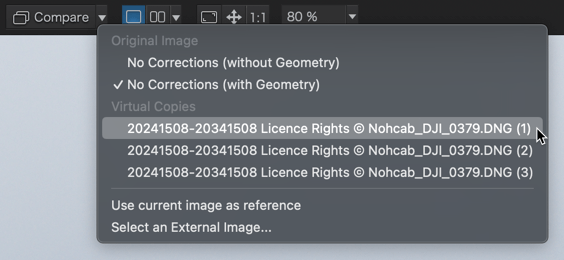
- In the upper toolbar (in either the Customize or PhotoLibrary tab), click on the tiny arrow located to the right of the Compare button (PC), or on the side-by-side display button (Mac), which will give you access to the Reference Image menu.
- A list of copies of the image in the Viewer are shown by this menu. Some may be grayed out and marked as Needs to be processed; others may be active.
- Choose one image from the active set. This image is now the reference image, and will appear on the left side of the comparison. You can compare these virtual copies without having to go through the source image.
Managing Metadata
About metadata
Metadata is information or data that describes or is associated with other information or data, such as a keyword that describes a photo, shutter speed, geographic coordinates, etc.
For RAW files, this metadata is recorded in annex files, also called sidecars; for RGB files metadata is stored in fields provided for this purpose within the file itself. They are also saved in the DxO PhotoLab database. The saving of metadata is automatic and executed in real time.
In photo software in general, and in DxO PhotoLab in particular, you will find two types of metadata: EXIF and IPTC. These are official protocols adopted by the international image and publishing industry:
- EXIF: the EXchangeable Image File format protocol is defined by the JEIDA (Japan Electronic Industry Development Association), which includes not only camera manufacturers, but also image processing application publishers (including those outside of Japan). EXIF standardizes the information related to shooting photos by recording within the images well-defined data tags, such as the shutter speed, the width of the image in pixels, the serial number of the camera, and hundreds of other data points.
- IPTC: The International Press Telecommunications Council consortium defines metadata fields, also stored in images, attachment files, or software databases, in which the photographer can enter information in the form of text, such as an image caption, copyright and contact information, subject codes and categories, geographic information, etc. DxO PhotoLab does not offer all existing IPTC fields, but provides a selection of those fields most used by photographers (contact, copyright, caption, location).
The photo software industry also uses XMP (.xmp extension), a universal format for storing and transferring information and metadata. DxO PhotoLab now uses this format for image metadata, in addition to its own proprietary DOP format (.dop extension). The first one enables assigning metadata to images, especially for IPTC fields (readable by all photo software), and the second one enables saving corrections made to images (and readable only by DxO Labs software).
You can find more information and features related to metadata in the following sections of this user guide:
- Searching for images with metadata and keywords.
- Image export options.
The Metadata palette
Overview
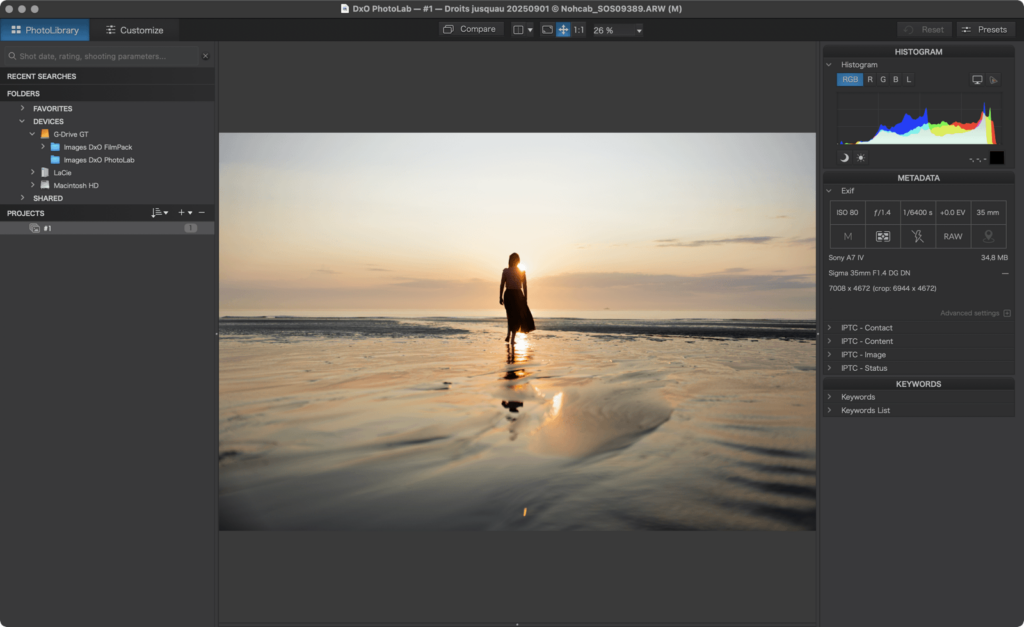
Located in the right panel of the PhotoLibrarytab, the Metadata palette contains the following subpalettes:
- Exif: Shows the main capture settings of the selected image.
- IPTC: divided into 4 sections providing description and input fields for the selected image.
To enter information in the input fields:
- Select one or more images in the Image Browser.
- Click in an input field to activate it.
- Enter the information.
- Move to another field or click elsewhere to confirm.
To correct or change information in a field:
- Select one or more images in the Image Browser.
- Click in an input field to activate it.
- Using your mouse, highlight the entire text or a portion of it and hit Backspace. You can also click in one place and then press the same key to delete the previous letter or letters.
- Move to another field or click elsewhere to confirm.
Only the Elite edition of DxO PhotoLab allows you to enter and modify data in IPTC fields. However, you can copy/paste IPTC fields in both the Elite and Essential editions.
EXIF sub-palette
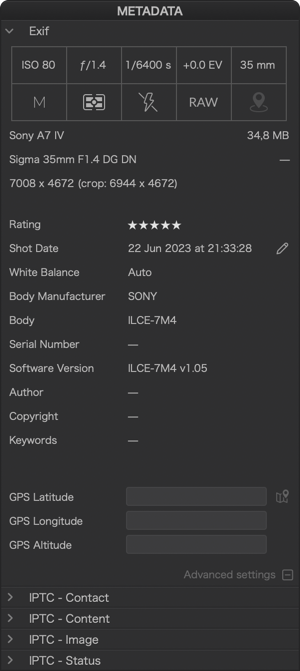
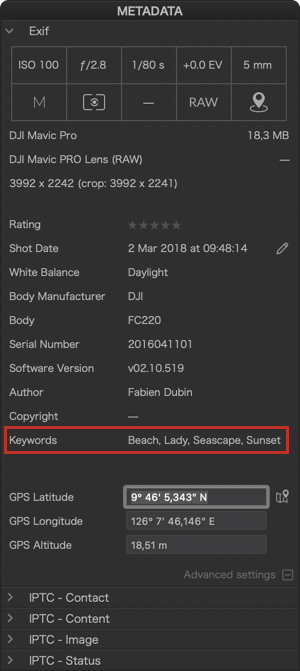
The More subpalette displays the main image and shooting information in a table and a list (from top to bottom):
- Table, top row (from left to right): ISO, aperture, shutter speed, exposure compensation, focal length used.
- Table, bottom row (from left to right): exposure mode (Program, A/Av, S/T/Tv, M, etc.), light metering mode in the form of a pictogram (evaluative, weighted, spot, etc.), whether or not flash is used, file type, RAW or RGB (JPEG, TIFF), and whether or not GPS coordinates are present (in the form of a pictogram).
- The brand and model of camera (for smartphones and drones).
- The dimension in pixels (width x height).
- The brand and model of the lens.
- The size of the file in MB.
- The star rating, given either on the camera, in DxO PhotoLab or in another software (editable by clicking on it).
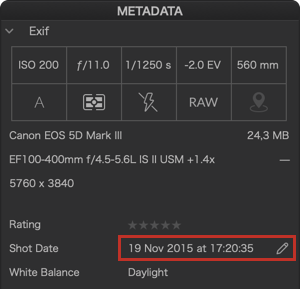
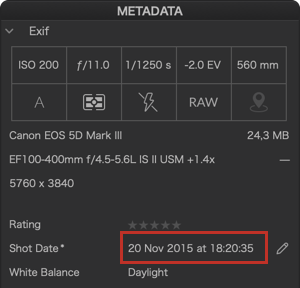
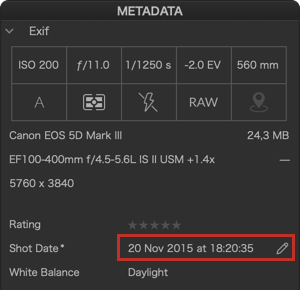
- The date and time of shot (can be modified).
- The white balance as set by the camera (Daylight, Cloudy, etc.).
- The brand of the camera (and model on the next line)
- The camera serial number.
- The firmware version of the device.
- The author’s name and, on the next line, the copyright information, as entered in the camera menus, in DxO PhotoLab or in another software. This information can be changed in the IPTC sub-palette.
- Summary of keywords entered in DxO PhotoLab or in another software.
- GPS coordinates (latitude, longitude, and altitude), recorded by the camera or in another software, and editable by clicking in the fields.
- A button for displaying the shooting location in Google Maps, based on GPS coordinates. Google Maps opens in the default web browser.
IPTC Subpalettes
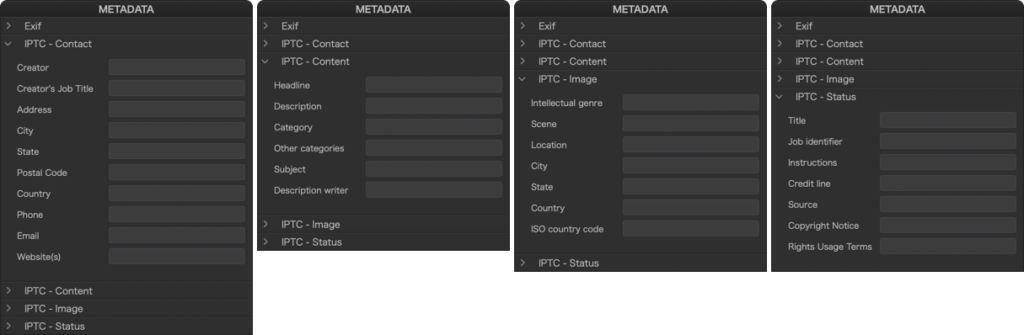
The IPTC subpalette shows textual information about your images and photographic activities that you can enter and edit yourself. You have the following categories, which are standardized and readable in all photo software that recognizes the IPTC protocol:
- IPTC – Contact: lets you enter information about the creator/author of the photo: name, address, e-mail, telephone number, and web site.
- IPTC – Content: You can use the Headline and Description fields to describe the image content, the subject photographed, etc.
- IPTC – Image: Lets you enter information about the location of where the photograph was taken (in DxO PhotoLab, these fields are not automatically filled according to the GPS coordinates recorded by the camera).
- IPTC Status: the fields let you enter a title, job identifier, instructions, publication credit line, the website or gallery where the image has been published (Source), copyright information (in general the name of the author and/or company followed by the current year) and lastly, the terms of use description (Rights Usage terms).
The Keywords palette
Keywords are a great way to document your photos and describe their content. They also make it easy to find and collect them in your PhotoLibrary. DxO PhotoLab allows you to add and display keywords, including those entered in other programs.
Keywords entered are stored in the DxO PhotoLab database, but not in the images themselves (RGB files), nor in the sidecars (.dop or .xmp) of RAW files. The keywords are included with the images when they are exported.
If you start typing a keyword that is already stored in the database, the program will suggest keywords that start with the same letters. So you can select a desired keyword by using the up and down arrows on the keyboard, instead of having to type in the word completely.
Entering single keywords
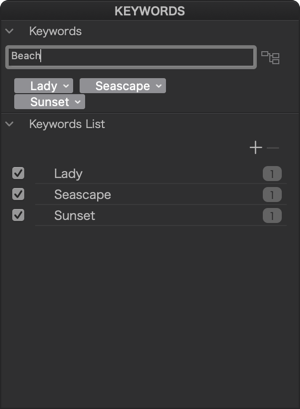
You enter keywords in the Keywords palette of the Customize tab (located by default in the right panel under the Metadata palette).
- Select one or more images in the Image Browser.
- Enter a keyword into the Add Keywordsfield (you can only enter one word at a time).
- Confirm with the Enter/Return key.
- The keyword is assigned to the selected image(s) and appears as a label below the input field.
You can only enter one keyword at a time, whether it is a single word or a compound word. The latter may contain a space or a separator, and will be treated as a single keyword (for example, if you enter “red; black”, you will get a single keyword “red; black”).
You can also apply one or more keywords that are not common to the selected images:
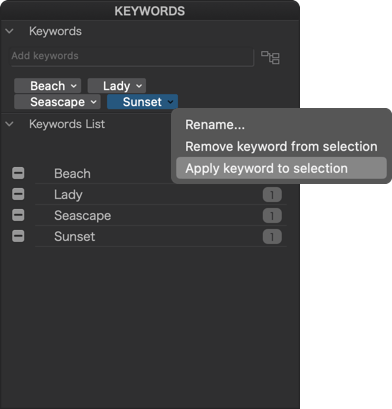
- Right-click on an uncommon keyword (dark label) to select it.
- The label turns blue.
- From the context menu, select Apply keyword to selection. The keyword is assigned to the other selected images.
Entering hierarchical keywords
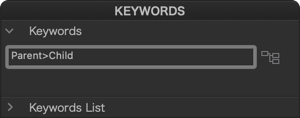
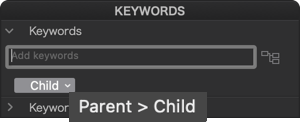
You can enter hierarchical keywords, that is, parent and child keywords, using signs. For example, if you enter “Parent > Child” (“Parent” is larger than “Child”) or “Child < Parent” (“Child” is smaller than “Parent”), the Keywords palette will display only the Child keyword label. The Keyword list, on the other hand, will display the “Parent” keyword, and clicking the arrow to the left of it will reveal the “Child” keyword.
This means the child keyword always takes precedence, but the parent keyword is implicitly present: if you place the mouse on the “Child” label, a tooltip will display the Parent > Child relationship. Note that the search also works on parent keywords.

You can also filter the display so that only parent keywords are visible, by clicking on the icon to the right of the input field (when the filter is active, the icon is blue). To return to the display of child and parent keywords, click the icon again (the icon is grayed out when the filter is inactive).
Automatic suggestions during input offer both single and hierarchical keywords.
Compatibility of hierarchical keywords: Certain photo software products do not allow displaying and/or keeping hierarchical keywords and their associated tree structure.
Modifying keywords
If you want to change or correct a keyword (PC):
- Right-click on the keyword label (you can also double-click on the label or hit the F2 key).
- The label becomes blue and active, and you can proceed with the input.
- Confirm with the Enter/Return key.
If you want to change or correct a keyword (Mac):
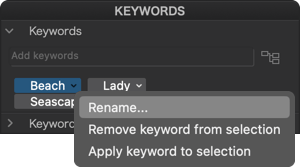
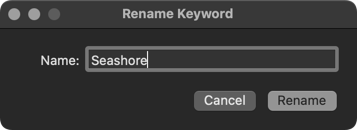
- Click on the small arrow in the keyword label.
- From the context menu, select Rename.
- The label turns blue and becomes active.
- A dialog box will prompt you to edit then confirm it (click on Rename).
Editing a keyword applies to all the images that keyword has been assigned to.
Deleting keywords
To delete a keyword:
- Click on the small arrow in the keyword label.
- Select Remove Keyword from Selection.
- The deletion occurs directly, without a confirmation dialog.
To delete multiple keywords at once:
- Click on the first keyword label.
- Shift-click the last tag, which causes all tags to be selected and turn blue.
- Hit Backspace.
- The keywords are removed from the selected image or images.
Removing keywords:
– You can remove keywords from the images you select, but not from the DxO PhotoLab database.
– You can remove keywords from the DxO PhotoLab database using the Keyword list sub-palette.
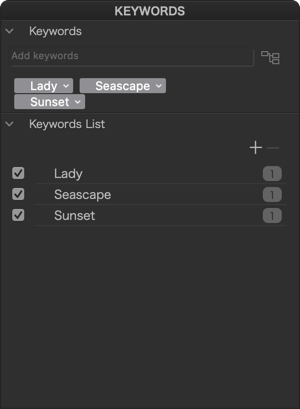
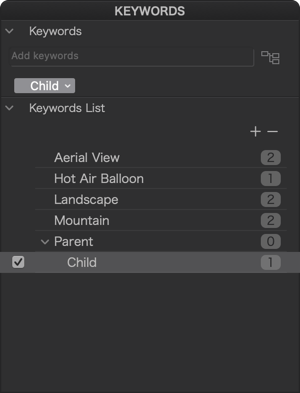
Keyword list
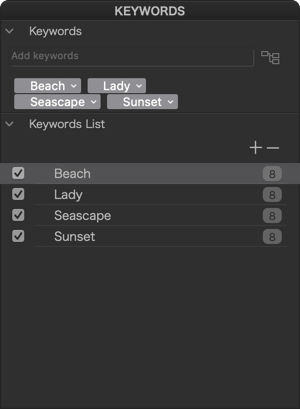
The Keywords palette includes a Keyword list section. It shows the keywords in alphabetical order. When you select one or more images, the assigned keywords are indicated by a check mark to the left of each keyword. This means you can check keywords in the list to assign them to the selected images or, conversely, remove them from the images by unchecking them. This also applies to hierarchical keywords. The advantage of the Keyword list is that you can easily assign to or remove large quantities of existing keywords from the selected images.
According to your choice in Preferences > Metadata, you have the option to attribute just the selected keywords or the selected hierarchy of keywords (see the Keyword options paragraph in Preferences below).
You can also save the hierarchy of keywords in the XMP dc:subject tag, in line with the Dublin Core metadata protocol (see section
The number to the right of each keyword indicates the total number of images the keyword is assigned to.
By right-clicking on a keyword in the list, you can access a context menu with the following functions:
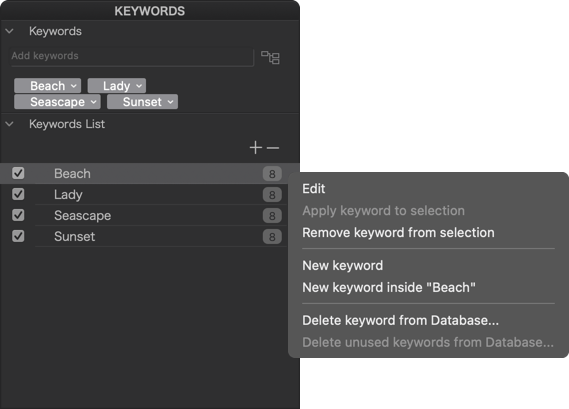
- Modify: Lets you correct or modify the keyword (you can also click on it directly).
- Apply the keyword to the image: if you have selected at least one image, the selected keyword will be applied to it.
- Remove Keyword from Image: Removes the Keyword from selected images.
- New Keyword: opens a floating window to enter the new keyword into. The Apply keyword to selection (X image) option is checked by default; you can make this keyword a child keyword by checking the Put inside… option. Confirm by clicking Create, otherwise click Cancel.
- New keyword inside…: this option displays the same floating keyword entry box but, this time, with all options checked by default.
- Delete keyword from database: Removes the keyword from the DxO PhotoLab database. A dialog box asks you to confirm to your choice (by clicking Delete), the keyword and its label are then removed from the list. Note that all such deletions cannot be undone.
- Delete unused keywords from database…: Removes an unused keyword (indicated by a zero). A dialog box also asks you to confirm your choice (click on Delete).
The list also includes the following buttons:
- + (plus sign) button: lets you add a keyword via a floating window. The Apply keyword to selection (image x) option is checked by default, confirm by clicking on Create. If you click the + button when a keyword is selected, the dialog box lets you create a child keyword.
- – (minus sign) button: deletes the selected keyword, a pop-up window asks you to confirm your choice (click Delete).
Finally, you can easily create hierarchical keywords in the list, by dragging and dropping a keyword onto another keyword. The keyword you drag and drop becomes a child keyword. You can do the opposite by entering the child keyword and dropping it between two keywords (the drop location will be marked by a line with a dot). The conversion of a simple keyword into a hierarchical keyword (and vice versa) will be indicated on all images to which this keyword is assigned.
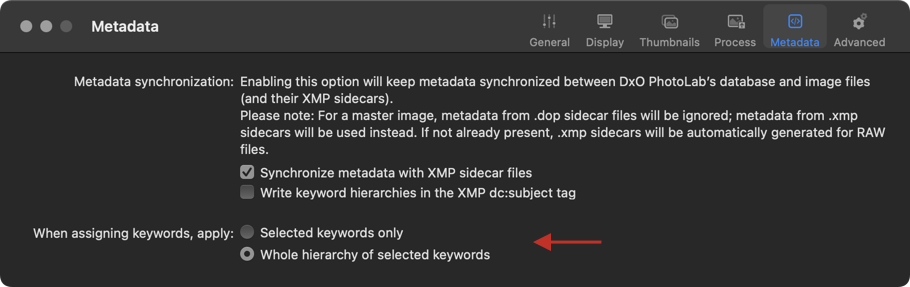
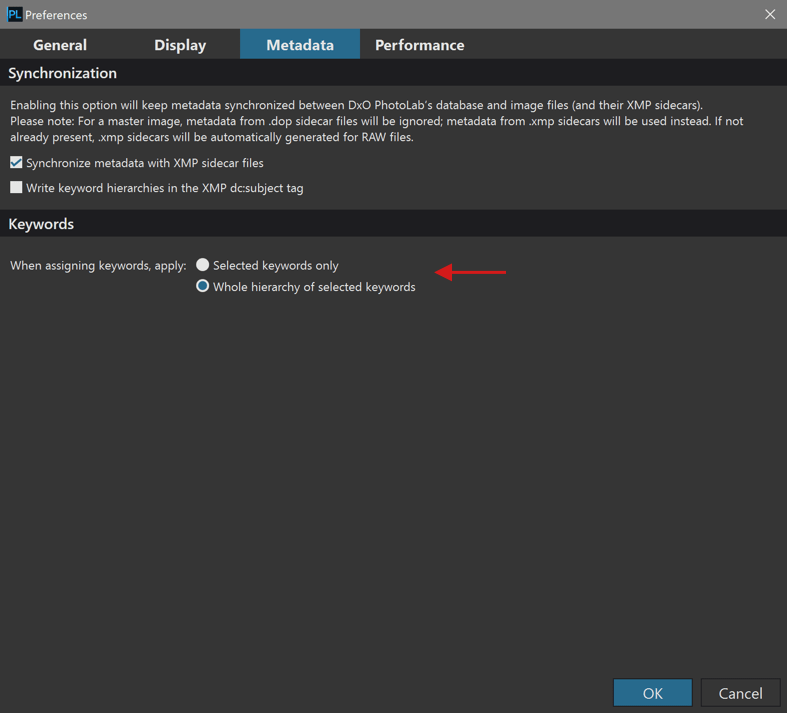
Keyword options in Preferences
DxO PhotoLab lets you assign a selected keyword or the hierarchy to which it belongs in a single click. To do this, you should go to Preferences:
- Mac: metadata tab.
- PC: Metadata tab, Keywords section.
Then, click one of the two checkboxes to set the behavior of the program when assigning keywords that belong to a hierarchy:
- Selected keywords only: if the keyword is part of a hierarchy, just the keyword will be assigned.
- Whole hierarchy of the selected keywords: if the keyword is part of a hierarchy, it will be assigned along with all the other keywords in the hierarchy.
Displaying keywords
There are several ways to display keywords, whether they were entered in DxO PhotoLab or come from another program.
If you only select one image:
- Metadata palette > More section > Keywords.
- Keywords palette: Assigned Keywords appear as gray labels and, in the keywords list, with ticked checkboxes next to each one.
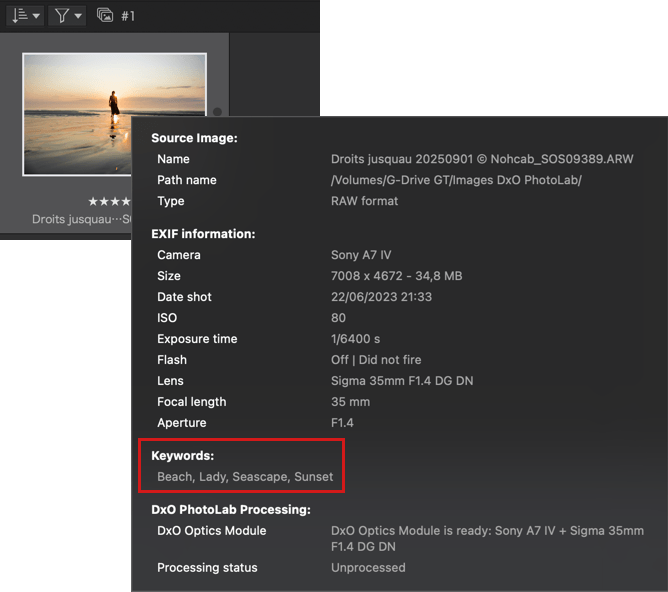
- Floating information panel in the Image Browser, after leaving the mouse on a thumbnail for a few moments:
If you have selected several images and they contain exactly the same keywords:
- Metadata palette > More section > Keywords: Just the keywords from the first image in the selection (white framed thumbnail) are displayed.
- Keywords palette: Assigned Keywords appear as gray labels and, in the keywords list, with ticked checkboxes next to each one.
- Floating information panel in the Image Browser, after leaving the mouse on a thumbnail for a few moments:
If you have selected several images and they contain only different keywords:
- Metadata palette > More section > Keywords: Just the keywords from the first image in the selection (white framed thumbnail) are displayed.
- Keywords palette: Assigned Keywords appear as gray labels and, in the keywords list, they are marked with a – (minus) sign.
- Floating information panel in the Image Browser, after leaving the mouse on a thumbnail for a few moments: Only the keywords of the image over which the mouse is hovering are displayed.
If you have selected several images and they contain both common and different keywords:
- Metadata palette > More section > Keywords: Just the keywords from the first image in the selection (white framed thumbnail) are displayed.
- Keywords palette: Common keywords appear in white text on a grey label while all other keywords appear in grey on a darker grey label; in the Keywords list, common keywords are checked, and other keywords have a – (minus) sign.
- Floating information panel in the Image Browser, after leaving the mouse on a thumbnail for a few moments: Only the keywords of the image over which the mouse is hovering are displayed.
Copying and pasting metadata
DxO PhotoLab provides a quick way to assign the information entered in the IPTC metadata fields, keywords, and sorting attributes (star ratings and Keep/Discard status) from one image to a batch of other images.

Copy/paste all metadata
To assign all the metadata, keywords, and attributes of an image to another image or group of images:
- In theImage Browser, right-click on the source image (the one that contains the metadata to copy).
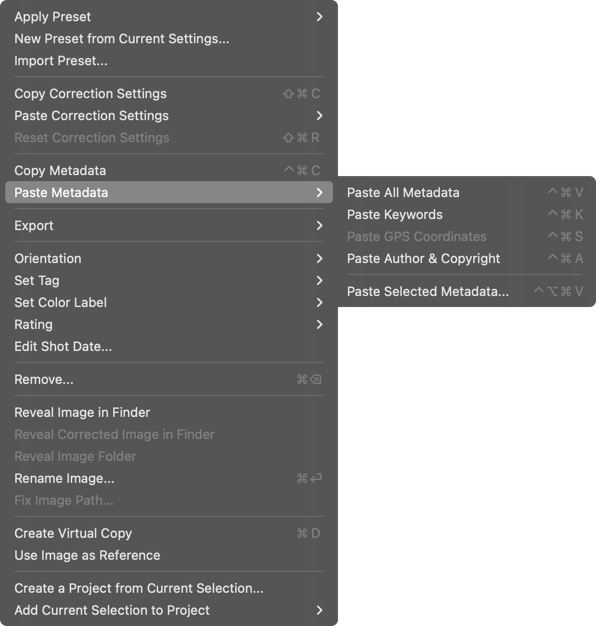
- From the context menu, select Paste metadata.
- In theImage Browser, select and right-click the destination image(s).
- From the context menu, select Paste all metadata.
- The set of metadata is assigned to the destination image(s) (there is no dialog box to confirm).
Copy/paste only keywords, or GPS coordinates, or author and copyright information
To assign keywords or GPS coordinates to other images:
- In theImage Browser, right-click on the source image (the one that contains the metadata to copy).
- From the context menu, select Paste metadata.
- In theImage Browser, select and right-click the destination image(s).
- In the context menu, select Paste meta and then, in the submenu, choose Paste Keywords or Paste GPS Coordinates or Paste Author & Copyright.
- The set of metadata is assigned to the destination image(s) (there is no dialog box to confirm).
Copy and paste a selection of metadata
You can choose in detail which metadata to copy from one image to other images:
- In theImage Browser, right-click on the source image (the one that contains the metadata to copy).
- From the context menu, select Paste metadata.
- In theImage Browser, select and right-click the destination image(s).
- From the context menu, select Paste metadata and then, from the submenu, choose Paste selected metadata….
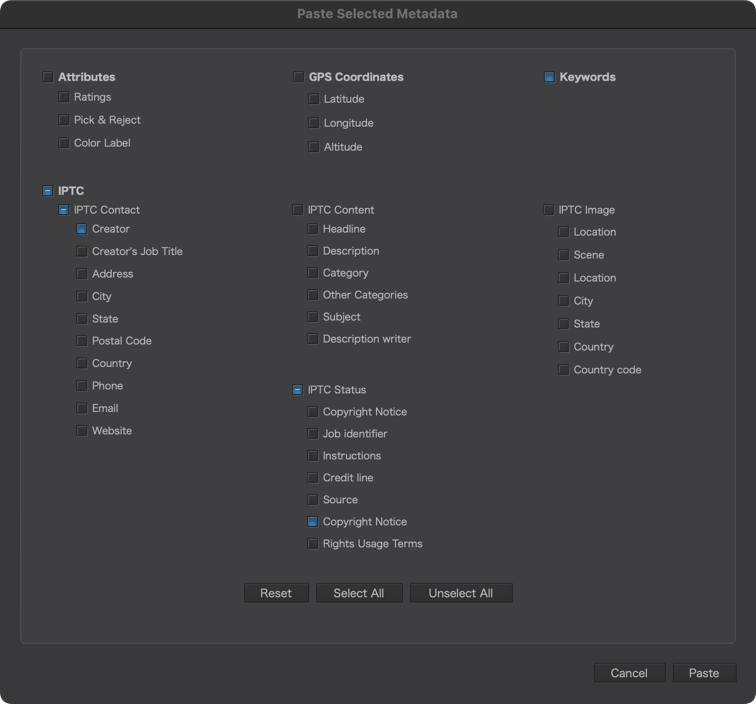
- A dialog box allows you to check different boxes to choose the different categories (Attributes, GPS Coordinates, Keywords, IPTC) and information in detail.
- Click Paste to assign the selected metadata to the destination images.
The dialog box includes the following items:
- Gray checkbox: Category or metadata not selected.
- Blue check box: Selected category or metadata.
- Blue checkbox with – (minus) sign: indicates a category in which not all of the boxes have been checked.
You will also find the following buttons:
- Reset: Checks the active checkboxes by default (Attributes/Note, IPTC/IPTC Contact/Creator, and IPTC Image/Location).
- Select all: Checks all checkboxes (if you want to copy/paste everything).
- Unselect all: Unchecks all checkboxes (if you want to return to the previous choice).
Items with an asterisk (*) indicate empty metadata fields that will delete the contents of the corresponding fields in the destination image.
Renaming images
If you want to rename your images, DxO PhotoLab allows you to do so either individually or in batches. You can easily replace or add text, or rename by adding a sequence number; The renaming tools are available both in the PhotoLibrary tab and in the Customize tab.
Renaming a single image or renaming one by one (PC)
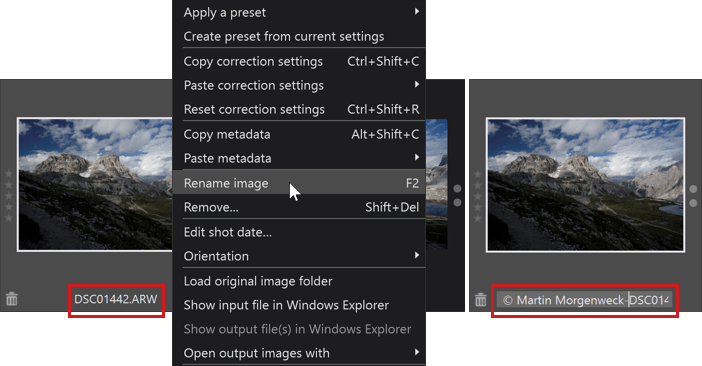
To rename a single image, or images one by one on a Windows PC:
- In the Image Browser, right-click on the thumbnail of the image to be renamed to select it and display the context menu. You can also right-click on the image displayed in the Viewer.
- Select Rename image from the context menu.
- The file name in the thumbnail becomes an active input field.
- You can remove the original name entirely and enter a new one, or change part of the existing name, by clicking on it at the desired location.
- Once you have entered the new name, hit Enter to confirm.
- Go on to the next image if necessary.
There are two other methods to rename an image:
- Click the image in the Image Browser to select it, then press the F2 key and follow the steps above.
- Clicking directly on the file name in the thumbnail to activate the input field, then entering or modifying the name.
Renaming a single image or renaming one by one (Mac)
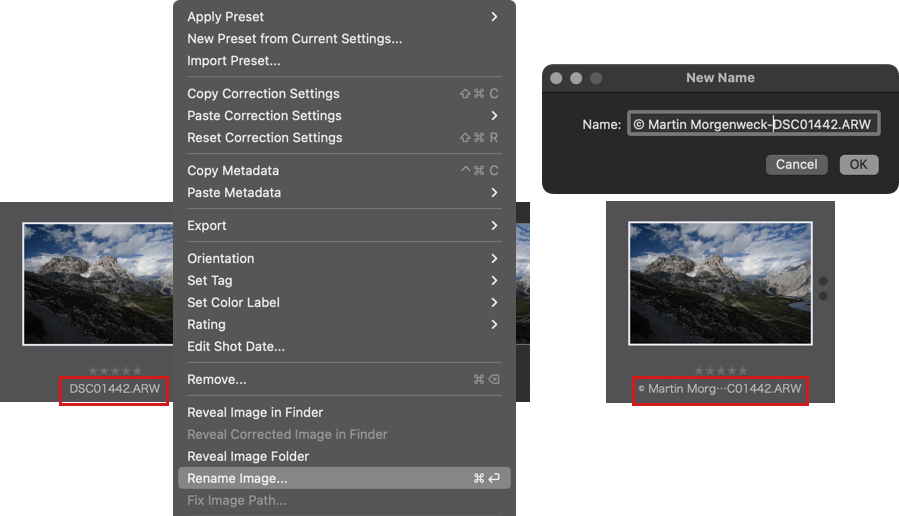
To rename a single image or images one by one on a Mac:
- In the Image Browser, right-click on the thumbnail of the image to be renamed to select it and display the context menu. You can also select the image by clicking on the thumbnail and going to the Image menu.
- Select Rename image from the context menu.
- A dialog box opens and displays the file name in an active input field.
- You can remove the original name entirely and enter a new one, or change part of the existing name, by clicking on it at the desired location.
- Confirm by clicking OK.
- Go on to the next image if necessary.
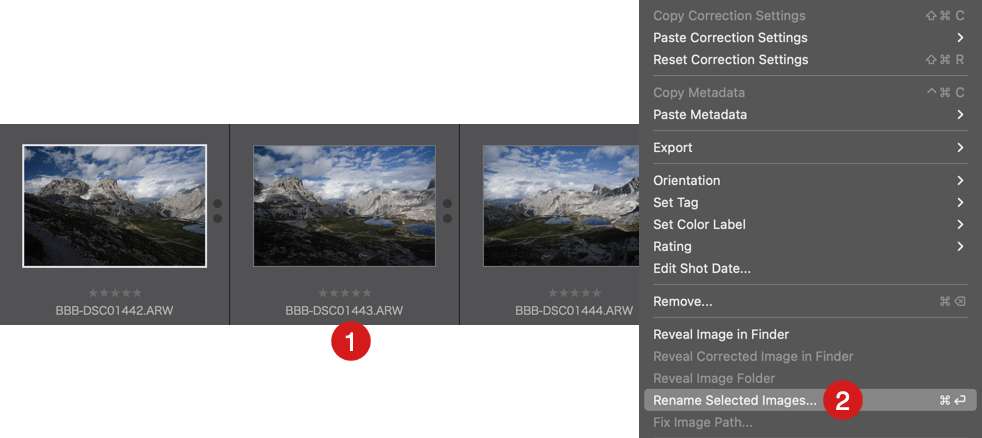
Batch renaming images (ELITE edition)
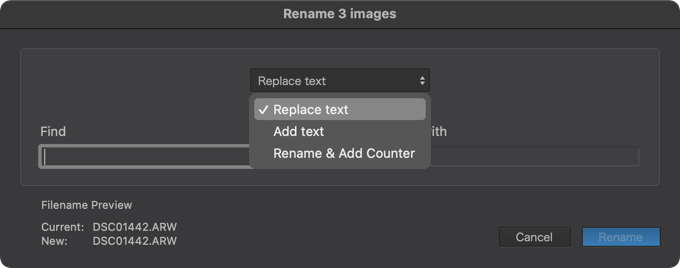
Three methods for batch renaming are at your disposal. To access them:
- In Image Browser, select a series of images.
- Right-click and from the context menu, choose Rename selected images…
- A dialog box will appear, where you can choose from the following options:
- Replacing text
- Adding text
- Renaming and adding a counter
Replacing text
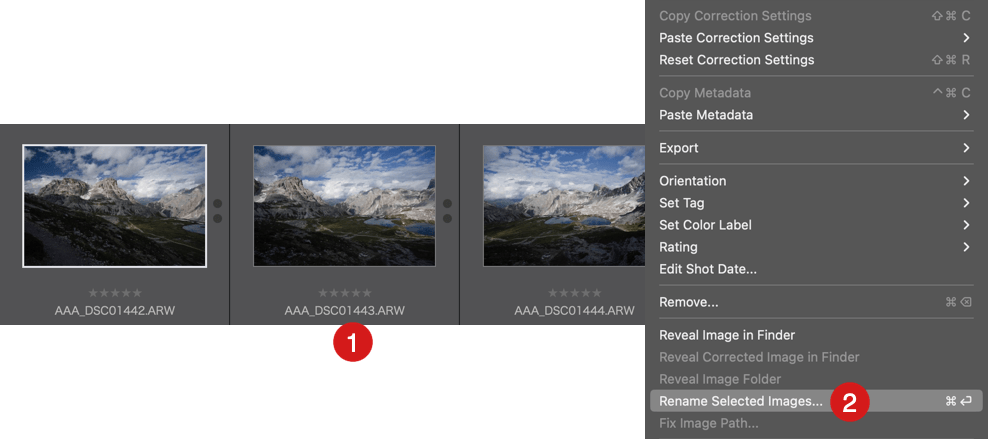
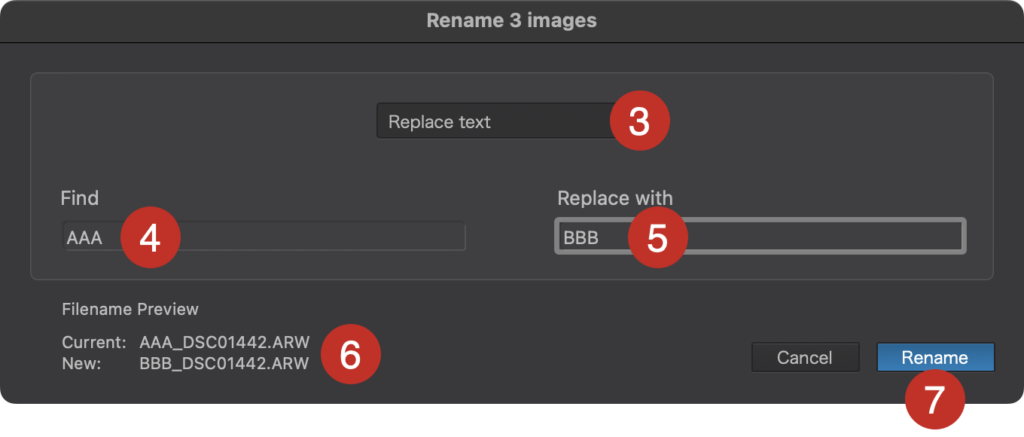

This function lets you replace the name or a portion of the filename. For example, if your files contain the string “AAA”, you can replace it with the string “BBB” in a single click:
- In the Image Browser, select the files you want to change or modify the names of.
- Right-click and from the context menu, choose Rename selected images…
- From the dialog box, select Replace Text.
- In the Search field, enter the text to replace (“AAA” in our example).
- In the Replace with field, enter the replacement text (“BBB” in our example).
- The dialog box displays a Filename preview featuring the current name (before change) and the new name (after change).
- Click the Rename1 button: the text or “AAA” portion of the text is replaced with “BBB”.
1 If one or many of the selected images do not feature the text to be replaced, the Rename button will remain inactive. In this case, select the files that contain the text you want to replace.
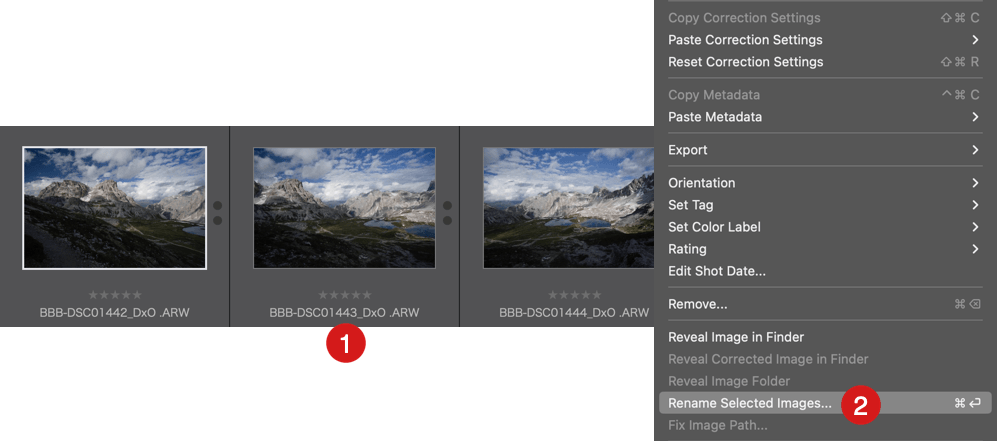
Adding text
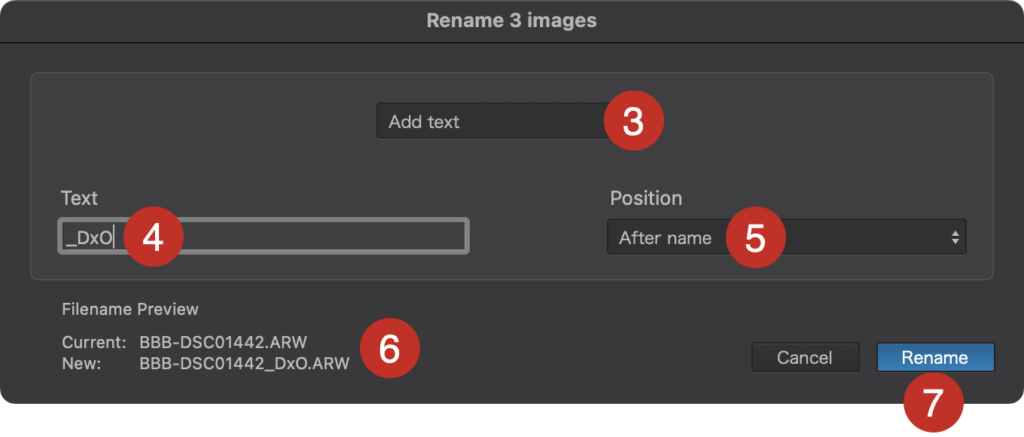

You can also keep the original name of your files and add additional information such as your initials, the name of your device, a date, a subject, etc., either as a suffix (after the original name) or as a prefix (before the original name). Here we will use the suffix “_DxO”:
- In the Image Browser, select the files that you want to change or modify the names of.
- Right-click and from the context menu, choose Rename selected images…
- From the dialog box, select Add text.
- In the Text field, enter the text you want to add (“_DxO” in our example).
- From the Position list, choose After name.
- In the Preview section, the dialog box displays the current name (before modification) and the new name (after modification)1.
- Click the Rename button: the suffix “_DxO” is added to the name of the selected files.
1 Depending on the length, the filename may be truncated. Place the mouse over one of the names to display it in full in a tooltip.
2 The Rename button also indicates the number of images.
Renaming and adding a counter
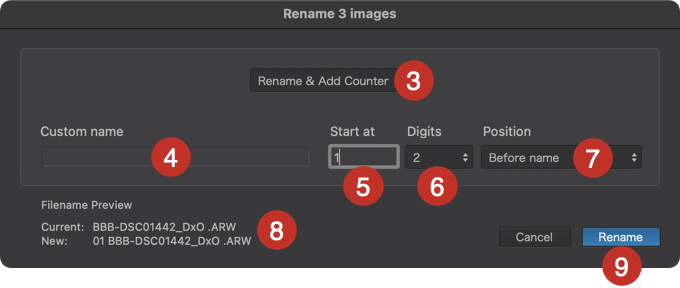
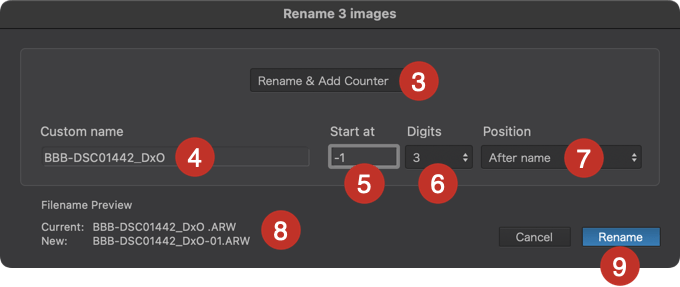
With this mode, you can add a counter (sequence number) to file names, or rename the files and add the counter.
To add a counter to an existing file name:
- In the Image Browser, select the files that you want to add a counter to.
- Right-click and from the context menu, choose Rename selected images…
- From the dialog box, select Rename & Add Counter.
- The Custom Name field is empty by default, leave it empty if you just want to add a counter, enter the original name or another name if you want to add it with the counter.
- In the Start at field, the counter starts at 0 by default (file name + 0, 1, 2, 3, etc.). You can enter a different figure. To start the counter at 1, enter 1; to separate the counter from the file name, enter a dash in front of 1 (1- or 1_ for a prefix, -1 or _1 for a suffix).
- In the Digits field, select the number of digits in the counter (e. g. 1 digit, 2 digits, etc.). If you enter a hyphen to separate the counter from the filename, add a unit to the number of counter units (2 units for -1, 3 units for -01, etc.).
- From the Position list, choose the counter location (in After name or Before name).
- The dialog box displays a Filename preview featuring the current name (before change) and the new name (after change).
- Click the Rename button: figures are added to the original filenames (filename 1, filename2, filename3, etc.).
Changing image dates
You can change image dates in the Metadata palette in 3 different ways:
- Add: adds a day, month, year, hour, minute, or second by increments to the capture time.
- Subtract: subtracts a day, month, year, hour, minute, or second by increments from the capture time.
- Replace with: Replaces a date/time with a custom date/time.
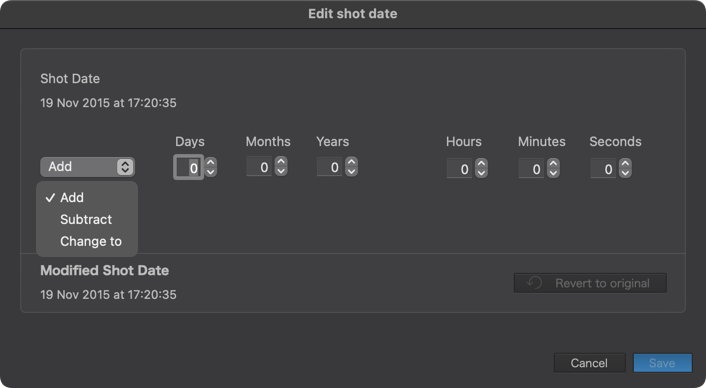
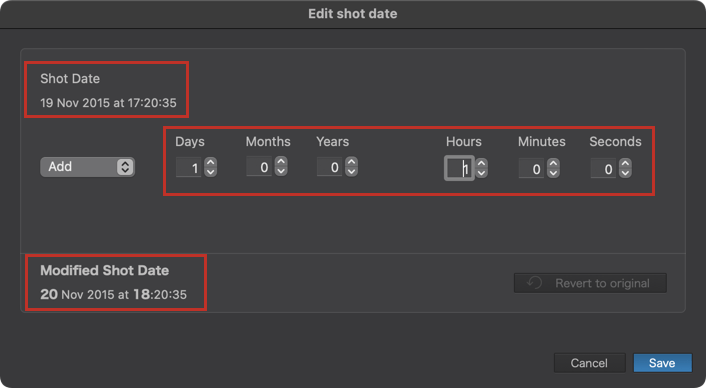
The Edit shot date window looks like this:
- The top section shows the original capture date and time and contains the Edit mode selectors and date/time counters, which you can scroll through or enter values in.
- The bottom section shows an example of the modified time, and contains a button to return to the original time.
- The Cancel and Save buttons.
When you change the date of an image, the Date tag, in the More subpalette, displays an asterisk: Date*.
You can change the date and time on an image-by-image basis, or by batches. When you select multiple images, only the date and time of the first one (identifiable by the white frame in the thumbnail) are displayed in the More sub-palette.
Add
- In the Image Browser, select the image or images you want to change the date for.
- Right-click the thumbnail(s) and then, in the context menu, Select Edit shot date… (you can also use the Image > Edit shot date… menu, or click on the pencil in the Metadata palette, More subpalette, to the right of Shot Date.
- In the Edit shot date window, select the Add mode.
- The various counters allow for increments by unit (1). For example, if you want to add 1 day and 1 hour to the original date, select 1 in the relevant counters.
- Check the modification in Modified shot date.
- Select the presets you want to import, then click Open.
Subtract
- In the Image Browser, select the image or images you want to change the date for.
- Right-click the thumbnail(s) and then, in the context menu, Select Edit shot date… (you can also use the Image > Edit shot date… menu, or click on the pencil in the Metadata palette, More subpalette, to the right of Shot Date.
- In the Change shot date window, select the Subtract mode.
- The various counters allow for increments by unit (1). For example, if you want to subtract 1 day and 1 hour from the original date, enter 1 in the appropriate counters.
- Check the modification in Modified shot date.
- Select the presets you want to import, then click Open.
Replace with
- In the Image Browser, select the image or images you want to change the date for.
- Right-click the thumbnail(s) and then, in the context menu, Select Edit shot date… (you can also use the Image > Edit shot date… menu, or click on the pencil in the Metadata palette, More subpalette, to the right of Shot Date.
- In the Change shot date window, select Change to.
- Adjust the days, months, years, hours, minutes and seconds as desired.
- Check the modification in Modified shot date.
- Select the presets you want to import, then click Open.
Reset to original date and time
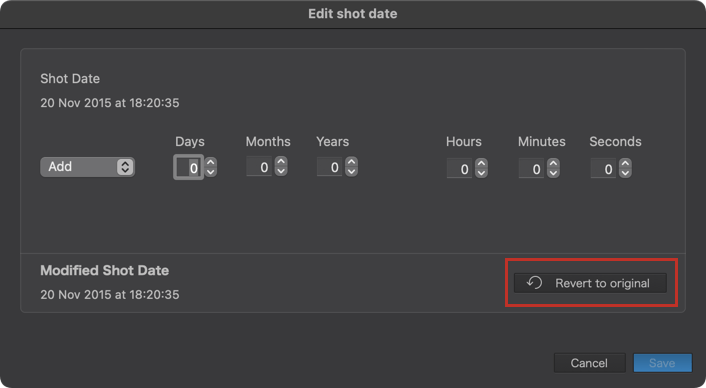

- In the Image Browser, select the image or images you want to reset the date for.
- Right-click the thumbnail(s) and then, in the context menu, Select Edit shot date… (you can also use the Image > Edit shot date… menu, or click on the pencil in the Metadata palette, More subpalette, to the right of Shot Date.
- In the Edit shot date window, click the Revert to original1 button.
- A dialog box informs you that the operation cannot be undone. Click Continue to confirm.
- The date and time are reset and the dialog box closes.
Synchronization, reading, writing of metadata and conflict resolution
Metadata synchronization
When you enter information in the IPTC fields and/or keywords, everything is saved in the DxO PhotoLab database and applied to exported images if desired.
If you enable metadata synchronization in Preferences, this information will also be saved in the .XMP sidecar files (for RAW images) or in the headers for DNG, JPEG and TIFF files. This will let you make use of this information in other versions of DxO PhotoLab and other photography software packages able to use it (Adobe Photoshop, Lightroom, etc.).
The option of saving the Keyword Hierarchy in the XMP dc:subject tag facilitates its inclusion in the basic metadata and ensures interoperability with the Meta Data Dublin Core protocol.
Metadata synchronization also ensures that the information remains the same and is up to date in both the database and the XMP sidecar files. This means that if you add, modify or delete metadata outside of DxO PhotoLab, the DxO PhotoLab database will be automatically updated.
When synchronization is enabled, XMP appendix files are automatically created for files that do not have them.
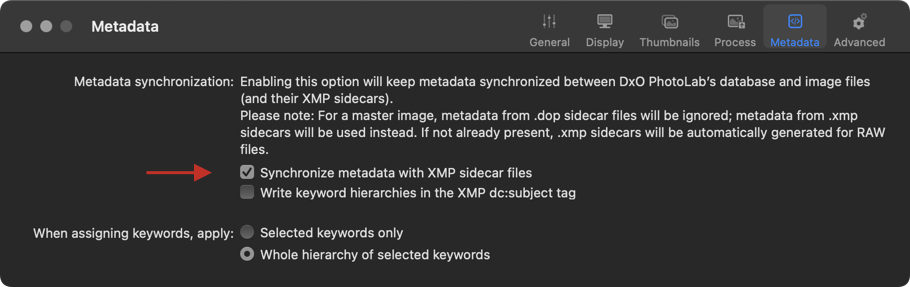

To enable metadata synchronization:
- Go to Preferences/Settings (Mac: DxO PhotoLab menu, PC: Edit menu).
- Go to the metadata tab, synchronization section.
- Check Synchronize metadata with XMP sidecar files.
- If you want interoperability with Meta Data Dublin Core protocols, check the Write hierarchy of keywords in the XMP dc:subject tag option.
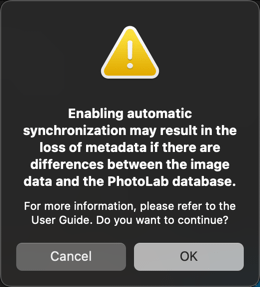
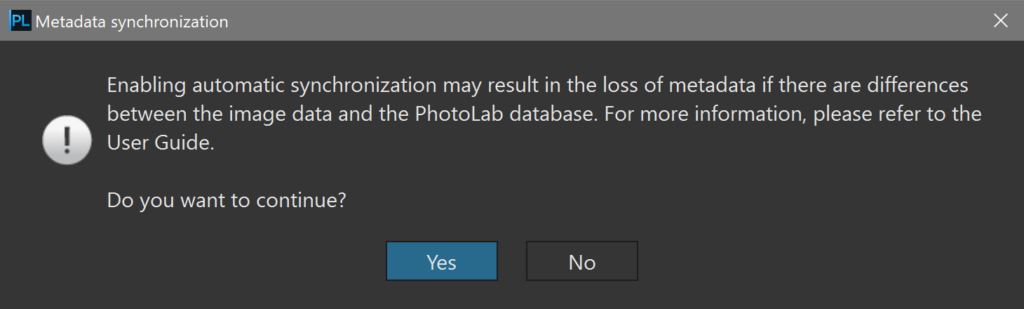
- If there is a difference between the DxO PhotoLab database and the XMP sidecar file, a dialog box will warn that you risk losing metadata by overwriting.
- Click OK to approve and exit Preferences (enabling sync does not require restart).
Reading and writing metadata
You can also force metadata to be read from or written to files, which also helps resolve potential conflicts (see Conflict resolution below).

On both Mac and PC, you can find the following options in the File > Metadata menu:
- Read from image: Metadata read from the XMP sidecar overwrites the metadata stored in the DxO PhotoLab database (metadata from the image takes precedence).
- Write to image: Metadata read from the DxO PhotoLab database overwrites the metadata stored in the XMP sidecar file (the metadata in the database takes precedence).
Conflict resolution
If you are using multiple photo programs, or a cataloger, and you edit or change metadata, these changes will automatically be reflected in the DxO PhotoLab database, provided you have enabled metadata synchronization.
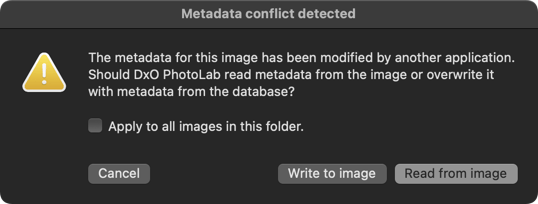
If you have not enabled metadata synchronization, you may find yourself with a metadata conflict, as indicated by a specific icon. However, you have the option to resolve the conflict:
- Click on the metadata conflict icon.
- A dialog box informs you that the metadata has been modified by a third-party application.
- If you choose Write to image, the information stored in the DxO PhotoLab database takes precedence and will overwrite the information in the XMP sidecar.
- If you choose Read from image, the information in the XMP sidecar file takes precedence and will overwrite the information in the DxO PhotoLab database.
- The checkbox lets you resolve the conflict for all images in the folder.
- The metadata is updated, the dialog closes and the metadata conflict icon disappears.