

About the Export feature
DxO PhotoLab features an export system that is fully integrated with the PhotoLibrary and Customize tabs, and which comprises three principal methods of exporting images:
- Export to disk: Exports your images to a hard drive.
- Export to application: Lets you open image files (including RAW files) in external applications.
- Export to Lightroom: transfer images into Adobe Lightroom Classic.
The PC version also offers export to a third party service of web galleries:
- Export to Flickr (requires an account and login to transfer images from DxO PhotoLab to Flickr).
The Mac version also offers specific export modes, related to utilities delivered with the macOS operating system (consult the relevant help):
- Mail (electronic mail)
- Messages (messaging service)
- AirDrop (transfer of images from one Mac to another Mac, iPad or iPhone, via a WiFi network)
- Notes (note taking)
- Add to Photos (photo manager)
- Reminders (notification system)
The ELITE edition of DxO PhotoLab lets you simultaneously export files in several formats to multiple folders, giving you an important edge in terms of productivity.
Interface
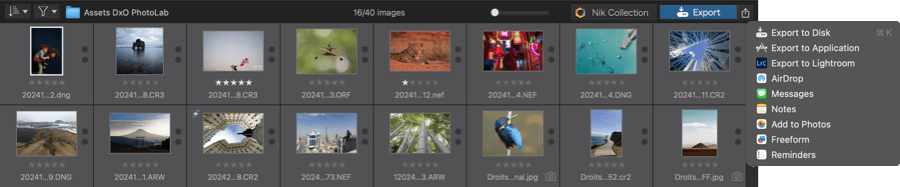
Export is available in the PhotoLibrary and Customize tabs, it is located on the Image Explorer toolbar and includes three options:
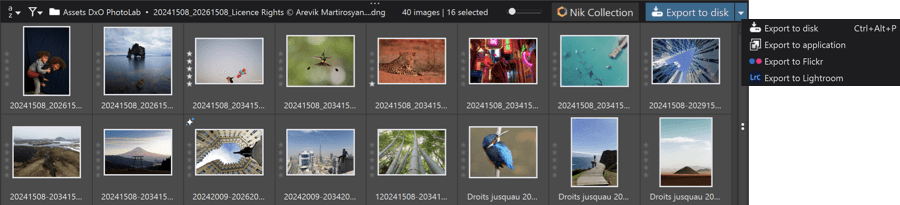
- Export to (pictogram): Selects the export mode: to disk, to application, to Flickr (PC) or to another shared plugin (Mac).
- Export to (blue button): Shows the chosen or most recently used export mode. Click to access it.
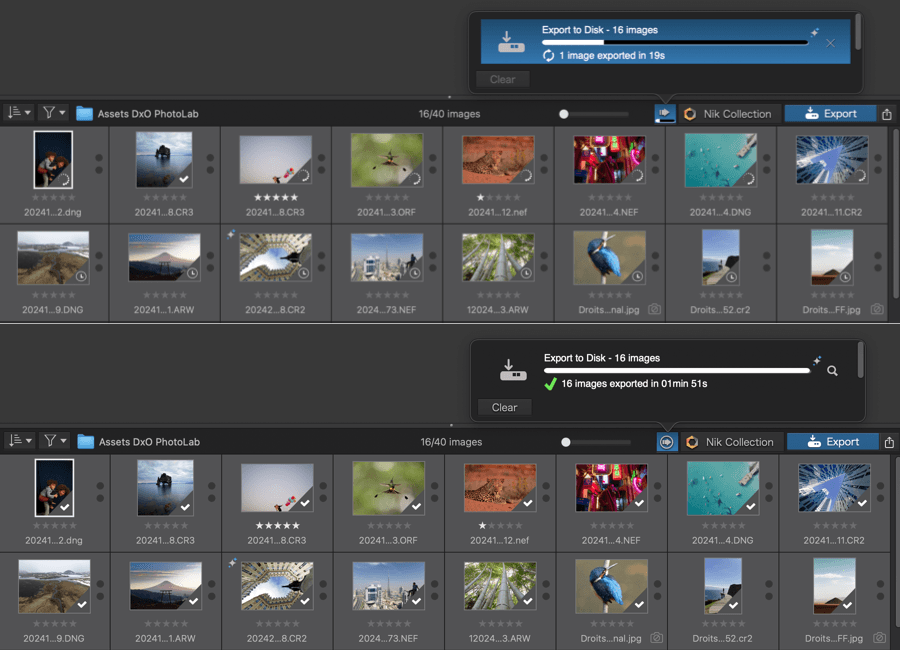
- An export progress button. When you click on this button, a floating palette displays indicating the progress of current tasks. A small progress bar also appears within the button itself during export.
To cancel an export, click on the progress button and then in the floating progress panel, click on the X next to the progress bar of the export that you want to cancel.
The floating progress palette displays a record of all of the exports performed during a session. You can delete the list of completed exports by clicking on the Erase button in the lower left corner of the palette.
There are two instances in which the export progress button is not visible: (1) after you launch DxO PhotoLab 3 and thus have not yet exported anything, and (2) after you have erased the contents of the progress palette.
A magnifying loupe for checking the exported image (Mac): When the image export is finished, a small magnifying glass appears on the right side of the progress bar in the progress palette. If you click on it, a Windows explorer (PC) or Finder (Mac) window opens for the folder location of the exported image.
Export to disk
Exporting images consists of creating image files to which are applied the corrections you made in the Customize tab, and then transferring the corrected images to the hard drive and the folder of your choice, or to an external application, or to a Flickr gallery. To do so, open the export options floating window by clicking on the Export to Disk button.
The purpose of the output options interface is to provide you with the settings you need that will automatically and simultaneously export images in different formats and to different destinations (ELITE Edition).
File formats and their constraints
Some image formats lose part of the file information to achieve a more compact size; these are referred to as lossy. Formats that keep all available information even while achieving a certain degree of compression are referred to as lossless.
JPEG is a lossy format, while TIFF and most RAW formats are considered lossless. DNG (Digital NeGative) is a format conceived by the Adobe software company to replace various RAW files with a universal standard. It’s important to recognize the distinctions between the variants of the DNG format — the “short” DNG, equivalent to proprietary RAW formats, and linear DNG, a demosaiced file that retains most of the possibilities and advantages of RAW files when processing them.
The following table shows the possible relationships between input and output formats:
| Input image format | Available export format |
| JPEG | JPEG, TIFF (8-bit) |
| TIFF | TIFF (8 or 16-bit, depending on the input image) |
| RAW | JPEG, TIFF (8 or 16-bit), linear DNG |
| DNG | JPEG, TIFF (8 or 16-bit), linear DNG |
| Linear DNG | JPEG, TIFF (8 or 16-bit), linear DNG |
Output formats and associated settings
JPEG:
The JPEG format is for files that are going to be printed in photo labs, displayed online, or sent by email.
A slider lets you to set the degree of compression, and thus quality loss. Of course, the higher the quality, the larger the output file.
Since JPEG is a lossy format, we advise choosing a higher quality setting (e.g., 90) and compensating if necessary by using a smaller image size. This is a better compromise than a larger image with a lower-quality setting.
TIFF:
TIFF is a format which guarantees a high quality non-destructive workflow, best used for corrections and retouches that do not require the original RAW data. When you choose TIFF format for an output image, you have to select the following:
- With or without compression: We advise the uncompressed option. The output files will be larger but you will be able to open them in all image processing software, unlike compressed TIFF files.
- 8 or 16-bit encoding: 8-bit encoding only allows 256 levels per color channel, compared to 65.536 in 16-bits. Of course, the choice is only made possible if the source image is 12-bit or 14-bit (RAW files), or 16-bit (TIFF files). We advise you to choose 16-bit encoding to maintain the highest possible quality workflow.
DNG:
While the linear DNG format also provides you with a high-quality workflow, it also lets you continue post-processing in compatible software, especially Adobe Lightroom Classic (or Adobe Camera Raw). To do this, you have the following options:
- Export to DNG (all corrections applied): The linear DNG generated on export includes all corrections made in DxO PhotoLab. This is the ideal choice if you use Adobe Lightroom Classic as a cataloger, while entrusting the entire processing of your RAW files to DxO PhotoLab.*
- Export to DNG (denoising & optical corrections only): The linear DNG created here includes only DxO noise reduction and lens flaw correction using a DxO Module. You can choose this option if you want to take advantage of the best of DxO technologies while processing and cataloguing your images in Adobe Lightroom Classic.*
* For more information, see the Adobe Lightroom Classic workflow page.
Export to disk options
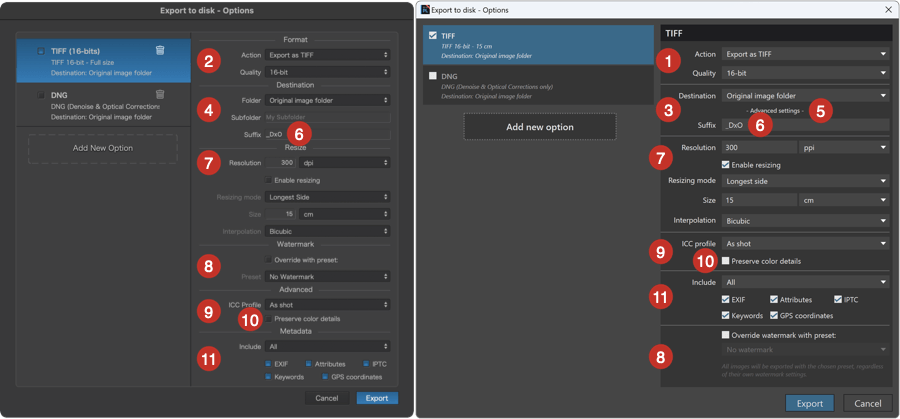
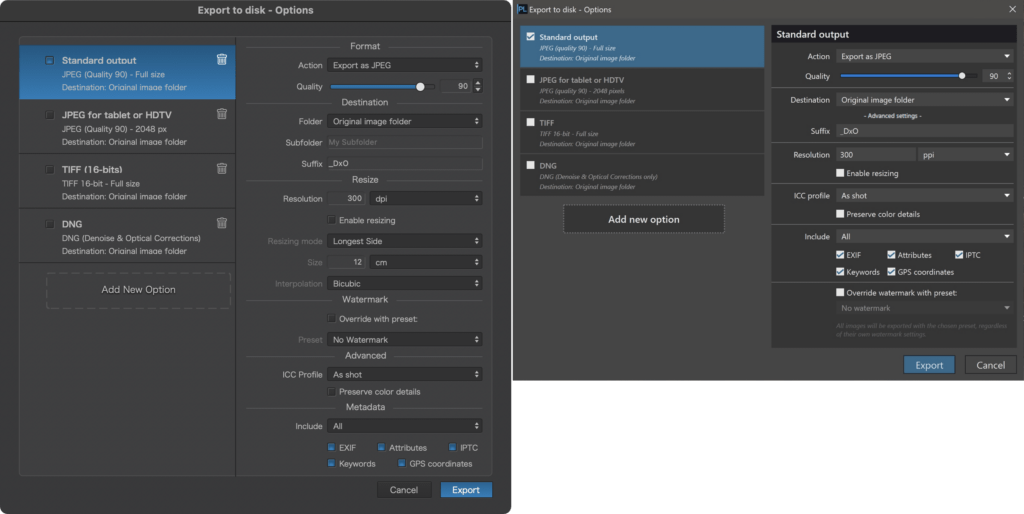
- PC: Right column displays the selected export option on the left, and offers the following options:
- Action: The menu lets you choose an export format, which reveals their associated tools:
- Export as JPEG: the Quality slider, set to 90 by default, lets you adjust the compression level of JPEG files (on a scale of 10 to 100). You can also enter the value in the window on the right, or scroll through the values by clicking on the small arrows.
- Export as TIFF : In the Quality menu you have the choice between 8-bit, 8-bit compressed, and 16-bit.
- Export as DNG (all corrections applied): Images are exported as linear DNG files, and include all the corrections made in DxO PhotoLab.
- Export as DNG (denoise & optical corrections only): Images are exported as linear DNG files and include just the corrections made via the DxO Modules and DxO Denoising Technologies subpalette, whether you have made other corrections or not. This export mode is especially suitable if you process your images in other software (such as in the workflow for Lightroom Classic).
- Action: The menu lets you choose an export format, which reveals their associated tools:
- Mac: The right-hand column displays the selected export option, and offers the following settings:
- Action: The menu lets you choose an export format, which reveals their associated tools:
- Export as JPEG: the Quality slider, set to 90 by default, lets you adjust the compression level of JPEG files (on a scale of 10 to 100). You can also enter the value in the window on the right, or scroll through the values by clicking on the small arrows.
- Export as TIFF: In the Quality menu you have the choice between 8-bit, 8-bit compressed, and 16-bit.
- Export as DNG (all corrections applied): Images are exported as linear DNG files, and include all the corrections made in DxO PhotoLab.
- Export as DNG (denoise & optical corrections only): Images are exported as linear DNG files and include just the corrections made via the DxO Modules and DxO Denoising Technologies subpalette, whether you have made other corrections or not. This export mode is especially suitable if you process your images in other software (such as in the workflow for Lightroom Classic).
- Action: The menu lets you choose an export format, which reveals their associated tools:
- Destination (PC): By default, the destination folder is the same as the original image (source image) folder. The options are shown in the Destination drop-down menu. If you select the Custom Folderoption a dialog box opens and an additional Path field appears. This lets you pick or create a folder on your hard drive. Note that the pathway can be either absolute (for example “C:Photos DxO PhotoLab output”) or relative (DxO PhotoLab output). In the first case, all the images will be saved in one single destination folder, even if the source images come from several different folders. In the second case, the images will be saved in a sub-folder within the source folder, which will allow you to keep the corrected images close to the originals. In this situation, there will be as many sub-folders created as there are source folders.
- Destination (Mac): By default, the destination folder is the same as the original image (source image) folder. The options are shown in the Folder drop-down menu. If you select the Custom Folderoption, a dialog box opens for you to choose, or create, a folder on your hard drive. The selected folder will be displayed in the Folder field. You can create a subdirectory (subfolder) inside the destination folder at any time; To do this, just enter the name in the Subdirectory field.
- Advanced Settings (PC): clicking on this text reveals or hides the options below.
- Suffix: The suffix input field is part of the Destination section. By default, DxO PhotoLab adds the “_DxO” suffix to each filename. You can change this as desired.
- Resolution: Sets the output resolution, either in ppi (points per inch), or in ppc (points per centimeter). The default value is 300 ppi. In this section, you can change the resolution, the physical dimensions and select an interpolation mode with the following options:
- Resolution : Set to 300 dpi by default, there is no need to use any other value until you specify the exact physical dimensions of the exported file for (for example) a print run, either for your printer or for a lab or printer (in the latter case, ask the lab what the resolution should be). The menu on the right side of the input field lets you select units between points per inch (ppi – recommended standard setting) or in points per centimeter (ppc).
- Enable resizing: Check this box if you want to change the physical dimensions of the exported file (actives the Resizing mode, Size and Interpolation fields).
- Resizing mode: a number of modes are available
- Rotate to fit: Defines the physical dimensions of the exported image, and makes the image fit, rotating it as required.
- Fit: Sets the physical dimensions of the exported image, and fits the image without changing its orientation.
- Shortest side/Longest side: sets the maximum size of the shortest or longest side of the exported image.
- Megapixels: Determines the resolution of the exported image in megapixels (conserving the original width/height ratio).
- Proportional: Adjusts the image size proportionally, according to a specified percentage.
- Size: Specifies the physical dimensions of the exported image, depending on the selection in the Resizing mode menu (values in pixels, cm, and inches according to the selection and destination).
- Interpolation: These are image resampling techniques used to define the output size and resolution as follows :
- Bicubic: the default interpolation mode is precise and offers softer tone transitions.
- Bicubic sharper: works like bicubic, but with heightened sharpness.
- Bilinear: Generates additional pixels based on adjacent pixels.
- The maximum dimension of the output image (height or width), expressed in pixels, centimeters, or inches. This dimension allows the program to automatically maintain the proportions of the image.
- Interpolation: Several options are available. Auto mode is a good choice, but many photographers prefer bicubic interpolation. DxO PhotoLab offers the sharper bicubic interpolation option that is suitable for web publication.
- Watermark: lets you add a watermark to the export, either by using one already applied to the image or by selecting a preset. The preset menu allows you to select a saved watermark, the default choice being No Watermark. The Replace watermark with preset checkbox, when checked, allows you to choose a watermark other than the one applied to the image in the Customize tab.
- Advanced / ICC profile (ELITE edition): the ICC profile for the output file (except DNG format) can be the profile of the source image, the profile of the soft proofing, the profile of a color space (sRGB, P3, Adobe RGB, Rec. 2020, ProPhoto RGB or DxO Wide Gamut), a custom profile, or an imported profile. The sRGB profile is suitable for web use, publishing and lab printing, P3 is use on many mobile devices and computer screens. Adobe RGB is designed for printing and other color spaces can be used for editing in other programs. In these cases, TIFF is the ideal output format.
- Preserve color detail checkbox: When this is checked, the colors in the output image will be desaturated a little bit so that all colors fit in the color range of the ICC Profile that you selected, but only if needed.
If your image doesn’t have saturated colors then this checkbox won’t change anything.
If you choose an ICC profile corresponding to a large color range (e.g., ProPhotoRGB or DxO Wide Gamut), this checkbox won’t change anything either.
This is particularly important when you export for instance to sRGB/DisplayP3/AdobeRGB, to make sure that you don’t lose details in the saturated parts of your image (but at the expense of a loss in color saturation).- Unchecked (default): no preservation of color detail.
- Checked box and softproofing profile: saturated color protection is applied, with the value applied to the color protection slider in the softproofing subpalette.
- Checked box and ICC profile: the ICC export profile is the same as the ICC profile selected in the Soft Proofing subpalette and color detail is preserved according to the intensity slider setting.
- Include (PC) / Metadata (Mac): This section lets you choose and control which information will be included in the metadata of the exported images:
- Include: the dropdown menu gives you the option to include All (unchecked options will be automatically checked), None, Copyright & contact info only, or Copyright only metadata with the export. If you select one of these options and check or uncheck any of the boxes, the menu will show Custom.
- Checkboxes: allow you to include or exclude the desired metadata in the choice made in the Include menu:
- EXIF attaches information about the camera and shooting settings.
- Attributes: attaches the sorting attributes (Pick, Reject) and the star rating.
- IPTC: attaches the information entered in the IPTC fields.
- Keywords: attaches the keywords.
- GPS coordinates: attaches the geographic coordinates (latitude, longitude, elevation).
Starting export to disk
Before starting the export, you must check the boxes in the Export to Disk – Options window to enable the desired output options (even if you just create a new output option, it will be disabled by default). You must enable at least one option, but you can also activate as many as you want. This is one of the key features of DxO PhotoLab ELITE Edition, which allows you to simultaneously export multiple different files from the same source image.
The export options let you create backup copies: all you have to do is do give the same name to an image but select a different place to store it on your disk or save it on a different server.
After viewing them in the Image Explorer, to start the processing and exporting of your images, click on the small arrow to the right of the blue export button and select Export to disk. If an exported image has the same name as another image already in the destination folder, a dialog box will prompt you to either overwrite the image already in the folder, or to rename the image being exported so as not to overwrite the other file.
While the export is underway, a gear icon is displayed in the lower right corner of the thumbnails in the Image Browser, while a tiny overall progress bar is displayed in the Export button itself. You can access a larger version of the progression bar by clicking on the Export button, which opens the Progress palette.
The processing time will vary according to the size and number of images you export.
When processing is complete:
- An icon confirming the success of the operation will appear in the lower right corner of the thumbnail.
- If an error occurs, an exclamation point will be displayed.
You can change the maximum number of simultaneously processed images by going to Edit > Preferences > Performance > Display and Process (PC) or DxO PhotoLab > Preferences > Advanced (Mac).
DxO PhotoLab uses all of your computer’s core processors to process one or several images. However, if you increase the number of images you want to process, make sure that you have enough RAM available so that you can take full advantage of your processors, rather than risking being slowed down because of the rate of data exchange between the RAM and the hard drive.
Creating a custom export option
To create a new export option (you can create as many options as you want):
- Click the Add New Option button in the floating Export Options window. By default, the new option will default to JPEG quality 90, full size and the original folder as the destination.
- Select the desired settings in the various sections of the window.
- PC: Name your custom export option. Click on the text icon next to the delete button, then, in the window that appears, enter an explicit name (e.g. JPEG 70 2048 for an image of this format, 70% quality and 2048 pixels wide) and validate by clicking on Rename.
- Mac: Name your custom export option. Click directly on the name Output Options and replace the text with an explicit name (for example JPEG 70 2048 for an image of this format, quality 70% and 2048 pixels wide) and validate with the Enter key.
To remove an export option:
- Click on the trash can (no need to select the option beforehand).
- In the dialog box that appears, click Yes (PC) or Delete (Mac
Export to application
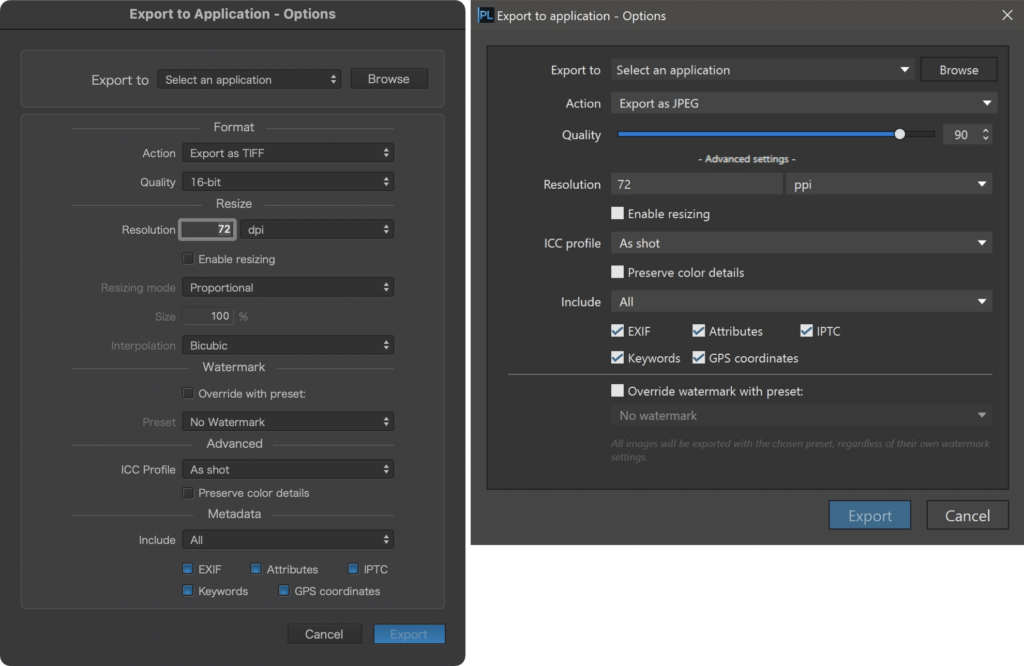
Export to application options
The Export to application options are the same as the Export to disk options, except for the following:
- There is no option (or export preset) to check on the left side of the options window.
- Export selected file(s) without processing: this option lets you export a file to another application, in the same format, without any DxO PhotoLab correction being applied, whether you have made corrections or not. For example, if you are dealing with a RAW file, a RAW copy of this file will be generated, if you are dealing with a JPEG, a JPEG will be generated, etc. The only other options available, in this particular situation, will be those in the Metadata section.
You can export your images to other applications to perform additional corrections.
- Select the images to export in the Image Browser.
- Open the drop-down menu arrow to the right of the Export to disk button and then select Export to application.
- A dialog box will open.
- When using for the first time, click Browse to select an external program in the operating system dialog box. The selected applications will be stored in the Export To list (you can clear the list in Export To > Clear History).
- In the Action menu, choose the file format (process in JPEG, TIFF, DNG*). You can also choose to export the image without applying any processing.**
- Depending on the file format, select your options (quality for JPEG, 8 or 16-bit for TIFF, ICC profile to attach, etc.). You can also apply a watermark.
- Click on Export: your file is processed and will open in the designated application.
* The two DNG-format options (with all corrections applied or only with denoising and optical corrections) are suited to a workflow with Adobe applications (Camera Raw, Lightroom).
** If you export a RAW file by choosing the Export without processing the selected file(s), the destination application will not import the renderings and corrections you have applied in DxO PhotoLab.
If you export a RAW file with this option, make sure that the destination program is compatible (for example, if you export to Photoshop in this way, the Camera Raw plugin will open).
Workflow with Nik Collection
The Nik Collection suite of plug-ins is directly accessible from DxO PhotoLab, thanks to the dedicated button next to the Export to button. The suite is composed of a number of image correction plug-ins and creative renderings:
- Nik Analog Efex, simulates the rendering of many types of negative film camera.
- Nik Color Efex, features many renderings and recipes for color photography.
- Nik Dfine, allows precise noise correction both globally and locally.
- Nik HDR Efex, for merging and processing dynamic range images.
- Nik Perspective, specialized geometric image correction.
- Nik Silver Efex, offers a rich palette of tools and rendering for black and white images.
- Nik Sharpener, split into Nik Presharpener and Nik Sharpener Output, supports all sharpening tasks, from the beginning of the workflow to the final output media.
- Nik Viveza, employs darkroom techniques to help correct tones and colors.
Used in conjunction with DxO PhotoLab, Nik Collection offers two types of workflows (please refer to the Nik Collection User Guide).
Workflow with Adobe Lightroom Classic
About the workflow with Lightroom Classic
DxO PhotoLab offers you an integrated workflow with Lightroom Classic (version 3.0 and later). It allows you to transfer RAW images from the Lightroom cataloger to DxO PhotoLab, process them and then return either a bitmap file (JPEG, TIFF), or a linear DNG file that includes all DxO processing or only optical corrections and DxO denoising. This last option allows you to process in Lightroom Classic, while taking advantage of the best of DxO technologies.
As far as RAW files are concerned, there can be no interaction or disturbance between processing in DxO PhotoLab and Lightroom Classic. Indeed, each one uses its own engine and its own means of saving corrections. Thus, the original RAW file will be dealt with indifferently by both programs; DxO PhotoLab will not see the corrections of Lightroom Classic, and vice-versa.
This workflow is based on two components:
- A plugin for Lightroom Classic that allows you to export your RAW images directly to DxO PhotoLab.
- An Export to Lightroom function in DxO PhotoLab, which allows you to export processed RAW images in various output formats.
The plugin is automatically installed by DxO PhotoLab in the appropriate directory of Lightroom Classic. In case the installation did not proceed correctly, or if you rejected the plugin installation or installed Lightroom Classic after DxO PhotoLab on your computer, you can start the plugin installation by clicking on Export to Lightroom in DxO PhotoLab.
Transferring an image from Lightroom Classic to DxO PhotoLab
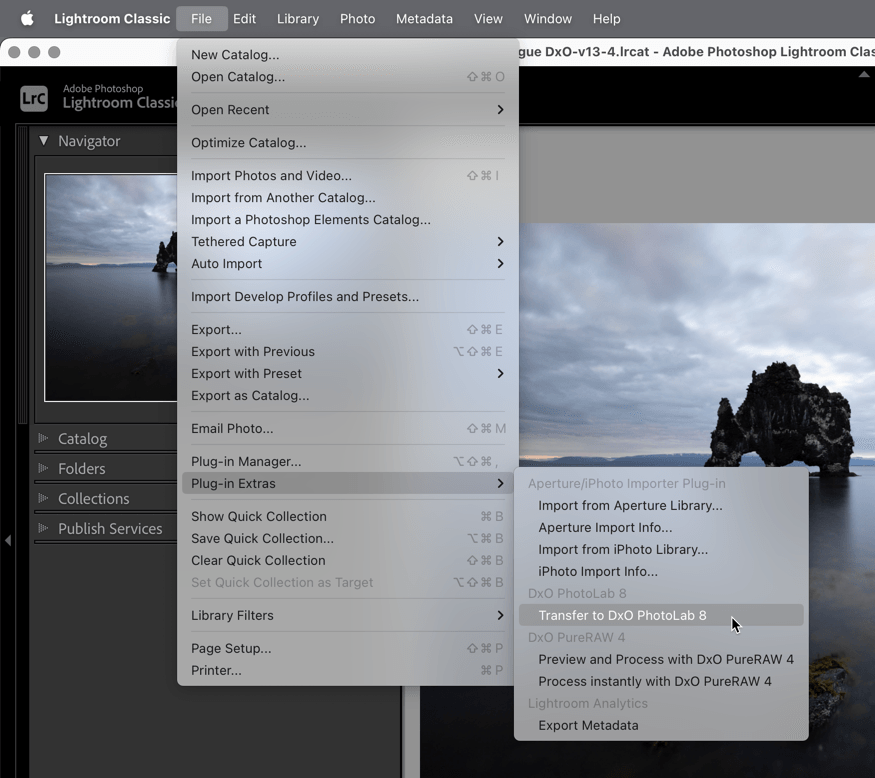
To transfer an image from Lightroom to DxO PhotoLab:
- After you have selected your worklist in Lightroom Classic, click on the images in the Filmstrip that you want to transfer.
- Go to File > Plugin – Extras > Transfer to DxO PhotoLab.
- DxO PhotoLab launches and automatically creates a project that contains the images you transferred*.
- Start processing your images.
* At the end of the transfer, DxO PhotoLab automatically displays the Customize tab, the created project, and the Export to Lightroom button.
Scenario 1: Exporting an image from DxO PhotoLab to Lightroom Classic in JPEG or TIFF format, or without corrections.
In this first scenario, you will export in a format for immediate use and without the aim of retouching or making additional corrections when you return to Lightroom Classic. For this, use the JPEG format (electronic publication or printing) or the TIFF format (printing):
- Once your images have been processed in DxO PhotoLab, select them in the image explorer.
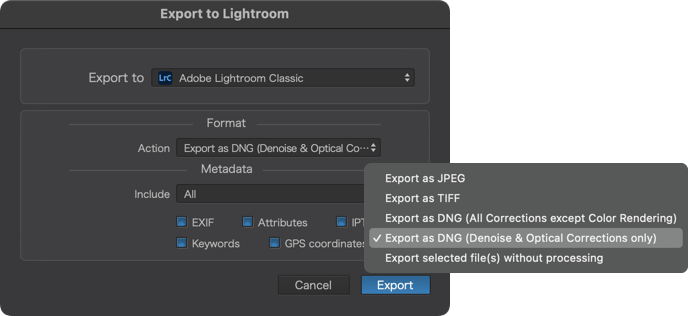
- Click on the Export to Lightroom button.
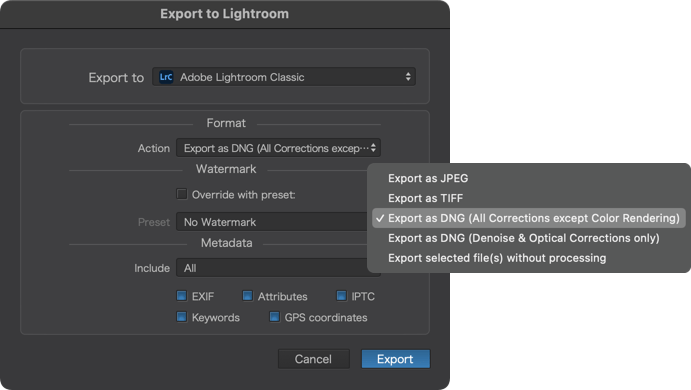
- A dialog box will open.
- From the Action menu, choose the file format: Export to JPEG or Export to TIFF.
- From the Quality menu, adjust the JPEG compression with the slider, or if TIFF, select the desired color depth (8-bit or 16-bit).
- You can apply a watermark at this point (except when exporting without corrections in Export mode).
- You can also choose in the Metadata section which metadata to include or not.
- From the Advanced Settings menu, choose the ICC profile to attach if necessary.
- Click on Export.


Scenario 2: Exporting an image from DxO PhotoLab to Lightroom Classic in linear DNG format with all DxO corrections
In this scenario, you will export linear DNG files entirely processed in DxO PhotoLab, instead of the Lightroom Classic development module, which in this case will be used to catalog, manage, and distribute your images:
- Once your images have been processed in DxO PhotoLab, select them in the image explorer.
- Click on the Export to Lightroom button.
- A dialog box will open.
- In the Action menu, choose the file format: Export to DNG (all corrections applied).
- You can apply a watermark at this point.
- You can also choose in the Metadata section which metadata to include or not.
- Click on Export.
Scenario 3: Exporting an image from DxO PhotoLab to Lightroom Classic in linear DNG format with only optical corrections and denoising
In this scenario, you export linear DNG files to which DxO PhotoLab will have applied only noise reduction and lens flaw corrections using a DxO Module. In this way, you will have files with the advantage of benefiting from the best of DxO technologies, while still allowing you to process your images in the Development module of Lightroom Classic, thanks to the characteristics of the linear DNG format (similar to RAW files, so they are already demosaiced).
- Once your images have been processed in DxO PhotoLab, select them in the image explorer.
- Click on the Export to Lightroom button.
- A dialog box will open.
- In the Action menu, choose the file format Export to DNG (noise and optical corrections only).
- Do not embed a watermark at this stage!
- Click on Export.
Returning images to Lightroom Classic
Returning images to Lightroom Classic does not require any action on your part:
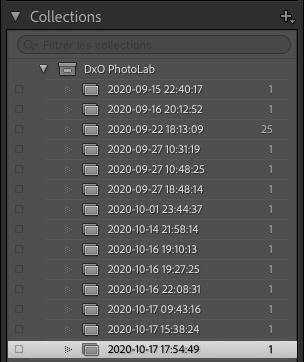
- A collection at the date and time of transfer (YYYYY-MM-DD HH-MIN-SEC) is automatically created within a DxO PhotoLab collection set, itself automatically created at the first use.
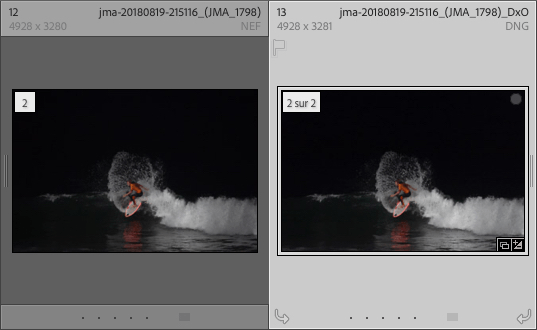
- DxO PhotoLab return images are automatically stacked with the originals (if the option is enabled in Preferences > External Edition) of Lightroom Classic.
- Images from DxO PhotoLab keep their original names with the suffix “_DxO” added.
Restarting processing in DxO PhotoLab
Of course, you can resume image processing in DxO PhotoLab by selecting the original raw file and resuming the entire transfer and processing process. In this case, DxO PhotoLab will identify the subject and the corrections it has applied to the reading of the data stored in its own database and/or its “.dop” sidecar files.
When you perform a new export to Lightroom Classic, a dialog box will propose to overwrite the previously exported file or to use a unique name; the latter option allows you to create an additional version of the image.
Exporting without processing
You can also export an original file without DxO PhotoLab processing to Lightroom Classic, with the option Export selected file(s) without processing:
- If the image is already present in the Lightroom Classic catalog, only a collection at the date and time of transfer (YYYYY-MM-DD HH-MIN-SEC) will be automatically created, but no duplicate will be created, nor will a “_DxO” suffix be added to the file name.
- If the image is not yet in the Lightroom Classic catalog, a collection with the date and time of transfer (YYYYY-MM-DD HH-MIN- SEC) will be automatically created, and the folder where the image is located (including if it is on the desktop) will be referenced in Lightroom Classic. The file will not be renamed with the suffix “_DxO.”