

General interface
The PhotoLibrary tab
PhotoLibrary tab Interface
At start up, DxO PhotoLab opens on the PhotoLibrary tab so you can select a source, folder, or project, then search for, sort, or select the images that you want to process, correct, and export.
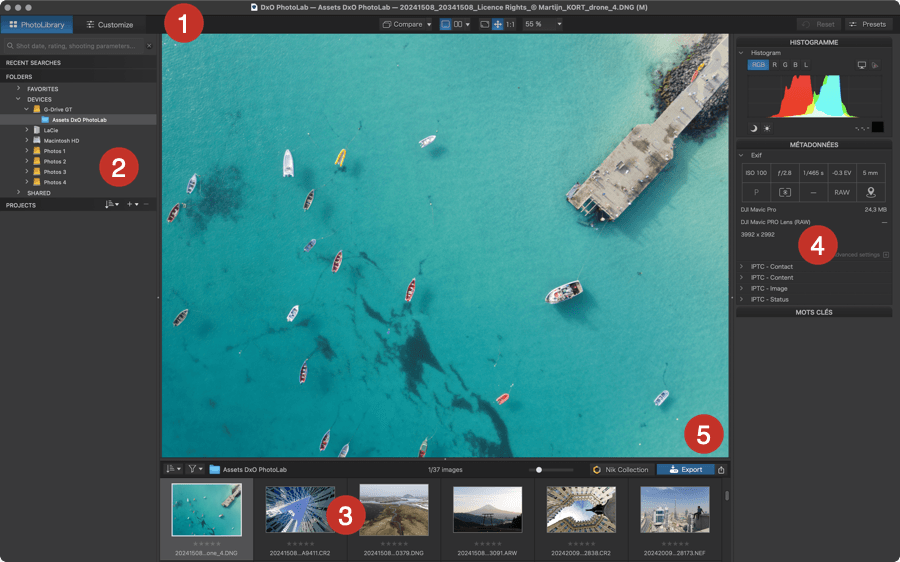
The PhotoLibrary tab is composed of five principal elements:
- The command bar lets you switch between the PhotoLibrary and Customize tabs, display your images, as well as apply presets.
- The Source Browser, lets you manage and explore the contents of folders and projects as well as perform searches based on strings such as date, star rating, and shooting parameters.
- The image browser displays the pictures within a selected folder or project as thumbnails. It can also be detached and moved to another screen.
- The right panel contains the Histogram, Metadata, and Keywords palettes.
- The viewer shows the selected image in the image browser. It also has a full screen mode, to make sorting and comparison easier.
You can adjust the sizes of all these panels. They are defined by two separator bars, one horizontal and one vertical, both indicated by three dots or an arrow on PC, or by a single dot on Mac. You can drag either bar to adjust the proportion that each part takes up on the screen.
The Customize tab
PhotoLibrary tab Interface
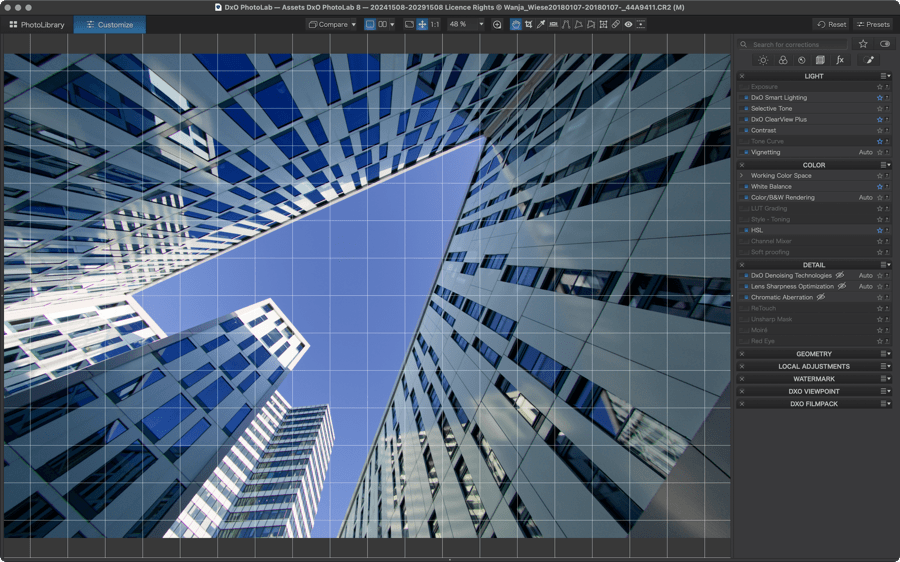
The Customize tab is the second key component of the DxO PhotoLab user interface. It facilitates all image corrections.
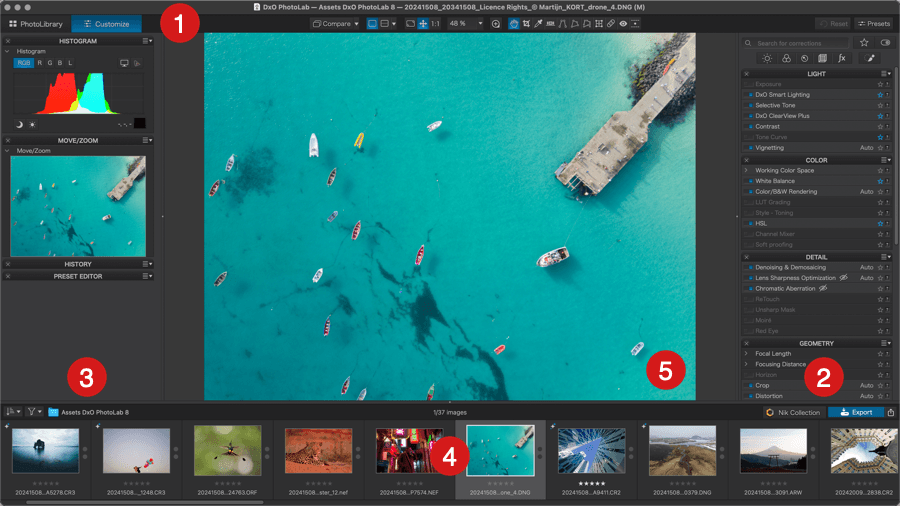
The Customize tab is divided into five parts:
- The command bar, similar to that for the PhotoLibrary tab, lets you control how your images will be displayed, and contains a number of other tools described below.
- The palettes on the right side contain all the correction tools. You can detach and move the palettes around as you wish.
- The left panel also contains a number of palettes, including: histogram, move/zoom, advanced history, and preset editor.
- The image browser, available in both tabs, displays the contents of a folder or project as thumbnails.
- The viewer displays one image at a time (which you select in the Image Browser). It lets you see the effects of the corrections you make with the various tools. You can also display both the original and the corrected images either one on top of the other, or side-by-side.
Workspaces
DxO PhotoLab offers you two workspaces, one shows the most essential tools that you will use regularly, to correct and process images, while the other displays every tool offered by the program. This approach, introduced in DxO PhotoLab 4 (October 2020), avoids the redundancy of certain tools being found in both their respective palettes as well as in the Essential Tools palette (which no longer exists).
If DxO FilmPack and/or DxO ViewPoint are installed on your computer, dedicated palettes will be visible in the Customize tab below the other palettes.
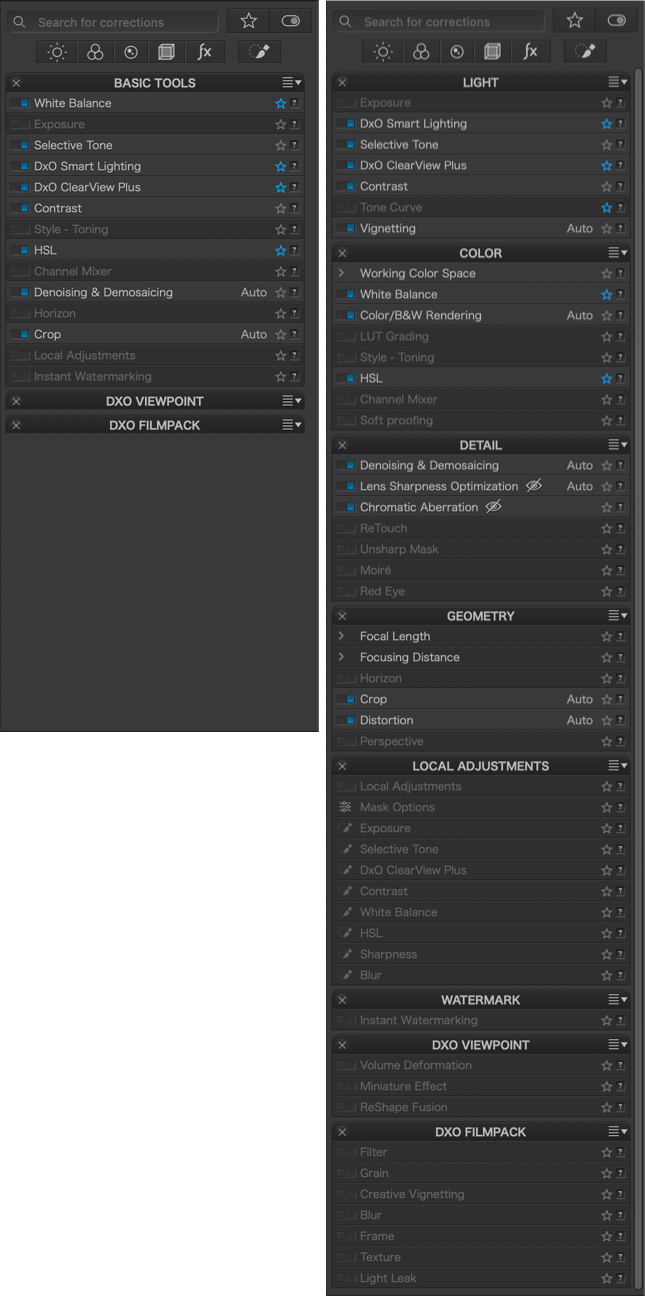
Standard DxO Workspace
The Standard DxO workspace consists of the following palettes:
Left:
- Histogram
- Move/Zoom
- Advanced History
- Presets
On the right:
- Basic tools: Gathers the essential tools you are likely to use systematically in image correction (tone, noise, white balance, contrast, etc.).
DxO Advanced workspace
The DxO Advanced workspace consists of the following palettes:
Left:
- Histogram
- Move/Zoom
- Advanced History
- Presets Editor
Right:
- Light: Includes tools for correcting tonality, contrast and vignetting
- Color: Includes color correction tools, such as white balance and saturation, as well as rendering tools
- Detail: Includes all tools related to rendering image details: noise, sharpness, dust.
- Geometry: Contains cropping and straightening tools as well as distortion correction
- Local Adjustments: manages localized corrections: Control Points, Control Lines, Graduated Filter, Brush, Luminosity Mask (DxO FilmPack installed), Auto Mask, Brush and Eraser. The palette also contains all the correction tools in their local version.
- Watermark: embedded Watermark editor.
Creating a custom workspace
You can create your own custom workspace(s) in DxO PhotoLab, in which you can add standard as well as custom palettes as desired. To create a workspace:
- Click on the X on the left in the title bar of the palettes that you do not want to use in your new workspace.
- If needed, follow the procedure in the preceding section for creating new palettes.
- To save your new workspace, open the Workspace menu and then select Save Workspace.
- Enter a name for your custom workspace in the Save Workspace floating window.
- Click Save.
Your custom workspace is available from the Workspaces menu (Mac: and under the View > Workspace menu).
To delete a custom workspace:
- PC: Select Delete Workspace from the Workspace menu. A dialog box will prompt you to confirm your decision.
- Mac: choose Delete Workspace from the View > Workspace menu. A dialog box will prompt you to confirm your decision.
– When you quit DxO PhotoLab, the last used workspace will be displayed upon relaunch.
– You cannot delete the DxO Standard or the DxO Advanced workspaces.
Managing palettes
The palettes
Palettes are containers that group together tools that have a common purpose. For example, the Essential Tools palette includes tools for correcting exposure, contrast, etc.
You can hide or display a palette either by clicking on its title bar (PC only) or on the arrow on the left side of the title bar (both platforms).
By default, correction palettes are anchored in the right-hand column, while the image analysis and presets palettes are anchored on the left. Any palette can be detached and placed anywhere on the screen. To detach a palette, simply drag it by its title bar to the desired location. To close a palette, click on the X in its title bar.
All of these operations can also be performed by using the drop-down menu found in the title bar of each palette. This menu lets you open and close the palette; anchor it in the left- or right-hand column; move it to wherever you want on your screen; and also change its order in the column where it is anchored.
It is also possible to anchor all the palettes in one single column to the left or the right of the image in order to provide more space to display the image.
To have even more space to work on your image, you can temporarily hide all of the palettes. On PC, go to the Palettes > Hide/Display all palettes menu, or press the F9 function key; on Mac, press the Tab key.
Advanced settings
Some tools have advanced settings, hidden by default. To show them, click the Advanced Settings label (PC) or click the + (or -) button in the lower right corner of the palette (Mac).
Local Help
The correction palettes also have a local help system, which is displayed when you click on the tiny question mark in the upper right corner. This local help is in the form of a text explaining the role and functions of the palette and the tools involved. To hide the local help, click on the question mark again.
Creating a custom palette (ELITE Edition)
To create your own custom palette, follow these steps:
PC
- Select Create User Palette from the Palettes menu.
- Enter a name in the My palette floating window.
- After you click on OK, your new palette will appear on the right, below the other palettes.
- At this point your new palette is empty, but you will see a message prompting you to drag and drop your favorite correction tools into it.
- As soon as you have finished populating the new palette with the tools you want to use for your corrections, you can close all of the other palettes.
Mac
- Select New Palette from the View > Palettes menu.
- Enter a name in the New palette floating window.
- After you click on OK, your new palette will appear as a floating window inside the program window.
- To add palettes and their associated tools, click on the icon on the far right of the title bar of your new palette and then select each tool you want to use from the list one at a time.
- Once finished, you can anchor the palette in the left or right column wherever you wish simply by dropping it into one of the two columns at the desired place (below the last palette or between two palettes.)
Filtering and searching for corrections
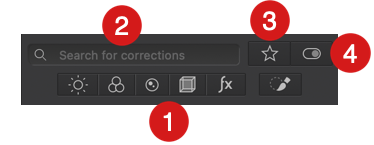
The Customize tab offers a wide range of tools presented as palettes, which are themselves divided into many sub-palettes. For dealing with and accessing so many tools, and to simplify your workflow, DxO PhotoLab offers a dynamic interface with DxO Smart Workspace, which helps you find the corrections and settings that have been previously applied to your photos. To do this, you can use the following resources:
- Six buttons to display tools by family (Light, Color, Detail, Geometry, Watermak & Effects and Local Adjustments)
- An input field for correction search
- A filter to display only sub-palettes marked as favorites
- A switch to display only active tools, represented by their respective blue switches
All of these filters work in custom workspaces, can be combined, and take into account the tools installed by DxO FilmPack and DxO ViewPoint.
Filtering and searching are automatically reset when you exit the program.
Buttons for settings families
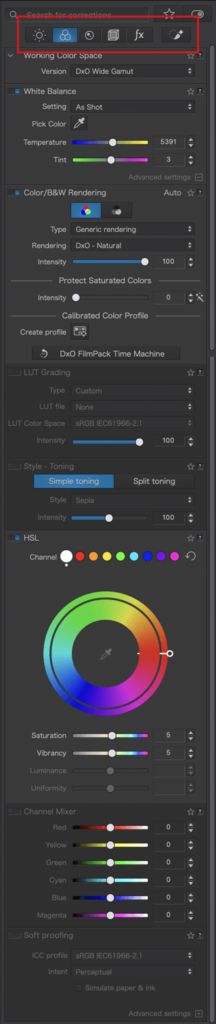
The settings families buttons let you display just the tools concerned, in the form of sub-palettes in the right panel. These families are, from left to right:
- Light: Displays the sub-palettes for brightness, contrast, micro-contrast and tone correction (DxO Smart Lighting, Tone Curve, etc.). If DxO FilmPack is installed, you will also see some of its tools.
- Color: Filters the sub-palettes for color correction and processing (white balance, HSL, etc.).
- Detail: Displays the sub-palettes for more technical corrections, such as noise reduction and sharpness, but also more specialized tools such as ReTouch, Red-Eye, etc. If DxO FilmPack is installed, the creative tools for grain, texture, and blur will also appear here.
- Geometry: Filters the Crop, Horizon, Distortion sub-palettes, but also such less-common tools as Focal Length, Focus Distance, etc. If installed, the DxO ViewPoint tools (Perspective, Miniature Effect, etc.) also appear here.
- Watermark & Effects: Displays creativity tools such as Watermark, or the DxO FilmPack and DxO ViewPoint tools if either or both programs are installed.
- Local Adjustments: Displays the Local Adjustments palette and all associated tools.
Corrections search field (ELITE edition)
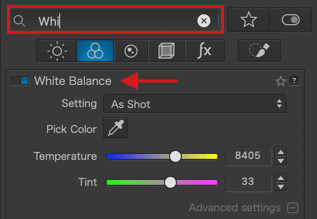
The corrections search field lets you find your work from the moment you enter the first few letters. For example, if you enter c, the filter will offer you Tone Curve, White Balance, Noise Reduction, etc. Then by typing cur, the search will narrow it down to Tone Curve, and so on.
The search filters palettes, sub-palettes, sliders, and tools, but not the contents of the drop-down lists. The input field is not case sensitive, so you can enter upper and/or lower case letters.
When you are finished with the search, remember to reset the input field with the X button.
Favorite sub-palettes and tools (ELITE edition)
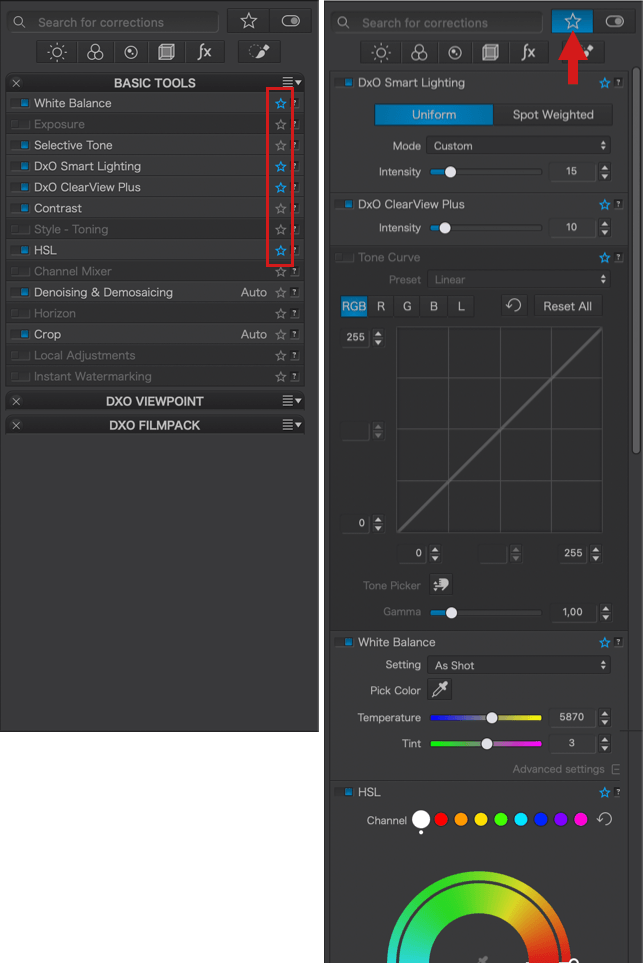
In each tool palette, you can mark the sub-palettes and their respective tools as favorites by clicking on the star in the upper right corner, opposite the sub-palette name. To display only the favorite sub-palettes and tools, click the Favorites button to the right of the search field. To return to normal view, click the button again.
Display switch for active tools (ELITE edition)
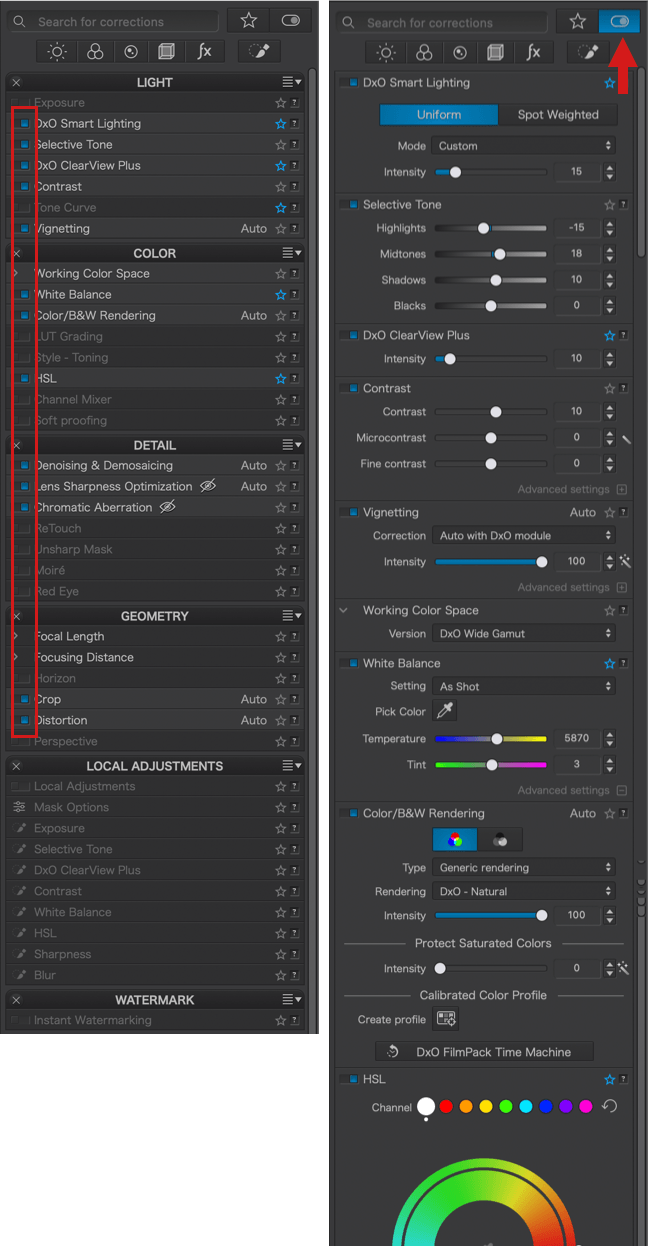
In the palettes, all active tools — that is, those whose corrections are applied to the image — are indicated by relevant sub-palette switches: active is blue. If you click on the button at the very top right of the right-hand pane of the Customize tab, only the active tools will be displayed, allowing you to easily browse through the tools and settings you’ve been using. To return to normal view, click the button again.
Copying and pasting corrections
A good way to ensure increased productivity, especially when working on many images, is to copy corrections from one image, which will be the “source,” to another image or even to a selection of several “destination” images. DxO PhotoLab offers numerous copy/paste modes that allow you to work not only faster, but also more accurately. The options available to you are described below.

Image selection
To copy/paste corrections from one image to another:
- In the image browser, right-click on the source image to select it and to display the context menu.*
- From the context menu, select Copy Correction Settings.
- Then, still in the image browser, right-click on the destination image and choose one of the available “Paste” modes.
To copy/paste corrections from a source image to a selection of destination images:
- In the image browser, right-click on the source image to select it and to display the context menu.*
- From the context menu, select Copy Correction Settings.
- In the Image Browser, select the destination images (click on the first destination image, then Shift+click on the last to select a continuous series, or Ctrl/Cmd+click for a specific selection), then right-click and select the paste correction settings to apply the corrections.
* You can also go through the Image menu both in the PhotoLibrary and Customize tabs. In this case, click on the thumbnail of the source image to preselect it.
IMPORTANT: If the destination images already have corrections and settings, these will be overwritten when you copy/paste.
Pasting modes
Once you have copied the corrections from the source image, you have the following paste modes available in the context menu:
- Paste Correction Settings: All corrections applied to the source image, both global and local, are applied to the destination image(s).
- Paste the selected corrections… : For more details on this mode, see the Selective pasting paragraph below.
- Paste Local Adjustments: Pastes only the corrections made with the Local Adjustment tools (Brush, Control Points, Graduated Filter, Auto Mask, Eraser), even if the source image has global corrections.
- Paste Global Settings: Pastes only global corrections, even if the source image has local corrections.
Selective pasting
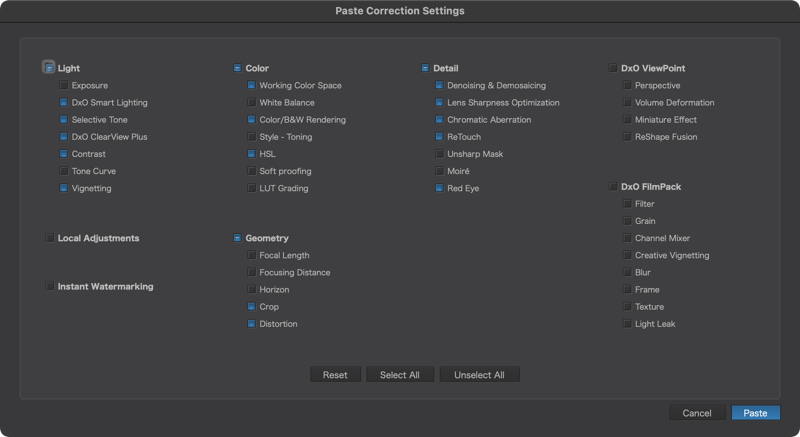
When you select the Paste Selected Corrections mode, a dialog box invites you to select the exact corrections and settings you wish to apply. The corrections to apply when opening the image in DxO PhotoLab are preselected (you can disable them if you wish, by clicking the active checkboxes). To add other corrections, click their respective checkboxes, then apply the corrections by clicking Paste.
The corrections are arranged in categories that correspond to the palettes in the Customize tab, along with local settings and a watermark option. If you do not select all the corrections in a category, the category box will be indicated as active (blue), but with a “-” (minus) sign.
The dialog box displays the following buttons:
- Reset: Resets the selection of active corrections to those automatically applied when the image is opened in DxO PhotoLab.
- Select All: Selects all of the proposed corrections.
- Deselect All: Deactivates all the corrections proposed by the dialog box, including those automatically applied when the image is opened in DxO PhotoLab.
- Cancel: Cancels the pasting of corrections and closes the dialog box.
Viewing your photos
The command bar
The command bar contains buttons and menus that let you move between the DxO PhotoLab tabs, determine the way in which your image will be displayed in the Viewer, and choose the level of zoom.

- The tabs let you switch from the PhotoLibrary to the Customize tab, and vice versa.
- Display modes.
- Reset: remove all manual corrections and returns the image to the default preset and assiociated corrections.
- Presets/Apply presets: Apply preset button brings up a palette of available presets to apply to your images.
Display Modes
DxO PhotoLab offers several display modes to perform your corrections, compare before/after, zoom, and even compare with a reference image. These display modes are available in both the PhotoLibrary and the Customize tabs.
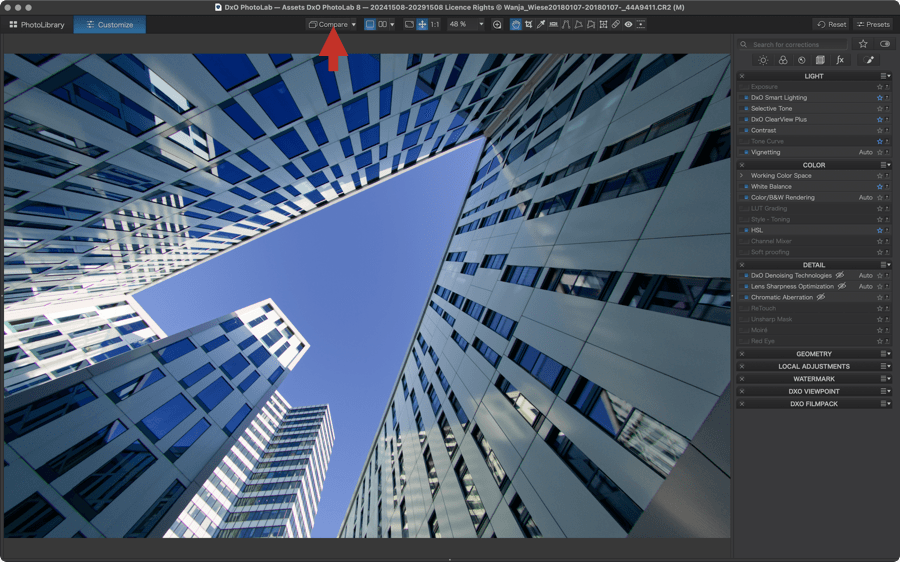
Compare Mode
The Compare button alone offers several display modes:
- Toggle before/after image:
- Toggle the image before and after correction: click the button for a temporary preview of the image before correction, release to return to its current state.
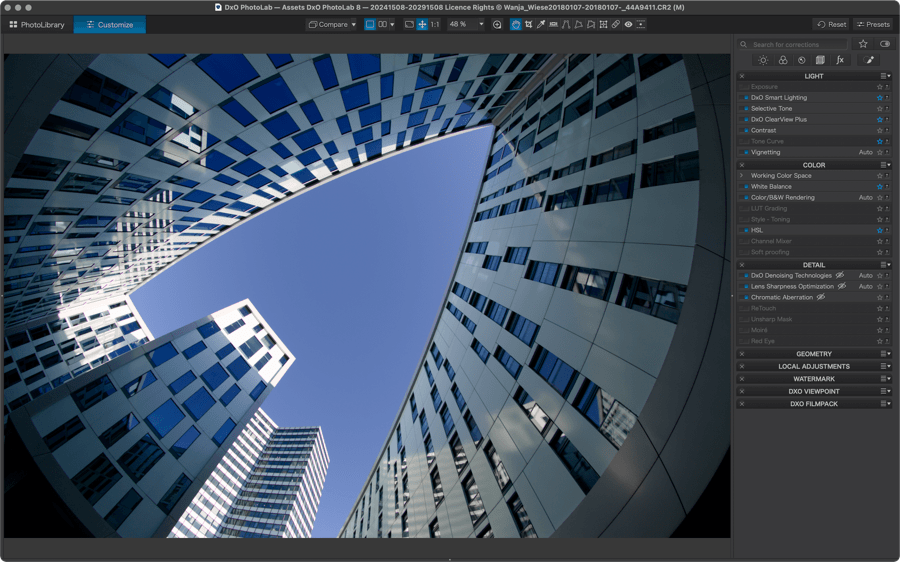
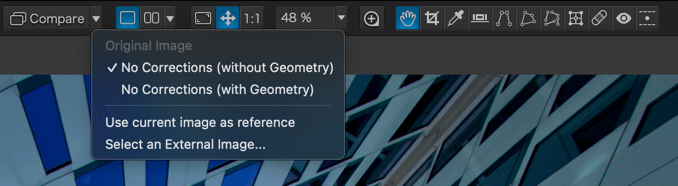
- In the context menu that appears when you click the arrow to the right, you can choose between the original image with geometric corrections (default setting) and without geometric corrections. This allows you to take into account or not corrections such as distortion, which can sometimes radically change the appearance of the image.
- This also applies if local adjustments are active. You can compare with or without the local adjustments.
- Reference image:
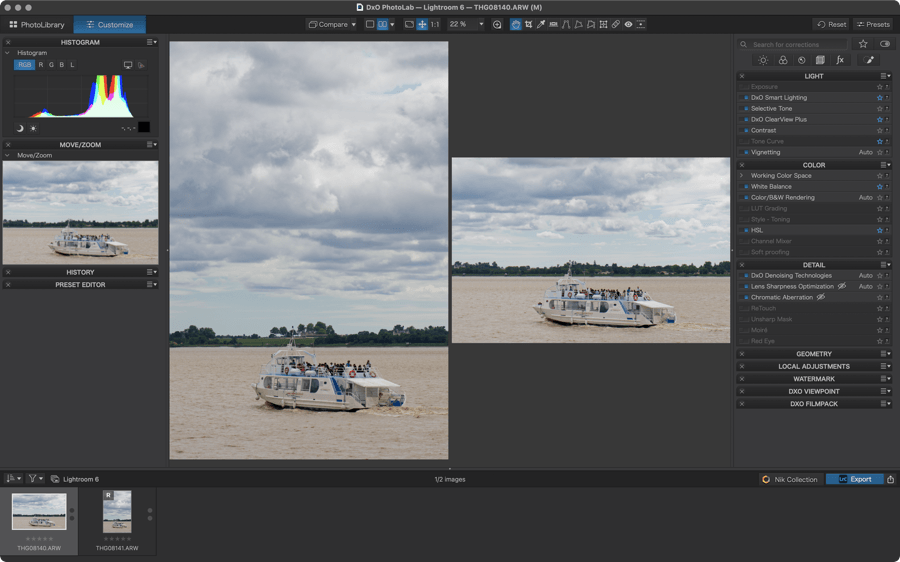
- The reference image allows you to display two distinct images in the viewer, to correct one image and make its rendering as close as possible to the reference:
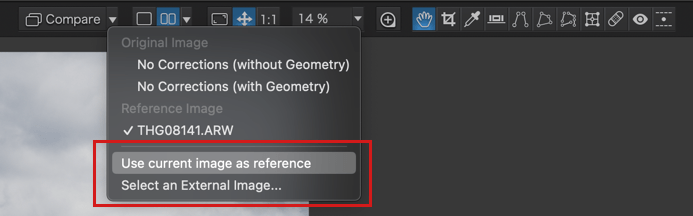
- In the context menu, select Use current image as reference, then select a second image in the image browser.
- You can also set a reference image by right-clicking on a thumbnail in the image browser and choosing, from the context menu, Use image as reference.
- The reference image always appears on the left.
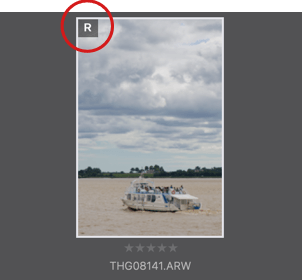
- The reference image is identified by the “R” icon, visible at the top left of the thumbnail image.
- You can change the right-hand image at will, simply by clicking on a thumbnail in the image browser, or by scrolling through them using the left or right arrow keys on your keyboard.
- You can zoom in or out, and navigate in the right-hand image, independently of the reference image on the left, and vice versa.
- However, the Fit and 1:1 mode buttons, as well as the predefined zoom values in the dropdown menu, affect both images in the same way. Navigation within the images is not synchronized.
- To exit the comparison mode with the reference image, return to the Compare button menu and select one of the modes without correction.
- You can also choose a reference image outside of DxO PhotoLab. To do this, still in the Compare button menu, go to Select an external image. A system dialog box appears, allowing you to choose the image and confirm by clicking OK.
- Using an external reference image is subject to the following restrictions:
- If the image is not known to DxO PhotoLab (neither in the database nor in an accompanying file), only the No corrections option is available. It will be displayed without any corrections or the application of the default preset.
- If the image is known to DxO PhotoLab, it will be displayed with its corrections (in M – Master – version if there are virtual copies).
- If the image has an accompanying file, it is imported into the database.
- If the image is not known to DxO PhotoLab and does not have an accompanying file, it will not be imported.
- If an external image is known to DxO PhotoLab, the rotation applied in DxO PhotoLab is used.
- Unsupported image formats are indicated by an error after opening the dialog box.
- When multiple versions are displayed (No corrections, M, 1, 2, etc.), No corrections is selected by default for RGB images and Master.
- The reference image allows you to display two distinct images in the viewer, to correct one image and make its rendering as close as possible to the reference:
Single View Mode
When you are in Compare mode, in side-by-side display mode, or in split display mode, clicking this button allows you to return to the normal display, i.e., a single image occupying the entire viewer area.

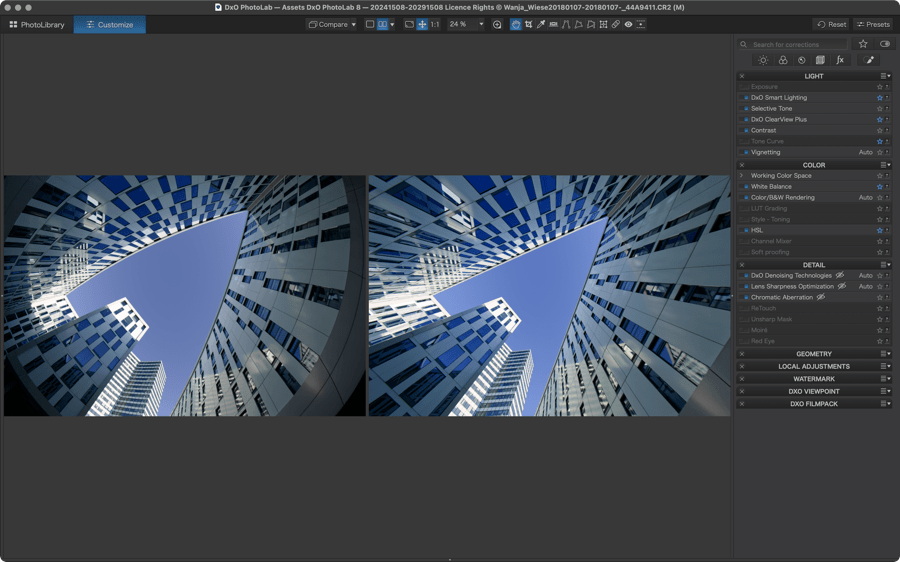
Side-by-Side and Split Display Modes
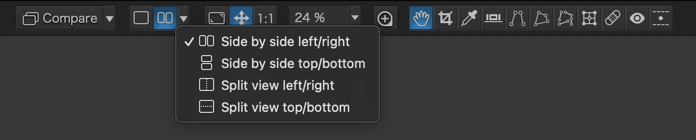
Click the arrow next to the button and select one of the four display modes:
- Side-by-side (left/right) or (top/bottom).
- The left view is the original, the right view is the image after corrections.
- Through the Compare button menu, you can select the display mode with or without geometric corrections.
- You can zoom in or out, but asynchronously.
- After zooming in, you can navigate, also asynchronously.
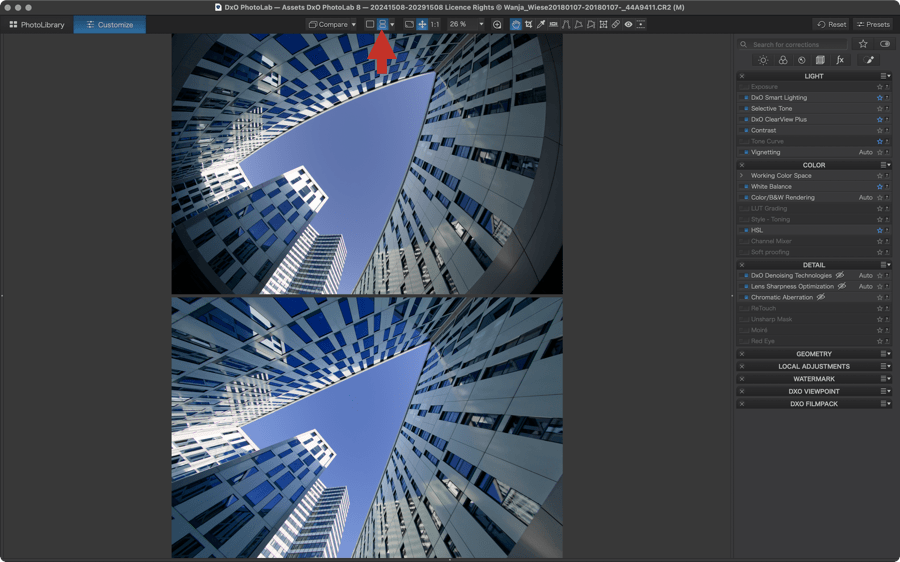
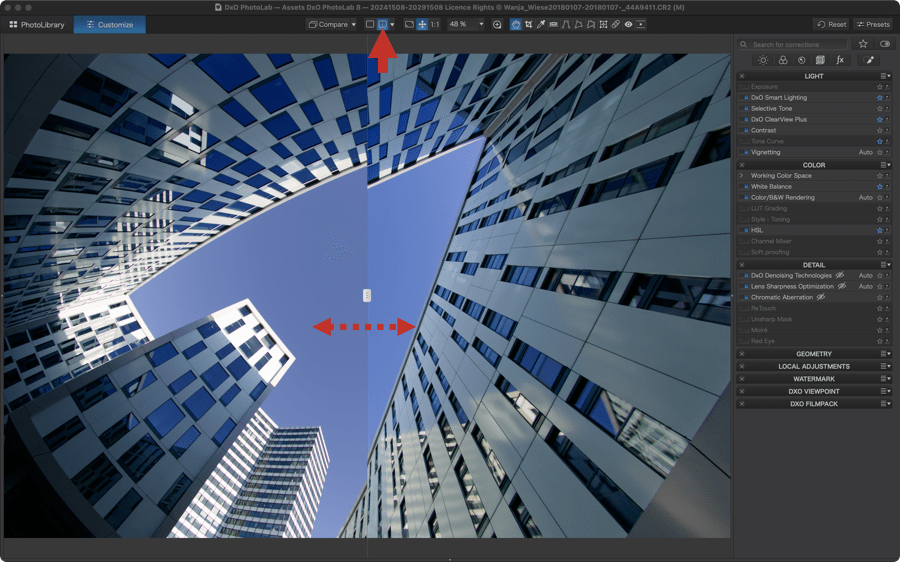
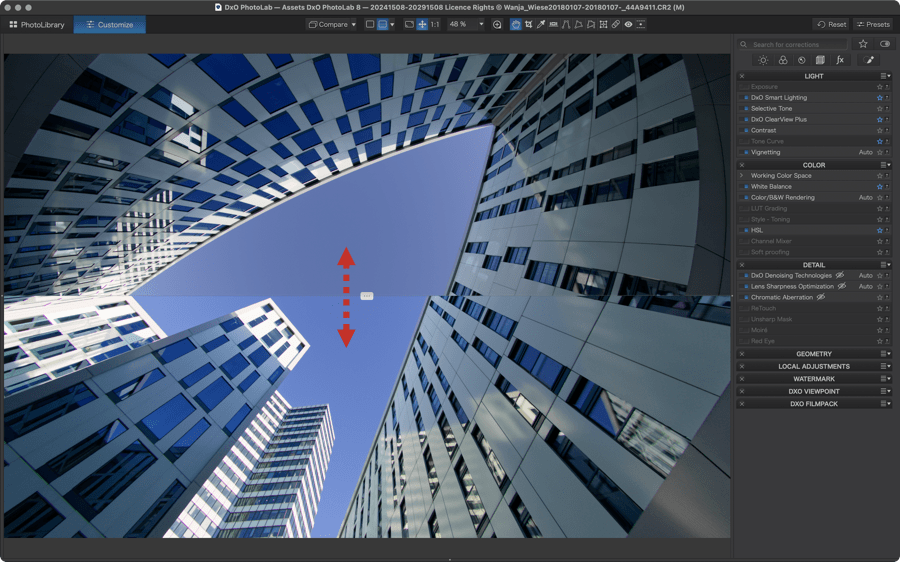
- Split view (left/right) or (top/bottom).
- The vertical or horizontal line can be moved across the entire width or height of the image, with the left or top half being the original, and the other half being the image after corrections.
- Through the Compare button menu, you can select the display mode with or without geometric corrections.
- Of course, in split view, the zoom and navigation are always synchronized.
Fullscreen Mode

Fullscreen mode allows you to display the image across the full height of your screen, with side bands due to the difference in aspect ratio between photo formats and screen formats. To exit fullscreen mode, press the Esc key (Mac) or Esc (PC) on your keyboard.
For a detailed description of the fullscreen mode intended for image sorting, please refer to the page Sorting and selecting the best images in full screen mode of this user guide.
Fit Mode
After zooming in on your image, clicking this button will display it again in Fit mode, which means displaying the entire image in the available space of the viewer.
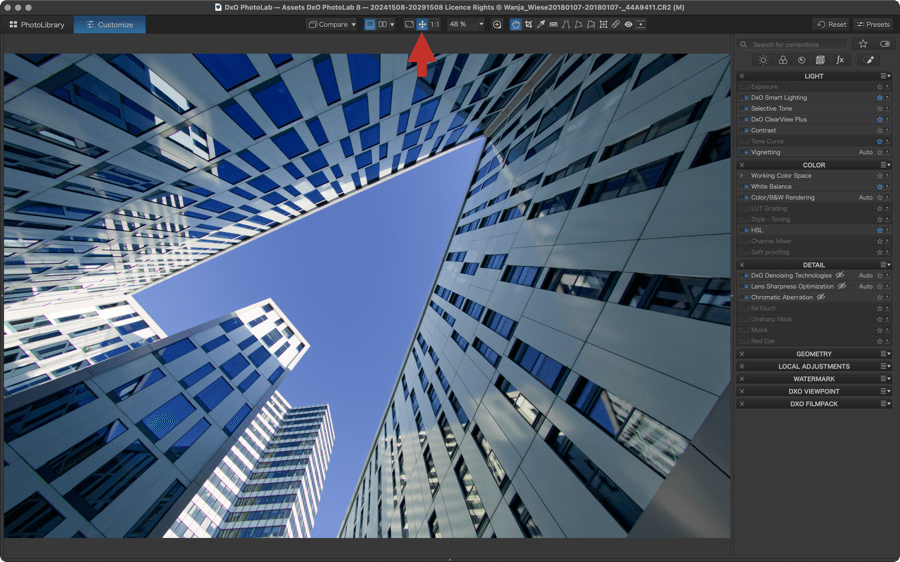
1:1 Mode
This button allows you to instantly display your image at 100% or 1:1. In this case, the magnification factor is determined by 1 pixel of the image = 1 pixel of the screen.
100% magnification is considered the most suitable for inspecting the image, especially for noise reduction, sharpening, or correcting chromatic aberration.

Zoom Menu
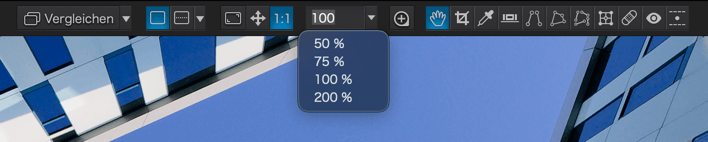
This menu has several roles:
- It displays the current zoom value (from 6 to 1,600%).
- You can select predefined zoom values (50, 75, 100, 200%) among the most commonly used in image processing.
- You also have the option to enter a zoom value, within the limit of 6 to 1,600%. Enter the desired value, then confirm with the Enter key.
Regardless of the display mode used, you can zoom in and out of the image with the mouse wheel.
Loupe
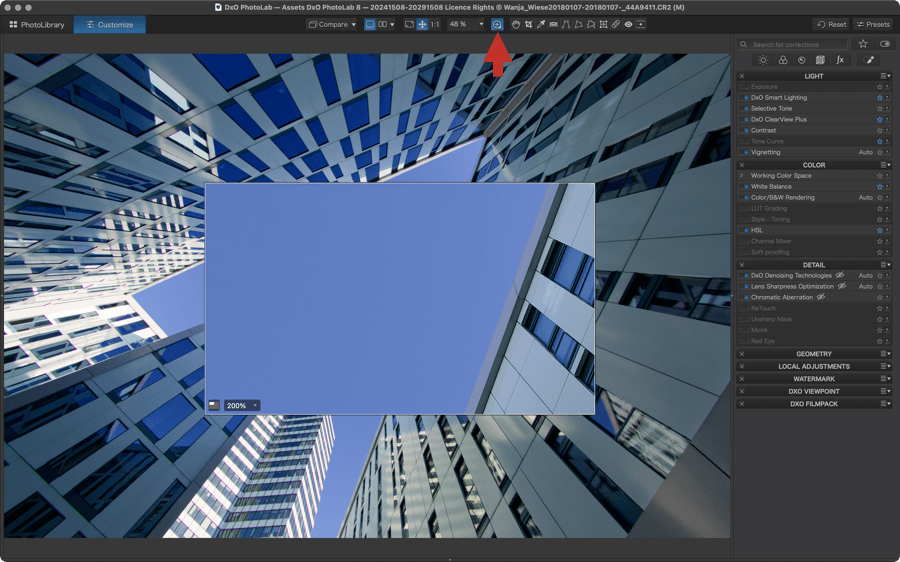
The loupe allows you to magnify portions of the image simply by hovering over it with the mouse. Usable only in the Customize tab, it allows you to examine your image and all the corrections you make. It is an ideal tool for checking noise reduction, sharpening, chromatic aberration correction, and more. To activate the loupe:
- In the top toolbar, click the Loupe button.
- The loupe appears as a floating rectangular window that displays whatever you hover over, by grabbing it and moving it with the mouse.
- In the loupe, at the bottom left, a button allows you to switch between two sizes:
- 752px x 448px.
- 376px x 224px.
- Also at the bottom left, a menu allows you to change the zoom value:
- 100%
- 200%
- 400%
- 800%
- 1,600%
- You can combine the loupe with the viewer zoom, to display, for example, the image at a different magnification.
- The loupe is usable in Compare mode, but not in side-by-side and split display modes.
- To close the loupe, click the button in the top toolbar or press the Esc key.
Grid
In the Customize tab (the PhotoLibrary tab on Mac) DxO PhotoLab lets you lay a grid over your image for use with any tool (except cropping which has its own grid). It can be used as a guide to help you correct perspective, distortion, etc.
To enable it, go to View > Show/Hide Grid, or use the Cmd + G (Mac) or Ctrl + G(PC).
You can also configure the grid:
- Mac: Preferences > View tab to change the size and color, or use inverted colors.
- PC: Preferences > View > Customize tab.
Image information
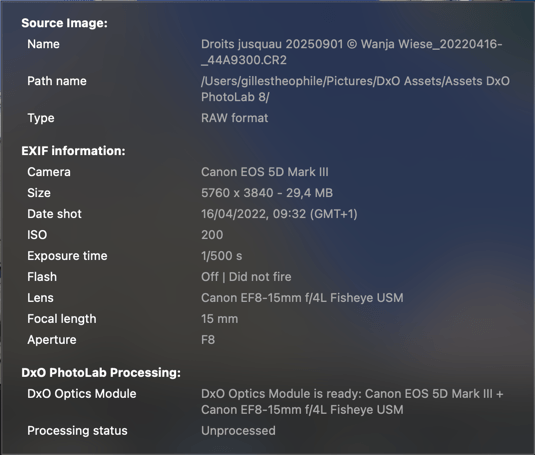
If you hover the mouse pointer over a thumbnail for a few seconds, both in the PhotoLibrary tab and the Customize tab, a text window will appear that shows preliminary image information. This information includes (from top to bottom):
- Source image: file name and extension, path on the computer and type (RAW format, JPEG, etc.).
- EXIF information: Camera (make and model), dimensions (width x height of the image in pixels, size in Mb), shot date (date and time), ISO (sensitivity), exposure time (shutter speed), flash (used or not), lens (focal length and max aperture), focal length (focal length used in mm), and aperture (aperture value).
To close the window, move the mouse pointer away from the thumbnail.
Live Review (PC)
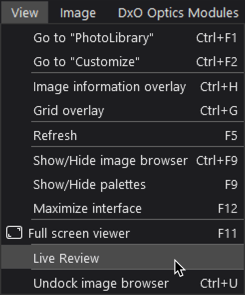
The Live Review function automatically displays any new images added to the current folder from outside DxO PhotoLab (the selected folder in the Source Browser, with content showing in the Image Browser.) For example, if you drop new images into the folder in question using Windows Explorer (PC), they will automatically appear in the DxO PhotoLab Image Browser.
To activate Live Review, go to the View menu (PhotoLibrary or Customize tab) and click Live Review. A check mark indicates that the function is active; to disable it, click Live Review again.
Preview of corrections on mouse hover
In the Customize tab, you have the option to get a real-time preview of certain corrections or renderings when you hover the contents of dropdown menus with the mouse. As soon as you exit one of these menus, the image instantly returns to its current appearance.
The corrections and/or renderings that allow real-time display are:
- Light Palette:
- Exposure > Correction.
- Smart Lighting > Mode.
- Vignetting > Correction.
- Color Palette:
- White Balance > Setting.
- Color/B&W Rendering > all menus associated with the selected Type (Generic Rendering, Camera Bodies, Color Positive Film, etc.).
- Color/B&W Rendering > Calibrated Color Profiles.
- LUT Grading > all menus associated with the selected Type (Standard, Premium, Custom).
- Style – Toning > Style (Simple Toning and Split Toning).
- Soft Proofing > ICC Profile.
- Watermark:
- Instant Watermarking > Preset selection.
- Font and font style menus.
- Blend modes (Mode menu).
- DxO FilmPack (if installed):
- Filter > Filter.
- Grain > Film (by category).
- Frame > Frame.
- Texture > Texture.
- Light Leak > Leak.