

Introducing DxO PhotoLab 8
We have tested your camera and lenses
Of course, we should start by introducing our company. DxO is a high-technology firm that specializes in digital image processing. Our engineers have published papers in some of the world’s most respected journals. This scientific, or more accurately — mathematical, background has enabled us to develop DxO PhotoLab as a tool aimed at not just at improving image quality, but at achieving perfection, or rather automatic perfection to be precise.
What makes DxO PhotoLab so special is that we test all of the equipment that you use in our laboratories. Each camera and lens spends several days in the hands of our technicians, who measure not only optical defects such as distortion, vignetting, and lens softness, but also the noise, colorimetry, and tone curves for each piece of equipment. They even analyze any in-camera processing that is applied to images.
The results are gathered together in a unique world-first database. It is this database that gives DxO PhotoLab the information it needs about the camera and lens used to shoot a given image, along with the aperture, focal length, exposure time, etc., to be able to calculate all necessary corrections — that this pixel needs to be brightened by x%; that that pixel needs to be moved by a particular distance in a particular direction; that yet another pixel needs its red channel adjusted, and so on. But all of these corrections require no effort on your part: the software downloads the profiles of your camera and lens all by itself, and then applies the necessary changes automatically.
Our software analyzes each of your images individually
Each photograph is unique — even photographs of the same subject under similar shooting conditions will differ from one another. One may contain a slightly overexposed area. The other might be too grainy because of noise in a dark shadow. A third photo might lack a bit of contrast. How do you deal with such variance?
For most photo software developers, the answer is simple: they will provide you with a number of correction tools and then leave you to fix each of your photos one at a time. That is not our approach. We think DxO PhotoLab, and not you, should analyze each image to determine whether corrections are necessary and apply them. This leaves you to judge the resulting output and then adjust any of the applied corrections according to your own tastes if you wish.
What DxO PhotoLab does to your images
- If your original photo is in RAW format, DxO PhotoLab deals with it using the latest and best RAW converter. During the “demosaicing” process (which converts raw data from the sensor into red, green, and blue pixels), this converter produces an image that is free of artifacts.
- Without any user intervention required, DxO PhotoLab corrects four optical defects: distortion, vignetting, lateral and longitudinal chromatic aberrations, and lens softness. It does this thanks to a unique database containing years of information on the optical defects of photographic equipment (lenses and cameras) tested in our laboratories.
- DxO PhotoLab subtly retains highlights, while preventing clipping, and even recovers certain details from areas that have already been clipped. We advise you to work in RAW to take advantage of the greater latitude in processing.
- Thanks to our laboratory measurements, DxO PhotoLab includes unrivaled denoising tools.
- DxO PhotoLab offers an exclusive correction to selectively improve contrast and brightness in the shadows. This correction’s effect is similar to fill-in flash, radically transforming underexposed, backlit, or extremely high contrast images.
- DxO PhotoLab a unique tool for modifying the color rendering of an image to make it look as though you took the shot with a different camera, or were using negative film.
- Essentially, the software automatically performs nearly all of the corrections mentioned above, leaving you to just fine-tune or adapt the results to your taste.
The functions that are only available in the ELITE edition of DxO PhotoLab are highlighted throughout this guide.
For easy reference, special features for computers on Microsoft Windows are indicated by “PC “, while those running macOS are marked with “Mac ”.
About DxO FilmPack plugin for DxO PhotoLab
DxO FilmPack brings all the quality and emotion of Fine Art photography to digital photos by associating the precise look of silver-emulsion film with quality rendering and creative effects. Based on DxO Labs’ advanced calibration technologies, DxO FilmPack faithfully restores the characteristic colors, contrast, saturation, and grain of dozens of legendary films.
DxO FilmPack for PC and Mac comes in two editions, ESSENTIAL and ELITE, which differ in terms of the number of film renderings and features available. DxO PhotoLab contains a trial version of DxO FilmPack, which can be launched via the Help menu (PC) or the DxO PhotoLab menu (Mac). The free trial lasts for 31 days.
As a plug-in for DxO PhotoLab, DxO FilmPack is completely integrated into the DxO workflow and appears as a dedicated palette in the Customize tab. This version gives you the best performing and most comfortable of user experiences. Indeed, it lets you deal with a whole batch of images in one go as part of a totally reversible RAW workflow.
About DxO ViewPoint plug-in for DxO PhotoLab
DxO ViewPoint fixes even the most complex perspective problems, and easily restores the natural shapes of subjects situated on the edges of images. It also lets you locally correct image geometry and apply a miniature effect.
As a plugin, DxO ViewPoint integrates perfectly with DxO PhotoLab: all features are easily accessible in a new dedicated palette. DxO ViewPoint can also be used as a standalone application or as a plugin for Adobe Photoshop, Photoshop Elements, and Adobe Lightroom Classic.
Once installed, DxO FilmPack and DxO ViewPoint can be activated using their respective activation codes, directly from within DxO PhotoLab via the File menu (Mac) or the Help menu (PC).
Getting started with DxO PhotoLab
After installation, when you are using DxO PhotoLab for the first time, or following an update, the program will run a number of functions to help keep you informed:
- Choosing the default correction preset
- The default workspaces
Choosing the default correction preset
The first time you install and launch DxO PhotoLab, whether it is the first time following your purchase of the software or its installation on a new computer, a dialog and information window will ask you to choose a default correction preset which will determine the behavior of the program accordingly. These presets are:
- DxO Style – Natural: Choice #1 lets you apply automatic corrections upon opening images in the program. These corrections include the default DxO Style – Natural preset, which corrects tonality and noise, and the DxO Module which takes care of the corrections of lens defects in the camera/lens pair. This is the normal operation of DxO PhotoLab and is intended for those who use it as their primary image processing software.
- DxO Optical Corrections: Choice #2 is intended for photographers who just want to entrust the automatic correction of camera/lens defects to DxO PhotoLab, while leaving them to manually set all other corrections, either in DxO PhotoLab itself or in another program. .
- No correction: Choice #3 lets experienced photographers take control all of their corrections, so no automatic adjustments will be applied to images when they are opened in DxO PhotoLab.
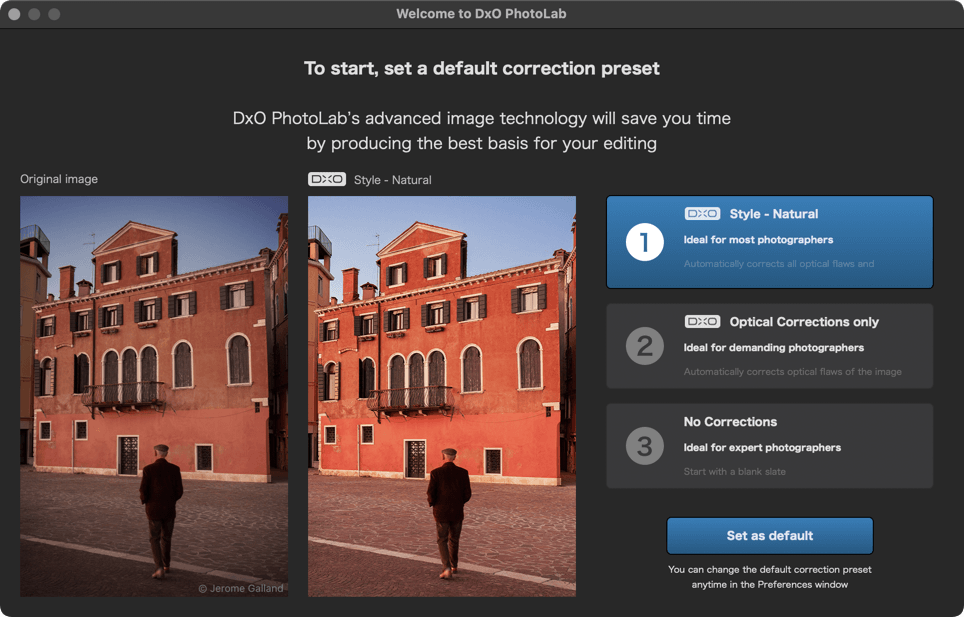
To make your selection:
- Click on one of the three options.
- Click on Set as Default.
If you want to change the default behavior, simply select the desired correction setting in the Preferences:
- PC: Go to Edit > Preferences > General, and then in the Correction Settings section, choose the desired preset for RAW and RGB files (JPEG, TIFF).
- Mac: Go to DxO PhotoLab menu > Preferences > General, and, in the Default Preset section, choose the desired preset for RAW and RGB files (JPEG, TIFF).
The default workspaces
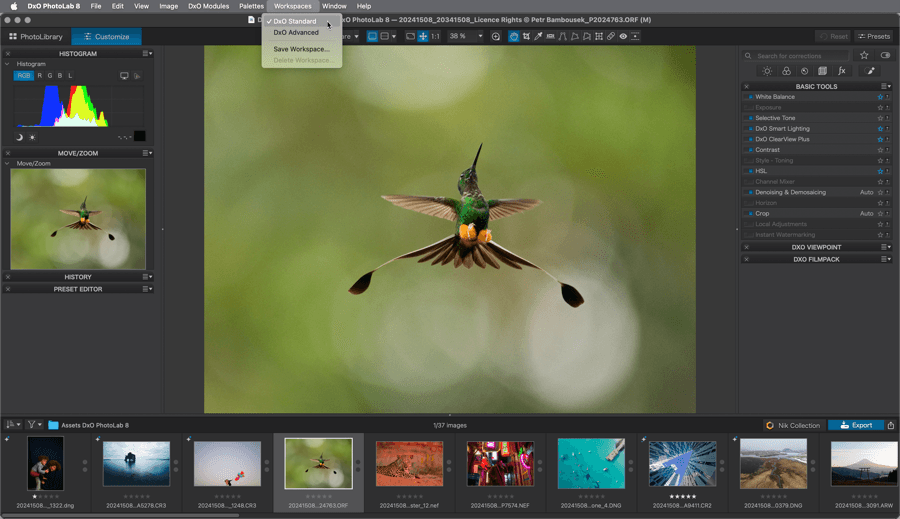
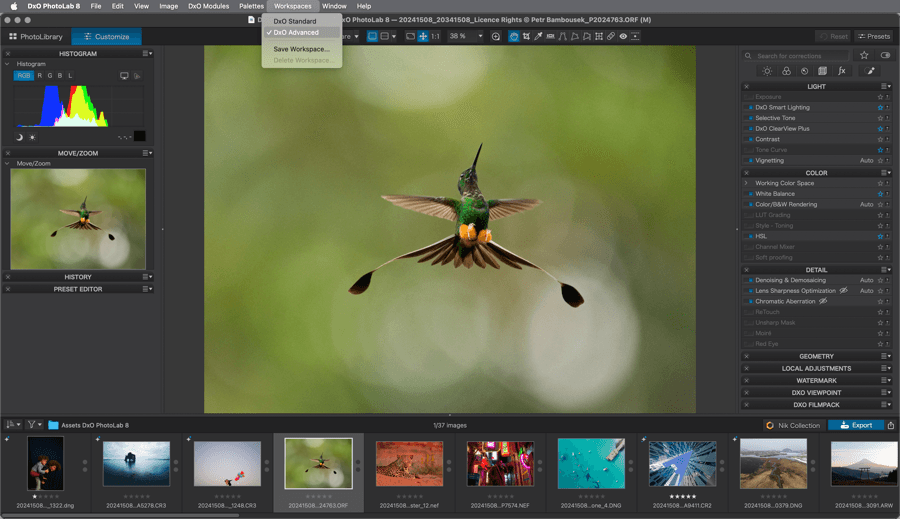
DxO PhotoLab offers 2 default workspaces, which you can select from the Workspace menu:
- DxO Standard: For beginners or minimalist users, this workspace displays the Basic Tools palette in the Customize tab, which groups together the most common tools you will use during image correction.
- DxO Advanced: For advanced users, displays all correction tools in the Customize tab.
Of course, if you use a custom workspace, you can return to it at any time by selecting it from the Workspace menu.
Installation and activation
You need an Internet connection for the steps described below.
Installation
PC
- As soon as downloading is complete, double-click on the DxO_PhotoLab.exe file to unpack it and to launch the installation. A welcome dialogue will confirm that installation of DxO PhotoLab has started.
- Choose the installation language.
- A welcome dialogue will confirm that installation of DxO PhotoLab has started. Click next.
- Accept the conditions and click Next.
- Choose where you want to install DxO PhotoLab.
- Click on Install. The installation will begin and will take a few minutes to complete.
Mac
- As soon as downloading is complete, double-click on the DxO_PhotoLab.dmg icon to unpack it and to launch the installation. A welcome dialogue will confirm that installation of DxO PhotoLab has started. Click Next.
- A window will open containing the DxO PhotoLab icon; drag and drop the icon into the Applications folder. Now you can launch DxO PhotoLab from this folder.
- When DxO PhotoLab first opens, a window with an End-User License Agreement is displayed. To use the software, you must read and accept this contract. Click on Accept to continue.
Once the application is installed, you can use it for 31 days without having to enter an activation code. DxO PhotoLab will work without restrictions during this period.
If Adobe Lightroom Classic is installed on your computer, a dialog box will ask if you would like to automatically install the DxO plugins for Lightroom.
Printing will be deactivated when the DxO PhotoLab trial period expires (31 days). To reactivate this function, you will need to register and activate your license.
Activation
Launch DxO PhotoLab:
- A dialog box will be displayed. Enter (or cut and paste) your activation code into the appropriate fields and click on Activate.
- A message will inform you that DxO PhotoLab has been successfully activated. Click OK. You can now start using your software.
The activation code lets you activate the software on 2 different computers (ESSENTIAL Edition) or on 3 different computers (ELITE Edition).
Uninstalling
PC
- Click on Start, right-click on the DxO PhotoLab icon and then select uninstall from the options.
- Follow the uninstall procedure.
Mac
- Go to the Applications folder.
- Drag and drop the DxO PhotoLab icon onto the waste basket.
Configuration
Microsoft® Windows®
Minimum system configuration:
- Intel® Core™ or AMD Ryzen™ with 4 cores
- 8 GB RAM
- 4 GB available disk space
- 1280 x 768 display
- Microsoft® Windows® 10 version 22H2 or 11 version 22H2 (64-bit)
- For DeepPRIME, DeepPRIME 3, DeepPRIME XD/XD2s and DeepPRIME XD3 X-Trans Beta:
- Nvidia RTX™ with 4GB of VRAM with latest drivers
- Nvidia GTX™ with 8GB of VRAM with latest drivers
- AMD Radeon™ RX6000 series with 4GB of VRAM with latest drivers
- Intel ARC with 8GB of VRAM with latest drivers
Recommended system configuration:
- Intel® Core™ processor or AMD Ryzen™ with 8 cores
- 16 GB RAM
- 4 GB available disk space
- 1920 x 1080 display
- Microsoft® Windows® 10 version 22H2 or 11 version 22H2 (64-bit)
- For DeepPRIME, DeepPRIME 3, DeepPRIME XD/XD2s and DeepPRIME XD3 X-Trans Beta:
- NVIDIA RTX™ 2080, AMD Radeon™ RX 6700 with latest drivers with 8GB of VRAM
macOS®
Minimum system configuration:
- Any CPU
- 8 GB RAM
- 4 GB available disk space
- 1280 x 768 display
- macOS 14 (Sonoma)
- For DeepPRIME, DeepPRIME 3, DeepPRIME XD/XD2s and DeepPRIME XD3 X-Trans Beta:
- M1 or Intel® Mac with AMD Radeon™ Pro RX5700.
Recommended system configuration:
- M1
- 16 GB RAM
- 4 GB available disk space
- 1920 x 1080 display
- macOS 14 (Sonoma)
Compatible file formats
Files opened by DxO PhotoLab
DxO PhotoLab handles the following file formats:
- RAW files from cameras supported by the program.
- Native DNG files from supported cameras.
- Linear DNG files created by DxO PhotoLab.
- DNG files created by Adobe Lightroom, Camera Raw and DNG Converter, excluding compressed lossy DNG format. DNG files output by merge HDR, Panorama, or Panorama HDR from Lightroom or Camera Raw.
- 8 and 16-bit TIFF files.
- JPEG files.
- JPEG and PNG files for watermark graphics, imported using the Watermark palette.
The following DxO ONE files are also supported:
- JPEG files.
- DNG files.
- SuperRAW files (.dxo extension).
DNG files created with Adobe Lightroom, Camera Raw or DNG Converter are supported as long as the native Raw files of the shooting camera are compatible with DxO PhotoLab. In DxO PhotoLab, DNG files created with Adobe software are considered Raw files. Therefore, all the tools and corrections specific to Raw files, as described in this user guide, also apply to DNGs.
Files exported by DxO PhotoLab
DxO PhotoLab lets you export in the following formats:
- 8 and 16 bit TIFF files.
- JPEG.
- Linear DNG, with all corrections, or just with lens and denoising corrections.
DxO Modules
DxO PhotoLab provides automatic installation of the DxO Modules that correspond with the equipment you use. Two dialogue windows also let you manually manage your DxO Modules.
You must have an active Internet connection to look for and install DxO Modules.
Installing new DxO Modules
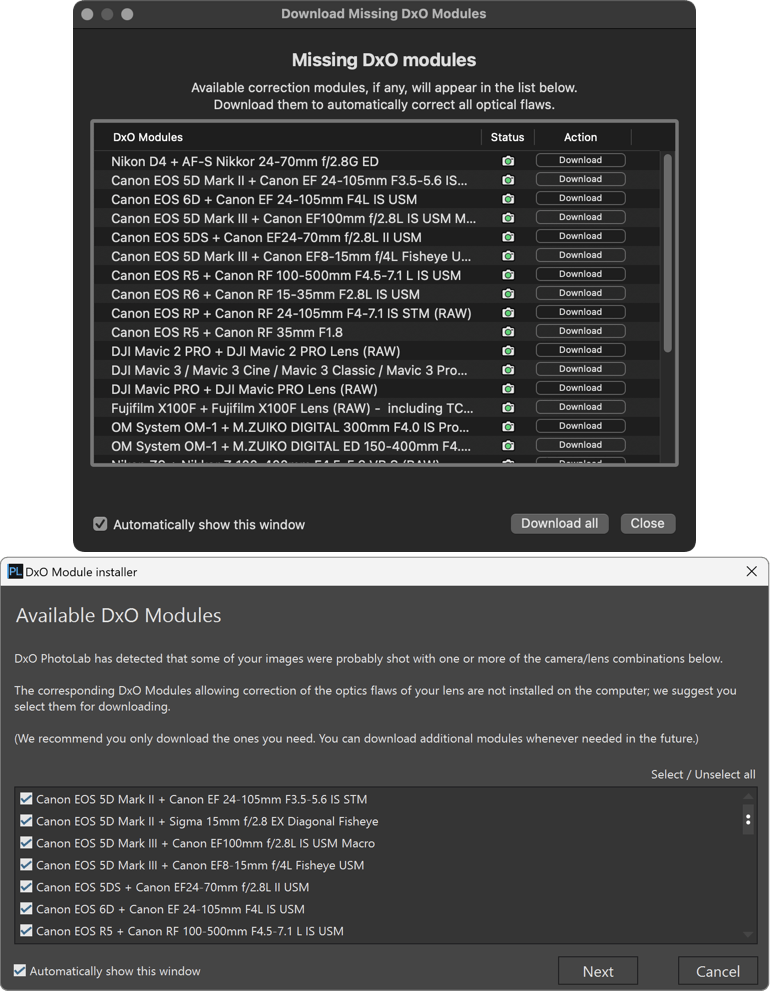
When you select an image source (folder or project), with an active Internet connection, DxO PhotoLab will automatically detect missing DxO Modules by scanning the EXIF metadata of your files.
To download DxO Modules on PC:
- Detected and suggested modules are displayed with a box (checked by default). You can also select or deselect all items by clicking on Select/Deselect all. If there are ambiguities (DxO PhotoLab cannot establish which equipment was used with certainty due to incomplete or missing metrics) you can opt to deselect any unnecessary modules.
- Click Next: The Modules will be downloaded and installed.
- A dialog box confirms that the DxO Modules have been installed. Click OK: no restart is necessary, the DxO Modules are available to use as soon as they are downloaded.
To download DxO Modules on Mac:
- Detected and suggested DxO Modules are displayed as a list.
- You can download them all at once by clicking Download All. If there are ambiguities, this means that DxO PhotoLab cannot establish which equipment was used with certainty due to incomplete or missing metrics. Ambiguous modules are indicated by an amber icon in the Status column, you can opt to download each one using the individual Download buttons.
- A dialog box confirms that the DxO Modules have been installed. Click OK: no restart is necessary, the DxO Modules are available to use as soon as they are downloaded.
To display the DxO Module installer, to manually manage your modules, go to the DxO Modules menu > Download additional DxO Modules (PC) or DxO Modules > Gear DxO Modules (Mac). To install, follow the steps above.
Managing DxO Modules
PC
The DxO Modules window displays all of the DxO Modules installed on your computer. To display this window, go to the DxO Modules > Installed DxO Modules menu. You can also filter the list to see just the installed modules or those that need to be updated.
To download a DxO Module again, select it from the list and click on Download to open the Install new modules window.
You can delete a DxO Module in the same manner by clicking on Remove. A dialogue box will prompt you to confirm that you want to delete the DxO Module.
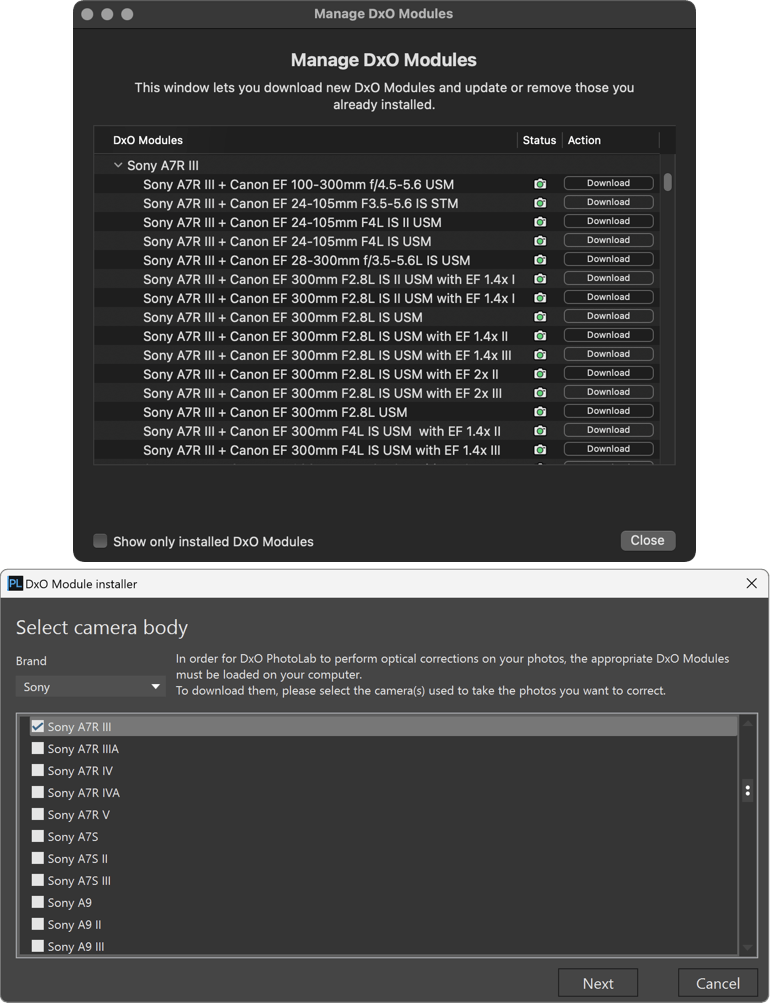
Mac
The Manage DxO Modules window lets you display all of the DxO Modules installed on your computer when you check the Show only installed DxO Modules box in the lower left corner.
To install additional DxO Modules, uncheck the Show only installed DxO Modules box, and follow the install steps in the Mac section above.
To delete a DxO Module, locate it in the hierarchical list and click on the corresponding Remove button to the right of the module you want to uninstall.
A DxO Module used during an ongoing work session cannot be uninstalled. To do this, you will have to restart DxO PhotoLab and go to the Manage DxO Modules window before you load any images.