

Printing – PC
The print module lets you print any of the file types supported by DxO PhotoLab, including RAW files and virtual copies. It is not necessary to export images in order to print them, and the print module can be called from either the PhotoLibrary or the Customize tab.
The print module automatically lists every printer connected to your computer, including virtual PDF printers.
Color management is handled either by the printer driver or by DxO PhotoLab, with the latter giving you the option of choosing an ICC profile and adjusting the rendering and print sharpness.
Interface
After selecting one or several images, the print module can be called by selecting File > Print selected images from the menus.
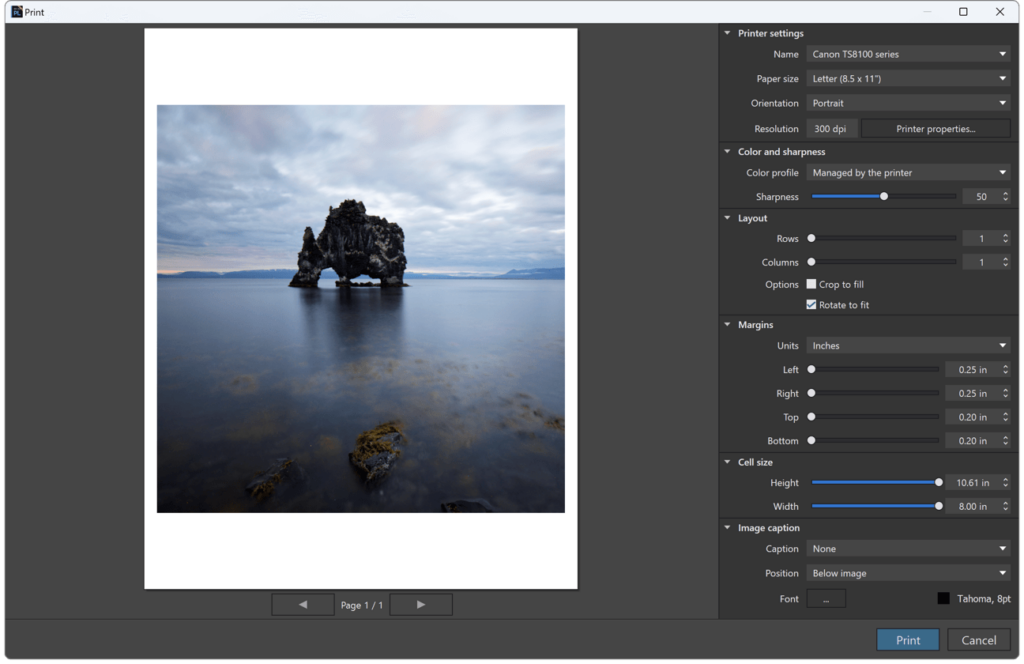
A large floating window appears on top of the DxO PhotoLab pane. It is divided into two sections:
- On the left: a print preview area displaying the images and pages to be printed (use the arrows to navigate through the pages).
- On the right: a settings column containing all the printer controls and adjustments.
In the bottom corner of the Print module window, you will find the Print button (which opens a floating print progress bar) and the Cancel button if you want to stop working with the module.
Settings
Printer settings
The first palette is devoted to the printer:
- Name: The drop-down list shows all the printers installed and connected to your computer. that you can use to print your photos.
- Paper size: Shows the paper size set by the printer driver.
- Orientation: Shows the portrait or landscape orientation set by the printer driver.
- Resolution: Shows the default resolution (300 dpi) set by the printer driver, allowing you to select another resolution if desired.
The maximum print resolution is 1200 dpi.
Color and sharpness
- Color profile: The Color and sharpness palette lets you manage the print colors in two ways: either through the printer driver, or by selecting an ICC profile and rendering mode yourself via the Color profile drop-down menu.
- Managed by the printer: As soon as the printer parameters have been set (see the paragraph on Printer settings above), no further action is necessary since the printer driver manages the colors during printing.
The following rendering modes will appear as soon as you choose an ICC profile in Color management by DxO PhotoLab mode.
- Managed by DxO PhotoLab: Selecting this mode displays the following menus:
- Import ICC profiles: A dialogue box lets you select the ICC profiles installed on your computer directly from the default color profile installation folder.
When color management is provided by DxO PhotoLab, you must ensure that the color options in the printer driver are disabled (a warning message is displayed in the palette).
- Sharpness: The Sharpness slider lets you reinforce the sharpness of your images when printing. It is set by default at 50, on a scale of 0 to 100.
Sharpening adapts automatically to the size of the print, but you can still use the slider to adjust the sharpness to suit your taste and the size of the prints.
IMPORTANT: It is not possible to get a screen preview of sharpening. We advise you to try a few test prints first to help determine the best settings for your photos, and according to your tastes.
Layout
The Layout palette lets you create contact sheets by using the Row and Column sliders or by entering the number of rows and columns desired into the appropriate fields. There are also two optional checkboxes:
- Crop to fill: When checked, the image will fill the page (and may end up being cropped).
- Rotate to fit: When checked, the print module will rotate the image in order to fill the page.
Margins
The margin sliders let you adjust the margin sizes on the page perimeter. You can select the measurement units (centimeters, inches, etc.) in the drop-down menu.
Cell size
The Height and Width sliders respond according to the content of the page or pages:
- Single Image: adjusting the sliders shifts the picture horizontally and/or vertically when there is just one image (cell) on the page.
- Multiple images or contact sheets: Use the sliders to modify the size of the image cells as well as the spacing between the cells, both horizontally and vertically.
Image captions
You can add captions to your images, positioning and formatting them as required. The Caption drop-down menu has four options:
- None (i.e., no caption).
- Image name: the file name.
- Image name and date.
- Image name and metadata: the metadata includes the shot parameters, such as the shutter speed, aperture, focal length, and ISO speed.
The Position drop-down menu lets you position the caption below, above, or on the left or right side of the image.
The Font menu lets you choose any font type, size, style, effect, and color available on your computer (a system window will open for this purpose).
The settings are saved when you quit the print module. If you want to set up a different layout or change other settings, you should reset the sliders by double-clicking on them one by one.
Printing – Mac

Interface
The print menu uses the operating system interface. After selecting one or more images, you can print from any tab by selecting File > Print selected images from the main menus.
A large floating window will appear on top of the DxO PhotoLab pane. It is divided into two sections:
- On the left: a print preview area displaying the images and pages to be printed (use the arrows to navigate through the pages).
- On the right: a settings column containing all the printer controls and adjustments.
In the bottom corner of the Print module window, you will find the Print button (which opens a floating print progress bar) and the Cancel button if you want to stop working with the module.
Settings
Printer settings
The first two drop-down menus on the upper right are devoted to the printer:
- Printer: The drop-down list shows all the printers installed and connected to your computer that you can use to print your photos.
- Presets: This menu lets you save and subsequently load your printing configurations.
A third drop-down menu in the center offers image settings for DxO PhotoLab and for the printer driver (see below).
DxO – Image Settings
- Crop to fill: When checked, the image will fill the page (and may end up being cropped).
- Rotate to fit: When checked, the print module will rotate the image in order to fill the page.
- Add caption: Lets you add and place a caption as well as choose a font and style.
There are three caption options:
- Image name: the file name.
- Image name and metadata: the metadata includes the shot parameters, such as the shutter speed, aperture, focal length, and ISO speed.
- Image name and date.
The Position drop-down menu lets you position the caption below, above, or on the left or right side of the image. The Font menu lets you choose any font type, size, style, effect, and color available on your computer (a system window will open for this purpose).
DxO – Layouts
- Margin: Enter the margin dimensions for the page (top, bottom, sides).
- Layout: The sliders let you adjust the number of rows and columns (especially useful for creating contact sheets).
- Cell Size: You can specify the size of the cells by entering values, or by using the Auto mode – in which case all available space will be used.
- Other settings: All other parameters, such as type of paper, paper size, orientation, etc., are set in the printer driver, accessible via the central drop-down menu.
The maximum print resolution is 1200 dpi.
DxO – Sharpness
The Sharpness slider lets you increase the sharpness of your images when you print them. It is set by default at 50, on a scale of 0 to 100.
Sharpening adapts automatically to the size of the print, but you can still use the slider to adjust the sharpness to suit your taste and the size of the prints.
IMPORTANT: It is not possible to get a screen preview of sharpening. We advise you to try a few test prints first to help determine the best settings for your photos, and according to your tastes.