

This section describes the basic workflow with DxO FilmPack as a standalone program and as a plug-in for host applications.
You will also find a description of the batch mode and how to use the snapshots.
Standalone mode
DxO FilmPack works autonomously with JPEG and TIFF files, as well as with RAW files. RAW files benefit from automatic processing that includes color protection, noise reduction, and correction of optical defects – vignetting, distortion, and chromatic aberration – thanks to DxO Optics Modules. These automated corrections of RAW files require no intervention on your part.

RAW files
- Open a file using the Image browser, or the File menu > Open (Mac version) or with the Menu button > Open a file (PC version).
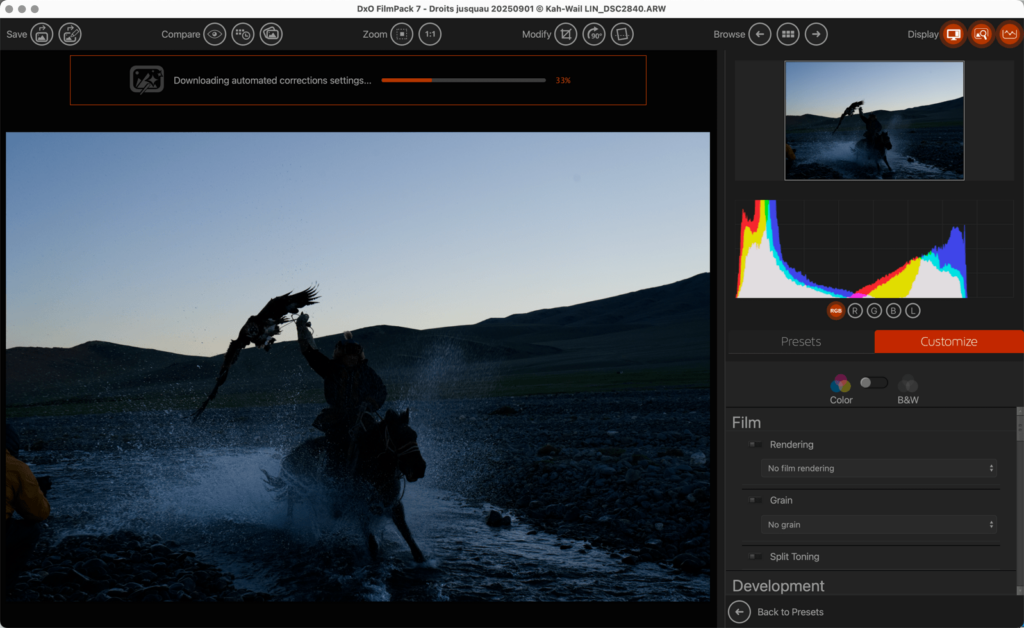
- As soon as the image opens in DxO FilmPack, a banner is displayed over the image that indicates that the automatic correction parameters are being downloaded.
- As soon as downloading is complete, the banner indicates that FilmPack is ready to apply the automated corrections to the photo.
- Validate by clicking on OK.
- The automated corrections are applied (an animated “Processing…” message is superimposed on the image).
- The image is ready for color or black & white processing. You can also simply apply a preset, and edit the settings if you want to.
DxO FilmPack uses the same DxO Optics Modules as DxO PhotoLab. Management of these Optics Modules includes the following functions:
- In the case of any ambiguity about which DxO Optics Module to use, DxO FilmPack will open a dialog box inviting you to choose the appropriate Optics Module.
- Optics Modules are updated only if necessary.
- DxO FilmPack will not display any annoying messages if you are not connected to the Internet and cannot download any Optics Modules.
- If the DxO Optics Modules have already been installed by DxO Optics Pro, DxO FilmPack will not try to download them again.

JPEG or TIFF files
- Open a file using the Image browser, or the File menu > Open (Mac version) or with the Menu button > Open a file (PC version).
- To the contrary of RAW files, DxO FilmPack doesn’t apply automated corrections and DxO Optics Modules.
- Your image is ready for color or black & white processing. You can also simply apply a preset, and edit the settings if you want to.
Workflow as a plug-in
DxO FilmPack integrates easily into your Lightroom Classic or Photoshop workflow. Used as an external editor or plugin, the application is called directly by the host application from an opened image.
Adobe Lightroom Classic
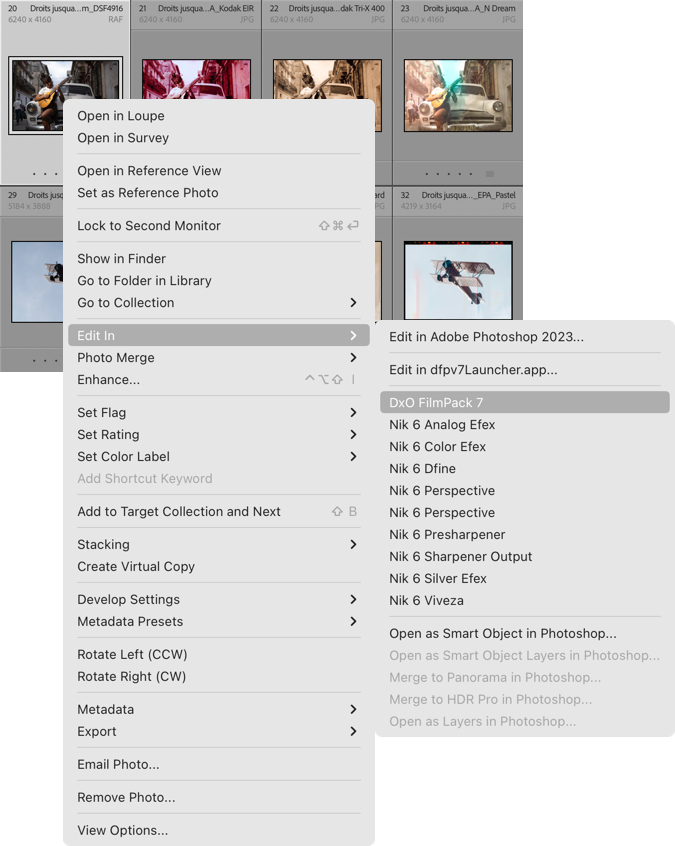
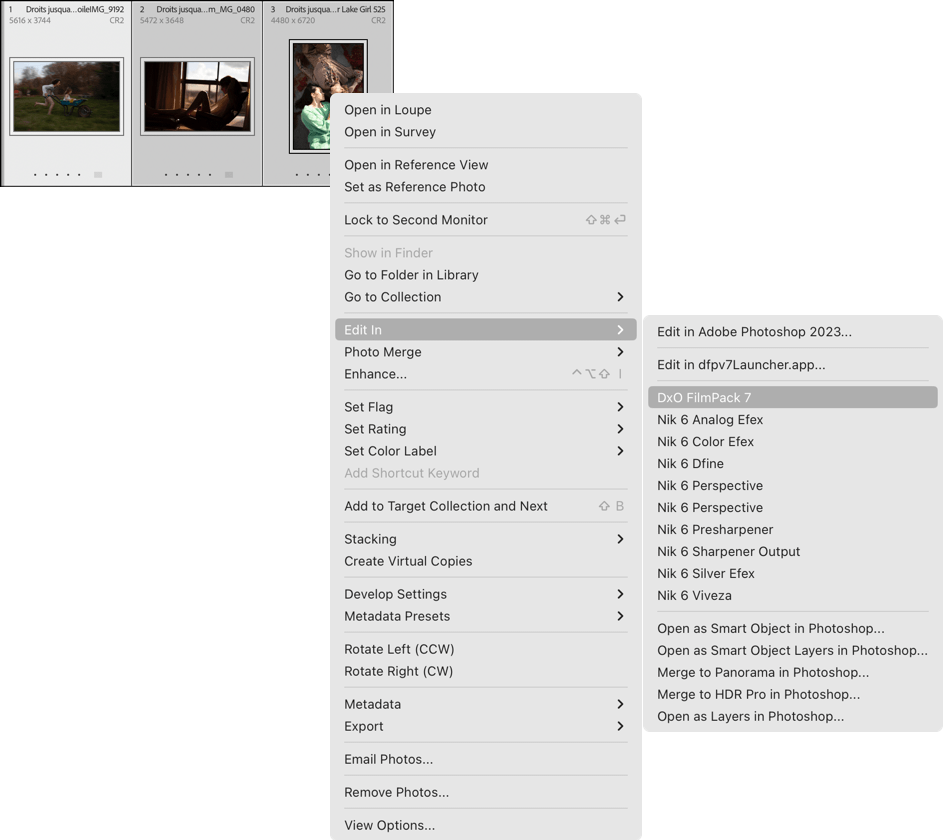
- Select an image in Lightroom Classic. You can also select multiple images.
- Launch DxO FilmPack from the menu Photo > Edit in > Edit in DxO FilmPack. You can also right-click on the image that you want to correct and use the Edit in > Edit in DxO FilmPack command.
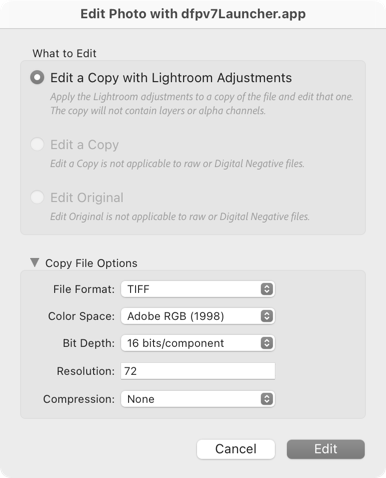
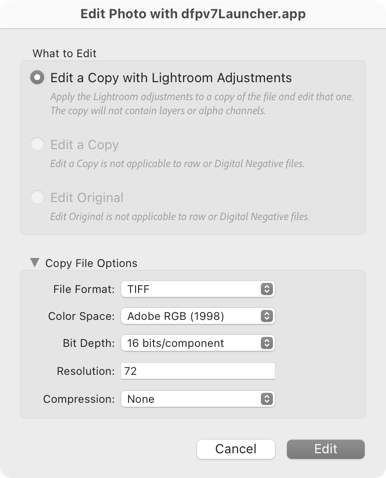
- A dialog box will open with the Edit a copy with Lightoom Classic option selected. This option lets you use DxO FilmPack to modify an image that has already been corrected by Adobe Photoshop Lightoom Classic.
- If your file options have already been set in Lightroom Classic’s preferences, click directly on Edit (however, the window lets you modify your external editing options on the fly).
- DxO FilmPack opens in plug-in mode, directly in the customize window.
- After you have finished correcting your image, click on the Save button to close the application and return to Adobe Lightroom Classic, which will display your modified image, next to the original RAW file.
Adobe Photoshop or Photoshop Elements
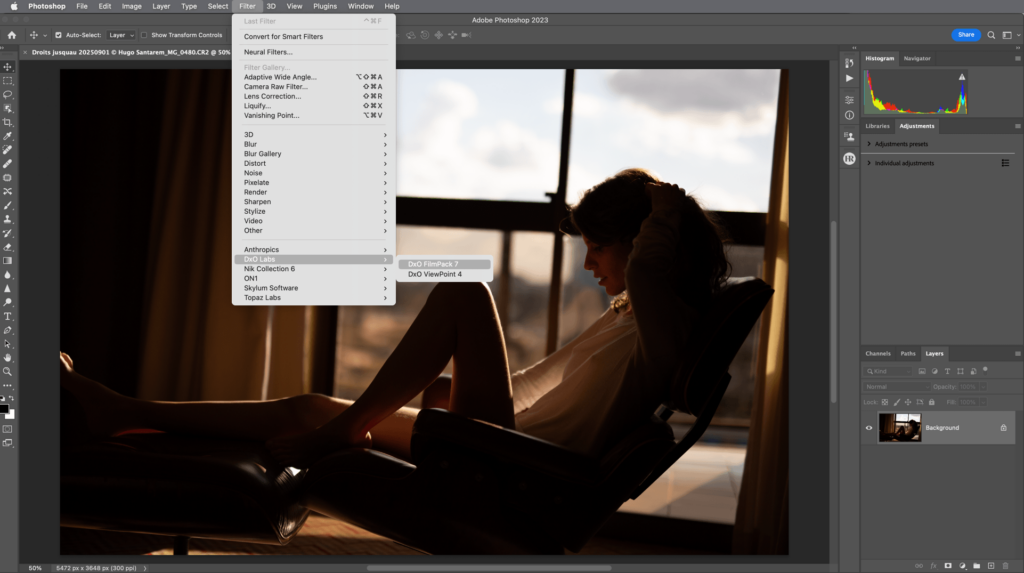
- Launch the application from the Filters > DxO Labs > DxO FilmPack menu.
- The image will open in DxO FilmPack.
- After you have finished correcting your image, click on the Save button to close the application and return to Adobe Photoshop or Elements, which will display your modified image.
Batch processing
About batch processing
Batch processing lets you apply the same set of parameters contained in a preset to multiple photos simultaneously. This feature operates differently depending on whether you use DxO FilmPack as a standalone application or as a plugin.
Batch processing in standalone application mode
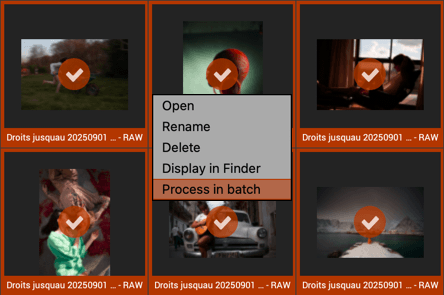
- In the Image browser, select the images you want to batch-process, then right-click and select Batch processing in the context menu, or go to File > Batch processing (Mac) or to Menu > Open a file > Batch processing (Windows).
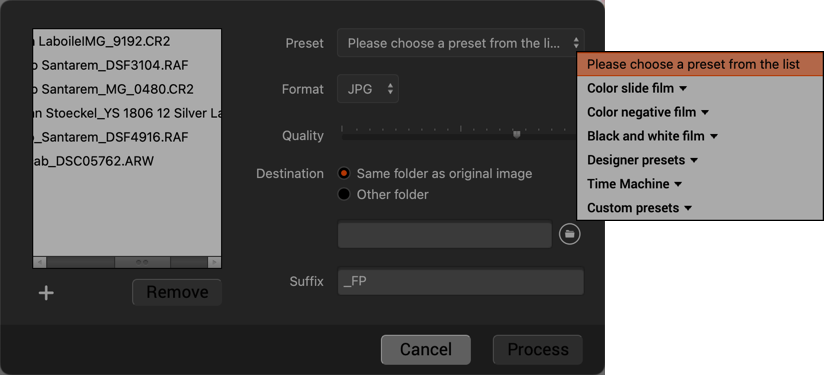
- The list of selected images will be displayed in on the left side of the dialog box window.
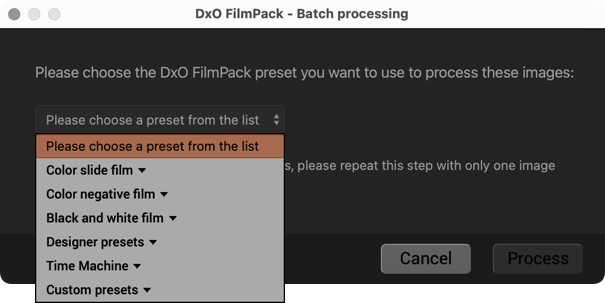
- Select the preset that you want to apply to your batch of images from the Preset drop-down menu.
- Select the format for your files – JPEG or TIFF – in the Format drop-down menu.
- Use the Quality slider to choose the compression you want for your image files (between 5 for minimal quality and 100 for maximal quality).
- Choose your destination folder — either the same folder as the original image (the default choice), or a destination folder that you indicate.
- If desired, change the file suffixes ( “_DxOFP” by default).
- Click on Process.
You can apply all of the available presets to a batch of images, including custom presets.
The Batch processing dialog box lets you add or delete images to process on the fly. To add images to your existing selection:
- Click on the + button blow and left of the list of images.
- In the dialog box that appears, navigate to the folders containing the relevant images.
- Select the photos.
- Click on Open.
- The new photos are added to the list.
To delete images from the list:
- Click on the name of the image in the list that you want to delete.
- Click on Delete.
- The image is removed from the list.
Batch processing in plug-in mode (Lightroom Classic)
- In Lightoom Classic, select the multiple images that you want to process as a batch.
- Open the DxO FilmPack application via the Photo > Edit in > Edit in DxO FilmPack menu or right-click > Edit in > DxO FilmPack.
- In the dialog box, click on the Edit button.
- A new dialog box called DxO FilmPack – Batch treatment opens.
- Choose the preset that you want to use to process your batch of images.
- Click on Process.
- A dialog box will inform you that the images have been correctly processed. Click on OK.
- After processing, the photos will be displayed in your Adobe Lightoom Classic catalog, side-by-side with the originals).
Batch processing in plug-in mode (Adobe Photoshop)
In Adobe Photoshop, batch processing requires that you create an action. (See the Adobe Photoshop user guide for information about creating and saving actions.) We will give you here only a general outline of the steps you need to follow.
- In Adobe Photoshop, open the Actions panel.
- Create a new action, name it, and then record it.
- Open DxO FilmPack via the Filters > DxO Labs > DxO FilmPack menu.
- Apply the effects or presets you want and then click on Save.
- Stop the action recording in Adobe Photoshop.
- In Adobe Photoshop, go to the File > Automate > Batch menu.
- Adjust all the parameters, then choose the action that you saved above.
- Start the processing.
If you are interested only in applying DxO FilmPack presets or effects to your images, we suggest that you use the standalone version of DxO FilmPack and its easy-to-use batch treatment command, rather than use Photoshop. On the other hand, if you want to apply more than just DxO FilmPack’s presets and effects, such as Photoshop’s own processing features (filters, crops, etc.), it can be advantageous to use Photoshop’s batch processing capabilities.
Snapshots
About snapshots
DxO FilmPack lets you take snapshots of your image during any stage of its processing. This feature is doubly advantageous: it lets you save the different steps of your processing in a visual way, and it lets you compare the effects of different settings on the same image. Of course, you can always reapply a snapshot to an image at any point during processing.

Creating a snapshot
- Open an image in DxO FilmPack.
- Apply the desired corrections and settings.
- In the command bar, click on the Change reference image button.
- In the window that displays, click on the «+» button on the right.
- Once the snapshot is activated in the window, you can directly enter a name for it in the field underneath the thumbnail; to validate, press on Enter.
- The snapshot of your image stays visible in the dialog box via the Change reference image button.
You can also create a snapshot, either by right-clicking on the image and selecting “Take a snapshot” from the context menu, or by pressing on the T key. Afterwards, all you need to do is follow steps 5 and 6 in the above procedure. You can create as many snapshots of your image as you wish.
Modifying a snapshot
- Using the Change reference image button in the floating window, right-click on the relevant snapshot.
- In the floating window, select Update with current settings.
- The changes are saved.
Comparing an initial image with a snapshot
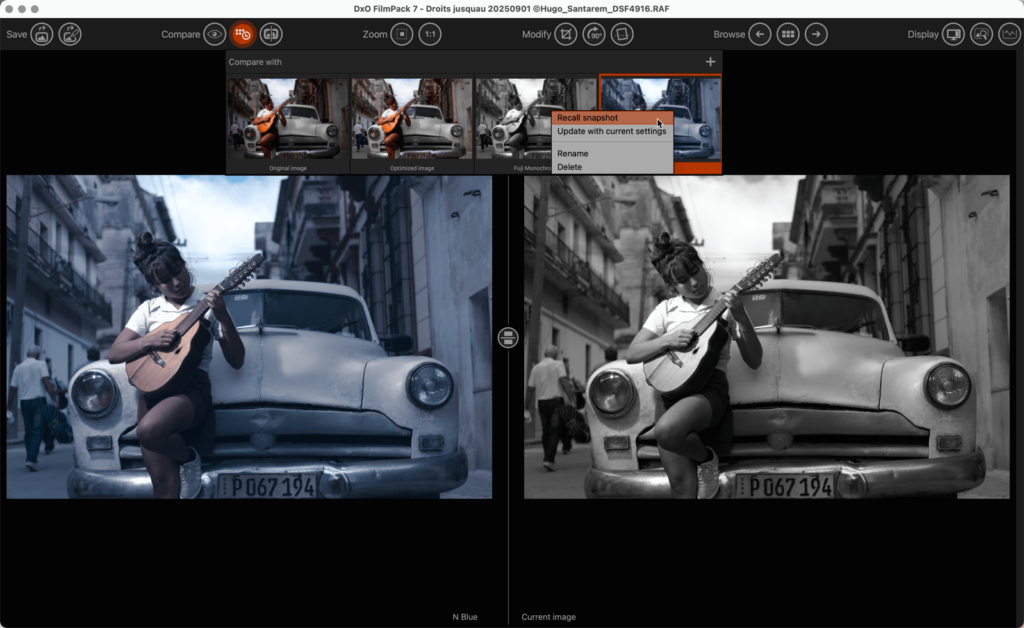
- From the image that you are currently processing, select the Side-by-side preview by clicking on the icon in the command bar.
- Click on the Change reference image button to display the snapshots window.
- Click on the thumbnail of the snapshot to which you want to compare the current image.
- The image selected in the snapshots window will be displayed on the left, and the current image on the right.
To change the display mode, click on the Split preview button. To display your image in full-view mode again, click on the Simple preview button.
Applying a snapshot to the current image on display
- In the Command bar, click on the Change reference image button.
- In the snapshots window, choose the snapshot you want to apply.
- Right-click on the snapshot.
- Select Recall snapshot in the pop-up menu.
- The snapshot is applied to the current image.
- To apply another snapshot, repeat steps 1–4.
Renaming a snapshot
- In the Snapshots window, choose the snapshot that you want to rename.
- Right-click on the snapshot.
- Select Rename in the pop-up menu.
- You can also double-click on the name to change it.
- Enter the new name in the field underneath the snapshot.
The initial image cannot be renamed in the snapshots window.
Deleting a snapshot
- In the Snapshots window, choose the snapshot that you want to delete.
- Right-click on the snapshot.
- Select Delete in the pop-up menu.
- A dialog box will ask you to confirm that you want to delete the snapshot. Click on Yes to delete, or on No to cancel the action.