

About the Customize tab
The Customize tab in DxO FilmPack contains all of the image correction and processing tools, both in color and black and white. It also complements the use of presets and different image renderings offered by the program, which you can modify to your liking here.

The Color/B&W switch
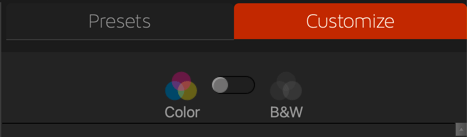
The Color/B&W switch allows you to switch between color and black and white image processing modes, with some common tools and a few specific tools. Here’s how it works:
- By default, the switch is set on Color, especially if you start with a RAW or a RGB (JPEG, TIFF) file.
- If you set the switch on B&W, the image will be converted in a neutral, basic black and white.
- You can switch back anytime to Color (and back and forth).
- If you have previously applied a preset, the switch will be set to the corresponding mode: if you apply a black & white preset and you move to the Customize tab, the switch will be on B&W.
The Film palette
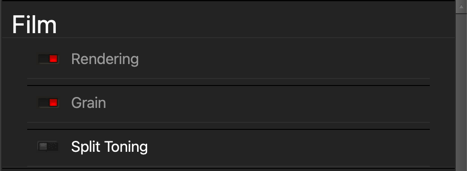
Rendering
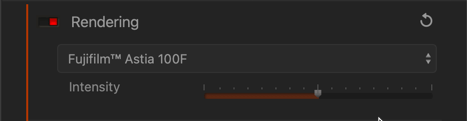
The Rendering palette lets you choose the type of film you want to simulate. By default, the scroll list is set on No film rendering. The list of film renderings is split in several categories you can open by clicking on them.
Unlike the Presets panel in which you click on a thumbnail to apply all of the characteristics of a particular film rendering, the Customize tab lets you apply the film rendering and grain characteristics separately.
Grain
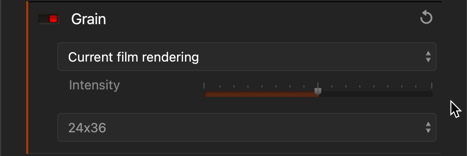
As part of the photographic emulsion process, metallic silver salts (or other colorants) are grouped in clusters of different sizes and shapes. When exposed to light, these clusters generate random variations in light intensity: the larger the clusters, the stronger the variations, making the grain more noticeable when looking at the emulsion. Grain has a direct link to sensitivity: a highly-sensitive (i.e., high ISO) film is one that has large clusters of salts that are more likely to be modified when the film is exposed to light.
The Film grain palette lets you apply and fine-tune silver halide grain by using the following tools:
- Film: The drop-down list lets you choose the grain associated with a particular silver halide film.
- Intensity: You can change how noticeable the grain is by changing the value (the default value is 100, and 0 nullifies the effect).
- Size: Lets you pick the size of the grain depending on the film size: 24×36, medium format, large format, or custom.
When you click on Current film rendering, the grain of the film currently selected will be used. You can also choose to eliminate the grain by selecting No grain.
You can use the Luminance slider in the Noise removal palette to completely smooth out the noise from an image and then substitute a more aesthetically-pleasing silver halide grain.
Adjusting the size of the grain
If you want to simulate a film as closely as possible, you will need to take into account the enlargement size to apply to a negative when processing the film for paper print production. Indeed, if two negatives, one 24×36 mm in size and the other a map film of 10×12 cm, had an identical grain, and the two were printed on 30×40 cm paper, the enlargement size would more than 10 times for the 24×36 mm and only 3 times for the 10×12 cm. Thus a print of a photo made from a 24×36 film negative shows a lot more grain.
To deal with this variable, the Film grain palette contains a drop-down menu called Size, where you can choose a pre-determined film
negative size from 24×36 to large format, or manually create a custom format size. In the latter case, you can specify the Grain size by using the dedicated slider and selecting a value ranging from 1 to 10.
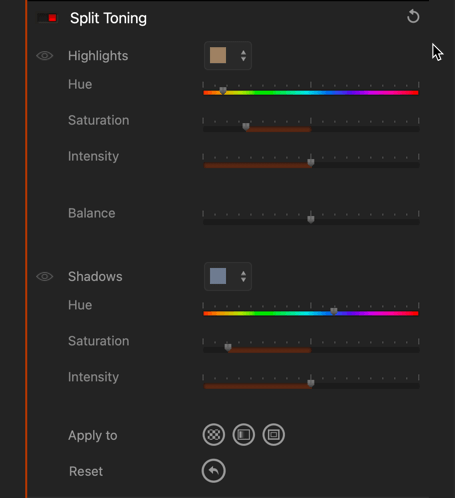
Split toning
In a conventional photo print, the image is formed from silver crystals: the more numerous or large the crystals, the darker the image. Toning is an old process that consists of replacing the silver crystals with various metal salts or silver-free colorants. The goal is both purely aesthetic (more subtle midtones, denser shadows) and practical (long-term print preservation).
Toning choices
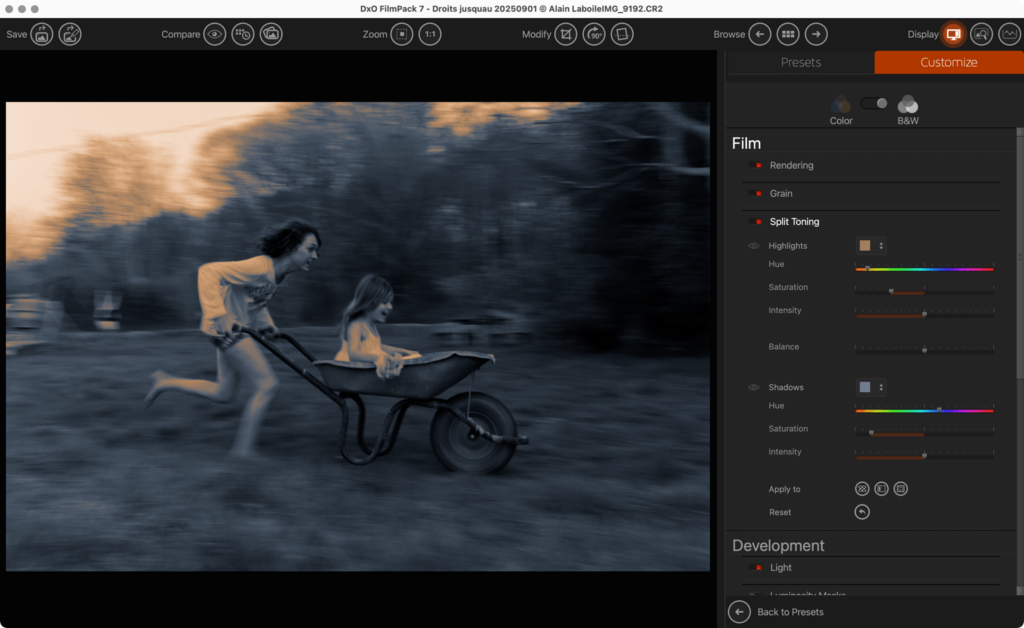
Choosing a toning depends on the Highlights and the Shadows tones. Each one is provided with a palette of tonings, thus allowing you to combine different tones for the light and dark parts in your image.
By clicking on the Highlights or Shadows buttons, a palette will appear with different-colored buttons representing the tints that are available to apply. (When you hover over any of the buttons, a tool tip will appear with the name of the toning.) The tonings offered for both the light and dark tones are strictly identical, and you can mix and match them according to your own tastes:
- Ferric sulfate produces a grey-green tint.
- Gold: This toning used gold chloride, which strongly enhanced print permanence as well as giving them flattering metallic blue- blacks.
- Selenium is a classic toning used mainly for the purpose of print permanence. Provides a light color change, mostly in the purple range.
- Sepia terra is lighter than classic sepia.
- Sepia gold: is light sepia with some colder or blue notes.
- Sepia: Albumen images in the 19th century had a natural sepia tint when processed. When albumen fell out of use in the 1880s, many photographers toned the new gelatin silver prints in sepia, both to protect them better and to make them look like the familiar older prints. Today, sepia has become a synonym for “antique photo.” This toning is the darkest of the sepia choices in the sub-palette.
Once applied, you can modulate the toning by using the following sliders:
- Hue: Lets you alter completely or slightly modify the color of the toning you have chosen.
- Saturation: Increase (right) or decrease (left) the vividness of the selected hue.
- Intensity: Sets the intensity of the toning separately for the light tones and dark tones — weaker toward the left, stronger toward the right.
- Balance: Lets you adjust the balance of the toning between the high tones (given priority by moving toward the left) and the low tones (given priority by moving toward the right).
Creating and storing custom tones

The palette for both light and dark tones also allows you to store custom hues. To do this, first make your adjustments with the Hue, Saturation and Intensity sliders and then click on the + button in the palette to add your hue.
To delete a memorized hue, right-click on its tile and click on Delete in the floating tooltip.
Other Split Toning tools
The Split Toning palette has some additionnal tools to help and to refine the corrections:
- Eye icon: Clicking on the eye icon next to the Highlights and Shadows labels lets you temporarily deactivate the application of the relevant tint to the image. To reactivate the application, click on the corresponding barred eye icon.
- Apply to: Lets you apply the selected toning to certain Texture, Light leak, and Frame effects, either separately for each one, or by combining them.
- Reset: Click on the Reset button to reset all settings.
The Development palette
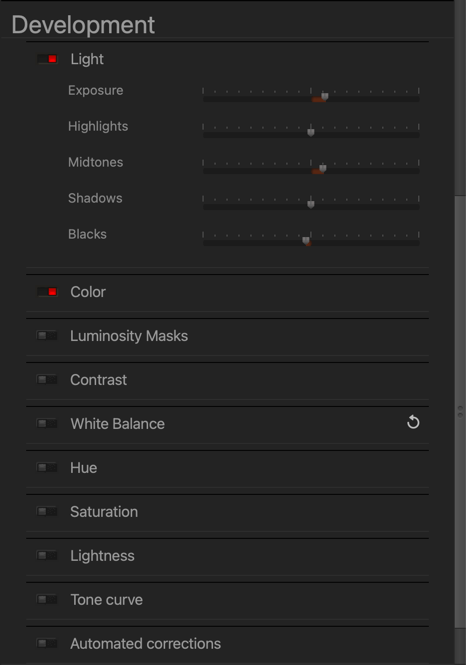
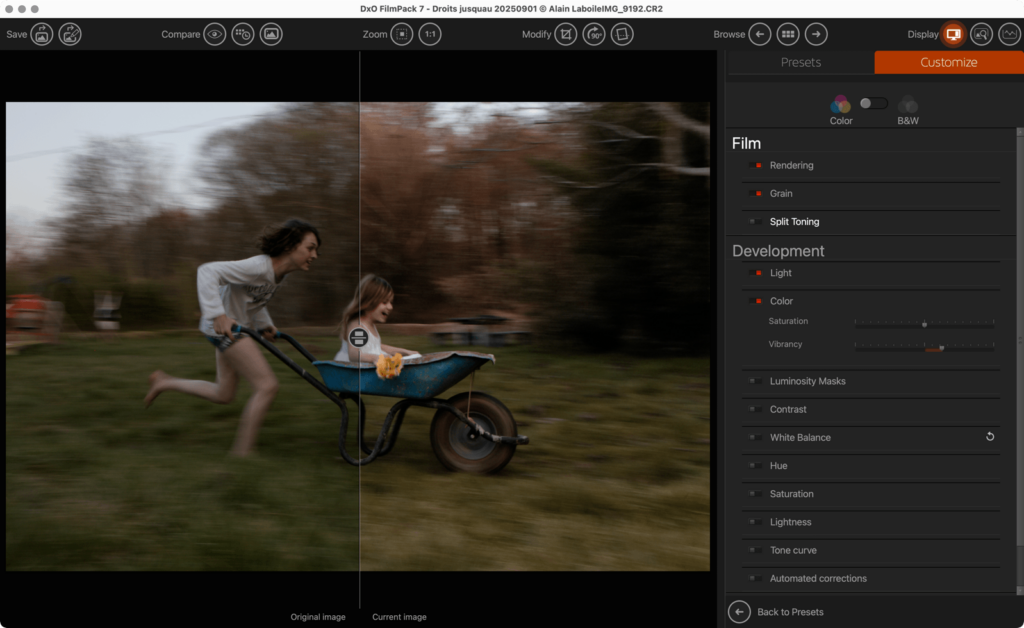
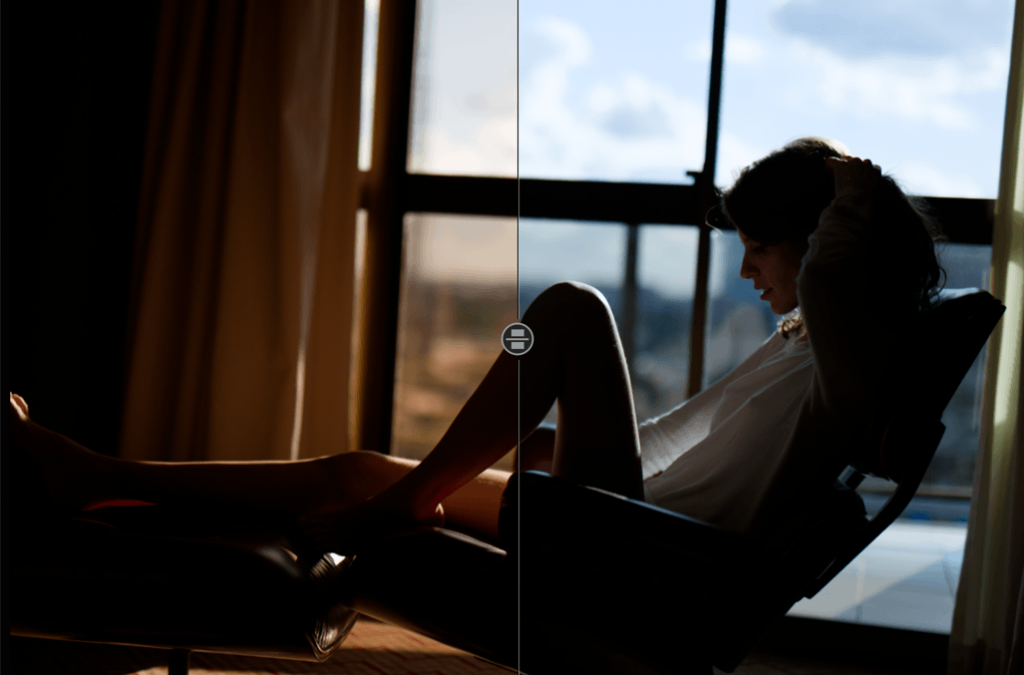
The Development tools allows you to make both basic corrections, such as brightness, contrast, white balance, and color, as well as very precise corrections, according to brightness ranges. It also contains the correction tools that are automatically applied when opening RAW files.
Light
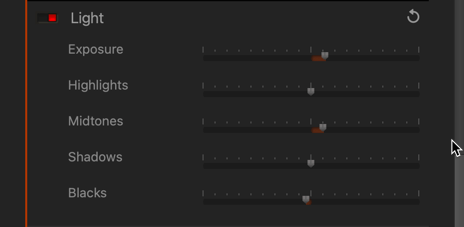
The Light section handles the following corrections:
- Exposure: Darkens (to the left) or brightens (to the right) the overall content of the image.
- Highlights: Recovers information and details in the brightest parts of the image (e.g., skies with bright clouds, the outside seen through an interior window pane).
- Midtones: Acts on the tones represented in the central part of the histogram.
- Shadows: Brightens or darkens the shadows and dark areas in an image.
- Blacks: This slider lets you set the black point (left end of the histogram) in your image. To the left, the slider progressively changes the dark areas to solid black and, to the right, progressively lifts the black levels and makes them brighter (the left end of the histogram will move to the right, leaving no image data in the blacks).
Color (Color mode)
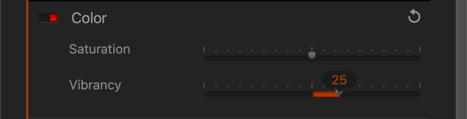
- Saturation: Globally decreases or reinforces colors. Moving the slider to the right, the colors become more vivid; toward the left, progressively grayer.
- Vibrancy: Compared to the Saturation slider described above, which affects all colors at once, the Vibrancy slider works in a more subtle manner by taking into account the different colors present in the image. Moving the slider to the right protects flesh tones and reinforces and deepens the blue of the sky without changing the tones that are close to gray, thus avoiding white balance drift. Moving toward the left diminishes the global saturation without going all the way to black and white; the desaturation is more pronounced among the reds, giving a more natural aspect to flesh tones. The range of this setting goes from –100 to 100.
Luminosity Masks
The Luminosity Mask allows you to correct an image based on a range of brightness that you can adjust with very high precision, including at the transition level.

Interface of the Luminosuty Masks palette
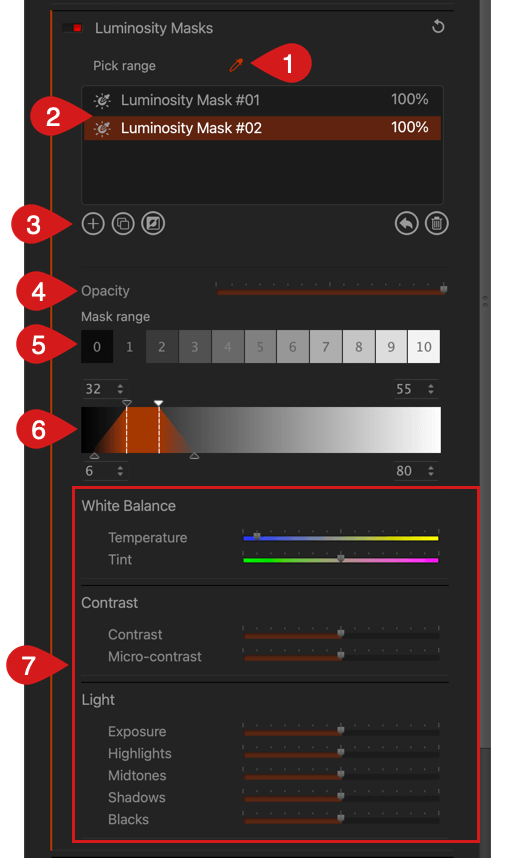
The palette is organized as follows (from top to bottom):
- Pick range eyedropper:First, click on the Add new mask button (the “+” button) to activate the Luminosity Mask tool, then click on the eyedropper and click in the image to select a luminosity range. You can click and repeat the sampling as many times as you want.
- List: Shows the list of the luminosity mask:
- In alphanumeric order (mask #01 is on the top). It is not possible to rename a mask.
- Opacity value in %.
- When hovering a mask in the list, an eye icon shows, to deactivate/activate the mask in the picture (including the relevant corrections).
- Buttons below the list (from left to right):
- Add new mask “+”: Creates a new mask. The new mask will have no corrections applied.
- Duplicate selected mask: The duplicated mask will have the corrections of the source mask.
- Invert selected mask: The area of the mask in the picture will be inverted (if the sky has a mask, the mask and the relevant corrections will be applied to the ground).
- Reset the selected mask: Sets the applied corrections to zero.
- Delete selected mask: Removes the mask and the relevant corrections from the list and the picture.
- Opacity slider: You can refine the luminosity mask and the associated corrections by using the slider, which is set to its full value (100) by default. To reduce the effect of the selected mask, move the slider to the left.
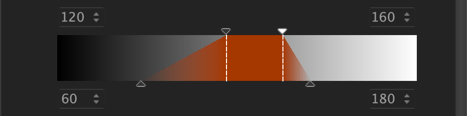
- Mask range: 11 luminosity zones to select a brightness range easily, by clicking on one of the tiles, from the darkest (0) to the brightest (10), the middle values being, of course, at 5.
- Trapezoid: in addition to its role of indicating the selected brightness range, you can adjust it by moving the trapezoid in the scale.
- Correction tools associated with the luminosity mask: All the sliders spread in the White Balance, Contrast and Light sections behave exactly the same as their global counterpart.
Refining the Luminosity Mask
No matter which method is used to determine the luminosity range, you can refine it using the following tools:
- The black and white triangles above the trapezoid, as well as the associated dotted lines, represent the lower (dark tones) and upper (light tones) limits of the selected luminosity range. The corresponding levels values – from 0 to 255 – are indicated in the two upper value fields. You can also adjust the values by clicking on the arrows or by direct typing.
- The triangles below the trapezoid indicate the limits in the transition of luminosity levels (fall-off), between the selected range and the rest of the image. The further you move these triangles from the dotted lines, the more you extend the fall-off, the more you dilute the luminosity levels, and the closer you move the triangles, the more you reduce the transition levels and the more abrupt the fall-off will be. You can also use the two lower value fields to adjust the levels, from 0 to 255.
Thus, by acting on the position and extent of the trapezoid, as well as the extent of the fall-off, you will arrive at an extremely precise selection of the range to be corrected.
Add to or subtract from the Luminosity Mask
You can go even further in the precision of the Luminosity Mask by adding to the selection with the Brush, or by subtracting from the selection with the Eraser.
When the Luminosity Mask tool is active, you will find a toolbar at the bottom of the window. The toolbar includes the following items (from left to right):
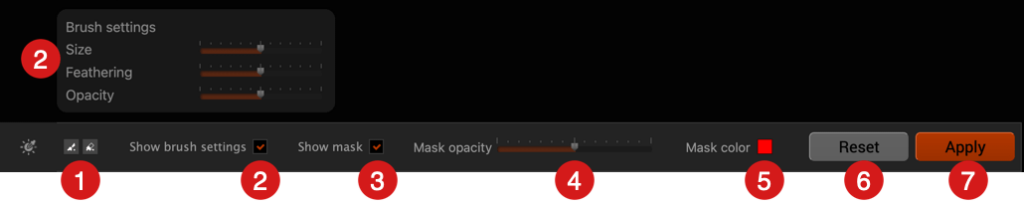
- Brush and Eraser buttons: Click to select the tool you need.
- Settings checkbox: displays/hide the Brush or Eraser settings, which are:
- Size: Adjusts the diameter of the Brush/Eraser.
- Feathering: Sets the edges (harder to the left, softer to the right) and, therefore, the way the stroke edges blend into the image.
- Opacity: Adjusts the intensity of the strokes.
- Show mask: Toggles the colored mask display on or off.
- Mask opacity: The slider adjusts the intensity of the colored mask display.
- Mask color: By clicking on the box, you will open your system color palettes, where you can choose another color for your masks to display.
- Reset: Resets all the settings and corrections.
- Apply: By clicking on this button, all masks and associated corrections will be applied to the image. You can modify your luminosity masks anytime by reactivating the tool.
In order to add to or subtract from the selected luminosity mask:

- Add to the selection: click on the Brush button, and paint in the image to extend the luminosity mask.
- Subtract from the selection: click on the Eraser button and paint in the image to remove parts of the luminosity mask.
Contrast
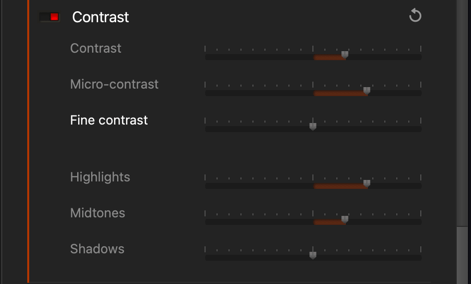

The Contrast palette acts on the contrast — that is, on the gap between the bright and dark tones, as well as on the micro-contrast, which boosts details and textures in an image:
- Contrast: Diminishes or amplifies the gap between the light and dark areas in the image. Moving the slider to the right, the whites are brighter and the blacks are deeper, making the overall image more contrasty. Moving to the left, the whites are duller and the blacks are not as deep, making the image appear flatter.
- Micro-contrast: Moved to the right, globally boosts the micro-contrast of the details, making the image looking snappy and crisp. To the left, makes the details and the image softer.
- Fine contrast: Acts even greater finesse on micro-contrasts by boosting details and textures, while protecting solid-colored areas or areas with few details.
The Contrast slider values range from –100 to +100, with the default value set at 0 (that is, no correction). For the Micro-contrast and Fine contrast sliders, the values 0 to +100 (slider to the right) progressively boost the details in the image. By contrast, the values from 0 to –100 (slider to the left) diffuse the details.
For a more selective micro-contrast correction, you can use the following sliders:
- Highlights: Acts on the brightest parts of the image.
- Midtones: Acts on the parts of the image with medium luminosity (i.e., the central part of the histogram).
- Shadows: Acts on the darkest parts.
White balance
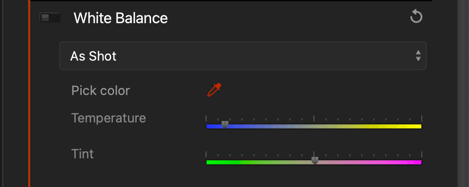
Regardless of its origin (artificial or natural), light usually appears white to our eyes. It is, however, nothing of the sort. Even daylight can contain strong blue dominants, particularly in shadows or when the sky is overcast. At the other end of the spectrum, incandescent bulbs have a yellow cast, while fluorescent lights produce complex green casts.
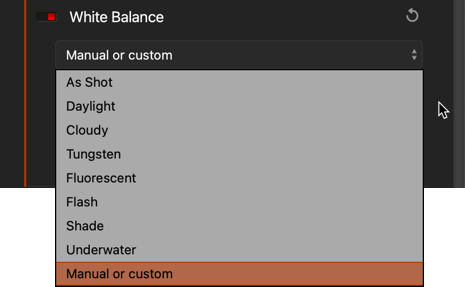
Adjusting white balance serves to correct these undesirable light dominants:
- Presets list (RAW files only):
- As Shot (the white balance as set in the camera).
- Daily.
- Cloudy.
- Tungsten.
- Fluorescent.
- Flash.
- Shade.
- Underwater.
- Manual or custom (as set in the camera).
- Pick color: Click on the eyedropper to activate it, and click in the picture, on a neutral area (grey, white) to set the white balance. You can refine the white balance with the Temperature and/or Tint sliders.
- Temperature slider: Move the slider to the left to make the colors and the picture cooler (more blue), and to the right to make it warmer (more yellow).
- Tint slider (RAW files only): Helps to further remove residual color casts in the green to magenta ranges.
Adjusting the slider affects all the colors of the picture. Therefore, it is important to adjust the white balance before any work on the colors.
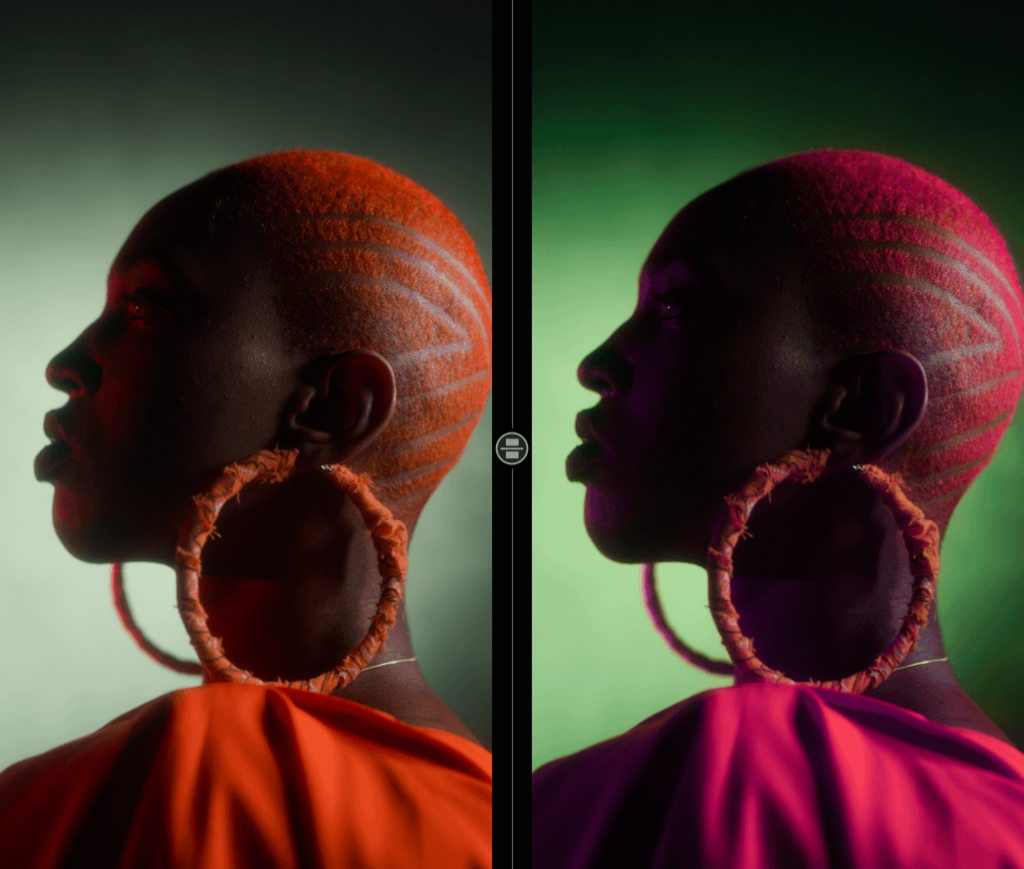
Hue, Saturation, Lightrtness (HSL – Color mode)
The HSL sliders are split into 3 palettes.
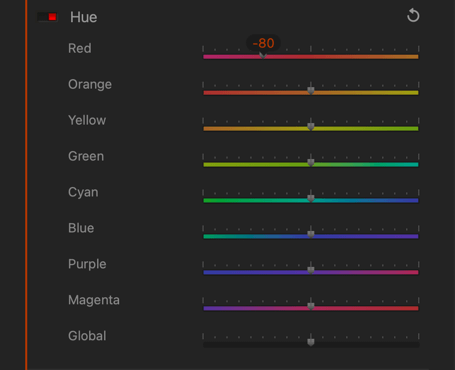
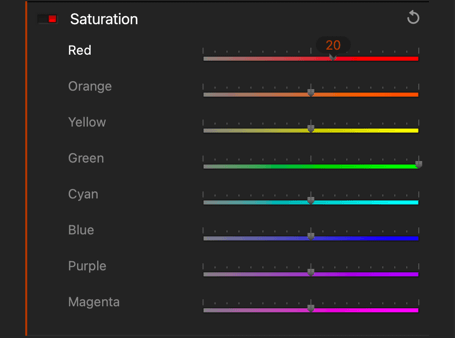
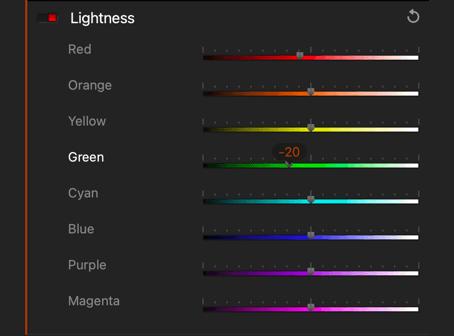
The HSL system makes it possible to correct each color for three parameters (Hue, Saturation, Luminance). This correction applies to:
- Additive colors, or RGB (red, green, and blue).
- Subtractive colors, or CMY (cyan, magenta, and yellow).
The Hue-Saturation-Luminance palettes allows you to choose which color channels to work on:
- Red channel
- Orange channel
- Yellow channel
- Green channel
- Cyan channel
- Blue channel
- Magenta channel
- Purple channel
- Global (the HSL sliders will act on all the colors in the image)
After choosing a channel, you can use the following controls:
- Hue: These sliders modify the tint of the selected channel. For example, if you select the yellow channel, the movement of the slider will progressively change the yellows present in the image to magenta (toward the left) or to green (toward the right). The slider has a range of –180° to +180°, in conformance with the principle of the color wheel.
- Saturation: Complementing the basic color saturation settings, these sliders control the strength of a particular color. If we use our previous example with the yellows, moving the slider toward the left with progressively attenuate the color until it becomes gray (near 0). By contrast, moving the slider to the right reinforces the yellow until it is nearly transformed to orange at the maximal value.
- Lightness: You can easily understand how these sliders work if you look at the histogram at the same time that you use the slider. If you move the slider to the right, you move the black point to the right, compressing the brighter values toward the upper part of the graphic. Conversely, by moving the slider to the left, you move the white point toward the left, thus moving the bright values towards the bottom. To simplify, still using our example, the yellows will be darker if you move the slider toward the left, and more light and clearer toward the right.
Channel Mixer (B&W mode)
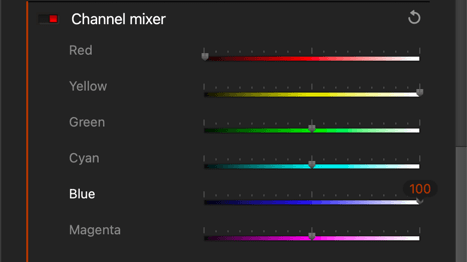
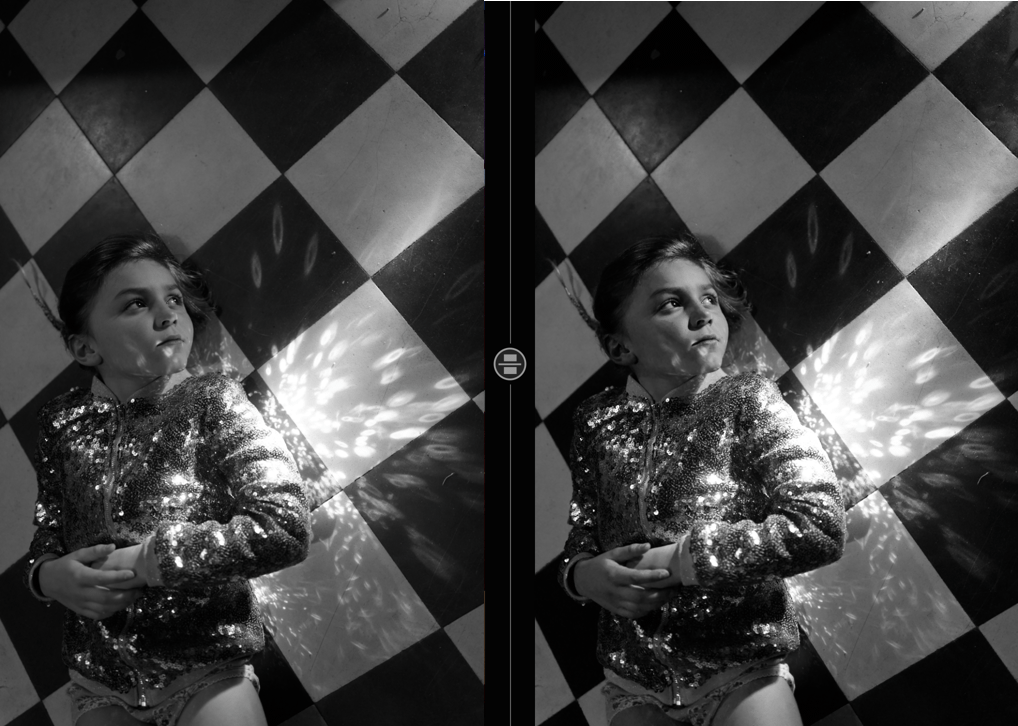
The Channel mixer lets you adjust and fine-tune the black & white conversion according to your taste by acting on the additive colors (i.e., RGB: red, green, and blue) as well as on the subtractive colors (i.e., CMY: cyan, magenta, and yellow).
You can think of the Channel mixer as a set of fully-configurable filters. Although the filters in the Filter palette are limited both in hue and intensity, the Channel mixer lets you create any combination of colors at any level of intensity. To use the Channel mixer, you will need to evaluate which channels are too bright or too dark, and then move the corresponding sliders in the desired direction. For example, if your image contains yellow elements, you can move the Yellow slider to the left to darken them, or to the right to brighten them.
Each channel can affect other close colors, so adjust your settings little by little while watching the effects they have on your image.
Tone curve
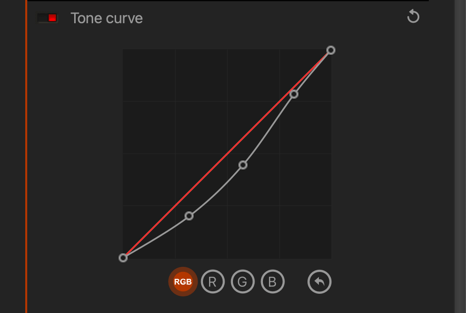
The Tone curve lets you act either on the overall contrast in the image (RGB button), or on each color channel for red, green, or blue (R, G, or B buttons), in order to diminish or reinforce the color dominants.
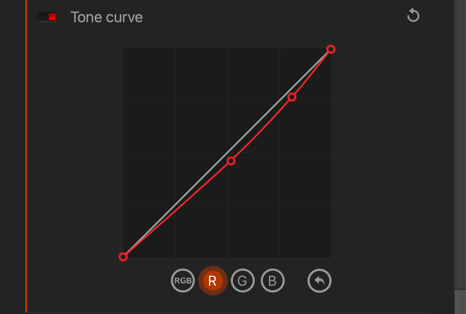

You can use your mouse to adjust the curve, and apply the points by clicking on them either for partial corrections or corrections that are limited to just one part of the image.
To reset the curve, click on the Reset all button.
Automated corrections
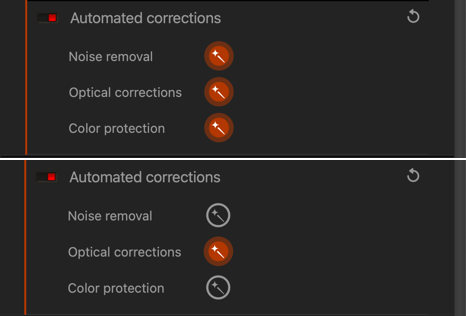
The Automated corrections palette handles the following settings, depending on the type of file:
- Noise removal (RAW, TIFF, and JPEG files): Noise correction is automatic.
- Optical corrections (RAW files only): Optical corrections are automatic. When an image is opened, DxO FilmPack will automatically download the relevant DxO Optics Module (if not previously installed; you can follow the progress of the download and accept it via a message that appears in a banner superimposed on the image). As soon as a DxO Optics Module is installed, all images taken with the same camera/lens combination will be automatically corrected.
- Color protection (RAW, TIFF, and JPEG files): Analyzes the content of the image and automatically adjusts the protection of saturated colors with the aim of avoiding clipping.
These corrections are displayed as buttons in the Automated corrections palette, and are displayed depending on the type of file and the automatic correction support offered by DxO FilmPack. You can deactivate/reactivate an automatic correction by clicking on the relevant button.
- The noise removal method is the same as HQ (High Quality), the standard denoising in DxO PhotoLab.
- In DxO FilmPack, the DxO Optics Module corrects vignetting, distorsion and color fringes. However, to the contrary of DxO PhotoLab, it doesn’t apply Lens softness (optimized sharpening).
- From DxO FilmPack 7, all new pictures opened in the standalone version of the program use the DxO Wide Gamut color working space, which is also the DxO PhotoLab (version 6 and onwards) default color working space. For the plug-in version, the color working space is set by the host program (Lightroom Classic, Photoshop) preferences.
Graphical effects
Frame
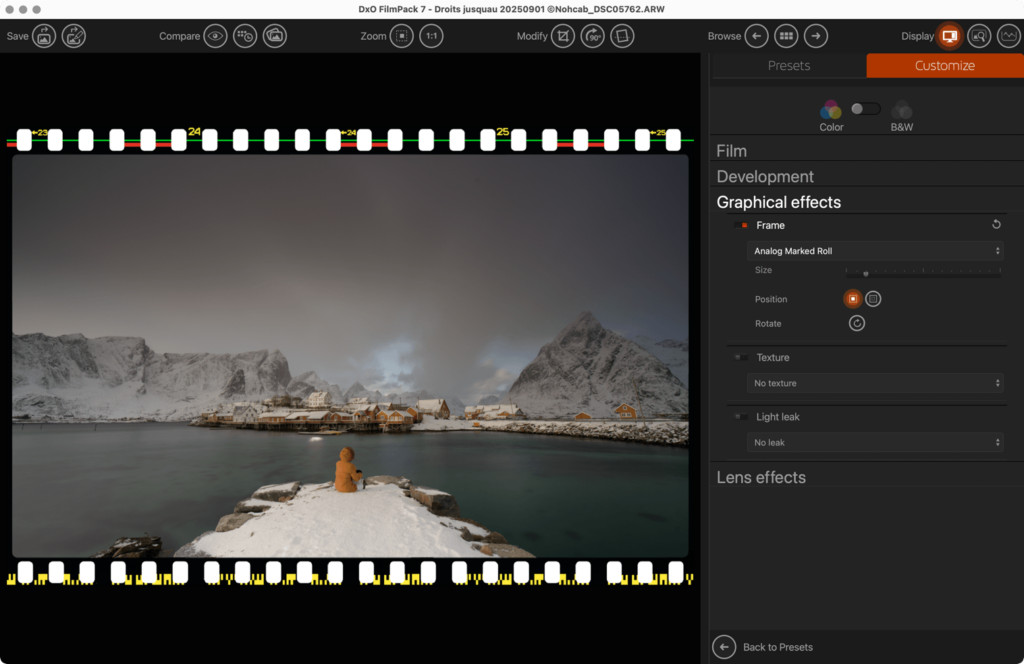
You can apply different frames or effects to the edges of your images:
- Frame: This drop-down menu lets you select from a number of predetermined frames (the default setting is No frame).
- Size: This slider lets you increase or reduce the thickness of the frame you apply to your image.
- Position: The Inside picture button (to the left) places the frame on the image in such a way as to partially cover the image perimeter. The Outside picture button (to the right) places the frame around the image without covering any of it.
- Rotate: Lets you successively click to rotate the placement of certain asymmetrical frame effects (Slide, Darkroom, etc.).
A frame placed outside an image increases the image’s dimensions.
Texture

The Texture palette lets you simulate scratches and tears on films:
- Texture: Lets you select from a number of predetermined texture effects (the default setting is No texture).
- Intensity: Moved to the left, the slider diminishes the effect; moved to the right, it strengthens the effect. The default value is 50.
- Randomize: Lets you change the position of the selected texture in the image.
Light leak
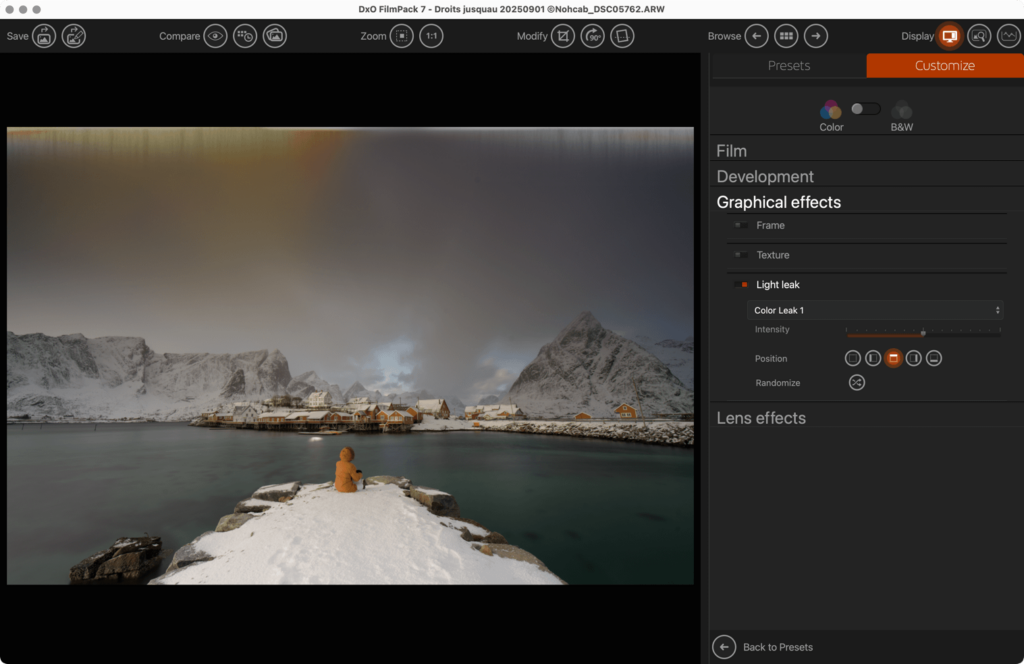
The Light leak tool simulates the problems that occur along the edges of photos due to aging or to accidental exposure of the film cartridge to the light:
- Defect: Lets you select from a number of predetermined defects (the default setting is No defect).
- Intensity: Moved to the left, the slider diminishes the effect; moved to the right, it strengthens the effect. The default value is 50.
- Position: The five button let you place the light leak effect on the whole image, on the left, on to the right, or on the bottom of the image.
Randomize: Lets you change the position of the selected defect in the image.
Lens effects
Filter
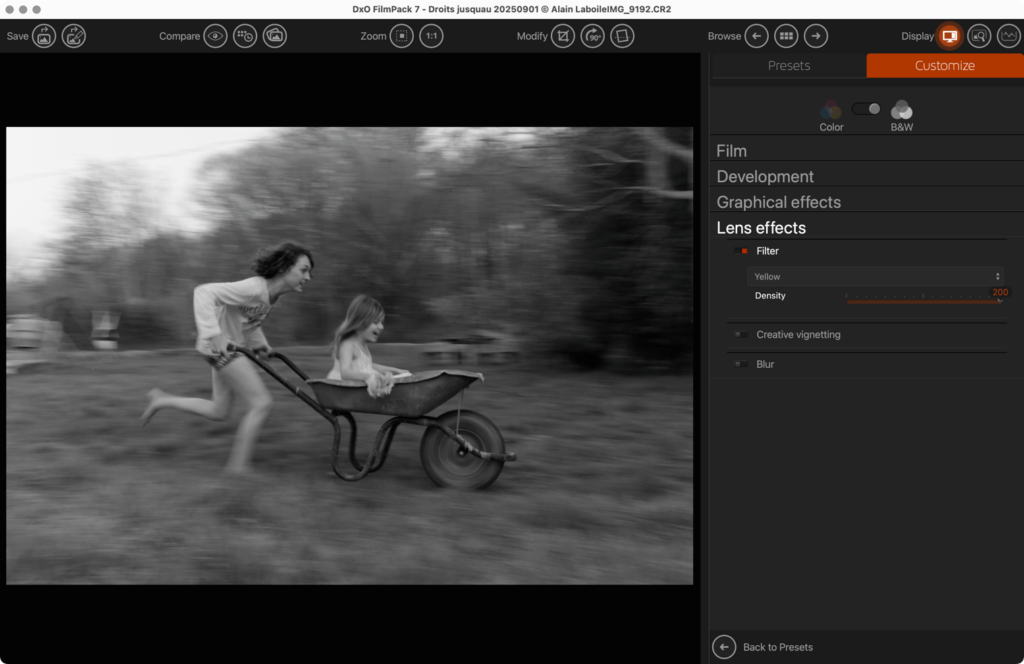
About filters
Front-of-lens photographic filters fall into three categories:
- Correction filters, used only with color films, make it possible to shoot under lighting conditions different from those anticipated by the manufacturer. So for example, a 85B filter will allow a film meant for tungsten lighting to be shot in broad daylight, while an 80A or B filter will allow the reverse.
- Effects filters are often used with black & white films to achieve various creative effects. For example, the ultra-classic yellow- tinted Wratten 8 filter absorbs blue, thereby revealing detail in skies and raising the general contrast of the image. More generally, such filters absorb the complementary color of their own color: the former is reduced, the latter is enhanced.
- Polarizing filters block certain incoming light rays according to their plane of vibration, thus eliminating a large number of reflections. These filters cannot be emulated digitally.
Available filters
A certain number of effects filters (shown in the list below) are available in the Filter drop-down menu. You can increase or diminish the effects of a filter by using the Intensity slider that automatically appears after you’ve selected it.
- Cool tone is used to moderately reduce the proportion of “warm” incoming light (in the red- yellow range), thus increasing the proportion of “cool” tones.
- Blue lends a foggy and unreal atmosphere to landscapes.
- Green lightens foliage (trees can appear excessively dark in many black & white photos).
- Yellow is a classic filter that slightly increases the texture of skies, and brings out clouds.
- Orange strongly darkens skies and increases differentiation between many objects of similar intensity but of different colors — for example, flowers and foliage. The stronger the orange, the more pronounced the effect.
- Dark orange enhances the effects obtained with an orange filter.
- Red is a very powerful filter that provides strikingly dramatic effects for very dark skies and overall extreme contrast.
- Warm tone moderately reduces the proportion of cool tones (blues) and increases the warm tones.
- Mallow: Used with black & white photos, this filter brightens reds and blues while enhancing the density of yellow-orange elements.
- Cyan: balances the light moving the color temperature toward cooler tones. Used in landscape photos, it strengthens the warm tones of a sunset, for example, by shifting them toward blue and green tones.
- Bright cyan: Used with black & white photos, this filter greatly increases the density of red, yellow, and orange elements in the image, and brightens the elements in blue.
- Purplish-blue: Used with black & white photos, this filter lends a great deal of density to yellows and reds, and subtly reduces the density of pinks, mauves, and purples, while brightening the blues.
- Violet: Used with black & white photos, this filter strongly reduces the overall contrast of the image, notably among the warm tones. Cool tones such as blue are denser.
- Bright orange: Used with black & white photos, this filter brightens the image overall and diminishes the contrast of warm tones. Blues are relatively unaffected.
- Light orange: Used with black & white photos, this filter affects the overall brightness of the image, but in a less marked way than a bright orange filter.
- Brown: Used with black & white photos, this filter acts like orange filters, but more subtly, by retaining more density.
- Pink: Used with black & white photos, this filter creates a denser image than the brown and orange filters, but with a flatter overall contrast.
- Magenta: Used with both color-positive and color-negative films, this filter brings out the clouds in a blue sky, brightens the reds, and absorbs the greens.
Creative vignetting
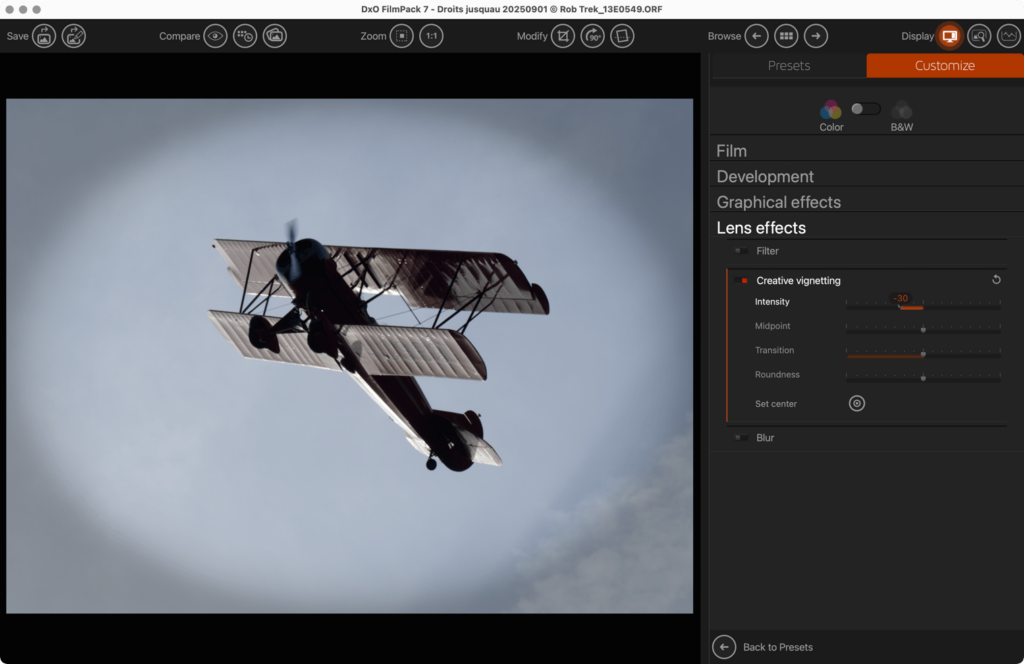
Vignetting is an optical defect that results in the peripheral zones of an image being darker or lighter than the center of an image. But this defect can also be used in a creative way to focus attention on the subject at the center of the image:
DxO FilmPack lets you de-center the effect so as to adapt it to the position of the subject in the image.
The Creative vignetting palette lets you create these effects by using a combination of the following sliders:
- Intensity: The greater the negative value, the darker the image edges (–100 corresponds to pure black), and the greater the positive value, the lighter the image edges (+100 is pure white).
- Midpoint: Moved to the left, the slider limits the extension of the vignetting to the image edges; moved to the right, the vignetting extends toward the center of the image.
- Transition: Determines the sharpness of the transition between the vignetted and the non-vignetted zones. The more the slider is moved to the right, the more abrupt the transition.
- Roundness: Determines the shape of the vignetting: the greater the positive value (slider to the right), the rounder the form; and the greater the negative value (slider to the left), the more rectangular the form.
- Set center: Lets you place the vignetting effect around the principal subject, regardless of the subject’s position in the image.
Blur
Soft focus vignetting, like Creative vignetting, lets you apply an effect along the perimeter of the image; however, this setting creates a more or less blurred border effect in order to draw attention to the (in-focus) principal subject:
The Blur palette contains two tools: Vignetting, for creating a blur vignetting effect around a subject, and Soft Focus, to create and diffuse effect for the entire image.
Vignetting

The Blur/Vignetting palette contains the following sliders:
- Intensity: When set at 0 (the default value), no blur appears in the image periphery, although the more you move the slider to the right, the more blurry it will appear (to a maximum value of 100).
- Radius: This slider lets you control the size of the surface area on which you want to apply blur. The default setting is 50, which means that the blur takes up roughly 50 % of the image surface starting from the edges. Moving to the left reduces the surface size (with no effect at 0); moving to the right extends the surface toward the center of the image (at 100, the image is completely blurry).
- Transition: Determines the sharpness of the transition between the vignetted and the non-vignetted zones. The more the slider is moved to the right, the more abrupt the transition.
Roundness: Determines the shape of the vignetting: the greater the positive value (slider to the right), the rounder the form; and the greater the negative value (slider to the left), the more rectangular the form. - Diffusion: Diminishes the effects of micro-contrast and detail diffusion as you move the slider to the right (the default value is 0).
- Set center: lets you place the vignetting effect around the principal subject, regardless of the subject’s position in the image.
Soft focus
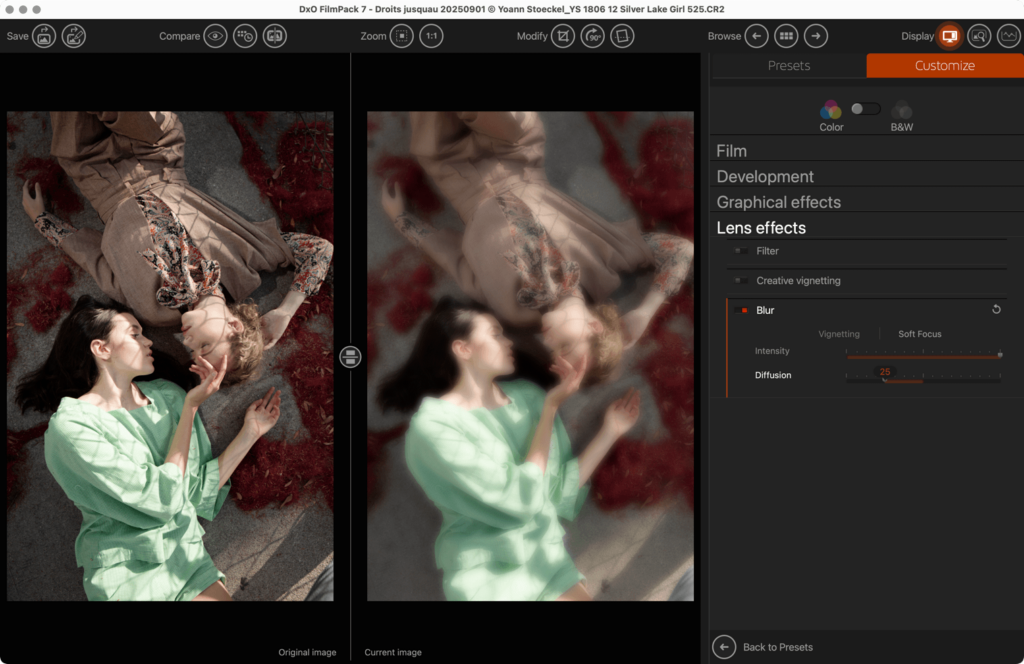
Soft Focus lets you create and apply a diffusion effect to give a dreamlike quality to your image.
The Blur/Soft Focus palette consists of two sliders:
- Intensity: set at 0 (the default value), no diffusion effect is applied to the image. The effect becomes more and more intense as you move the slider to the right (to a maximum value of 100).
- Diffusion: this slider has no effect when the Intensity slider is set at 0. Its own default setting is 50. Moved toward the left, the image is blurrier, and moved to the right, the image is sharper.