

The image processing, local adjustments and output options are identical in DxO PureRAW standalone and plug-in versions, and regardless of the Process Now and Process with preview modes.

- Using presets.
- Denoising and demosaicing.
- Applying optical corrections.
- Using local adjustments (Process with preview mode only).
- Setting the output formats.
- Choosing the destination folder.
- Output files renaming.
- Export the processed images to the software of your choice.
The options are arranged as follows:
- Process now mode: Corrections section and Output section, with a summary of the options, editable by clicking on the pen in each section upper right corner.
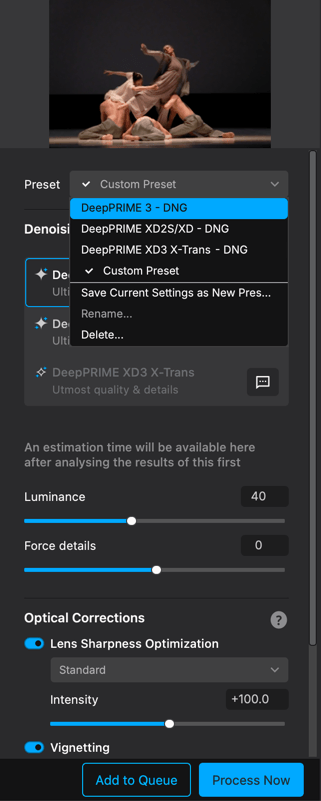
- Process with preview mode: the options are grouped in the right-hand panel, and split into 3 sections reachable by clicking on the buttons located on the right side:
- Image corrections settings
- Local adjustment masks
- Output settings
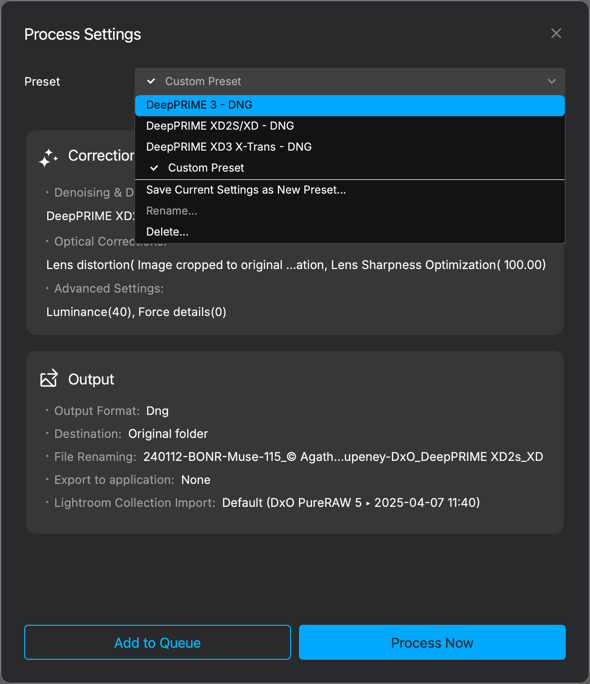
Using presets
In the Process Now and Process with preview modes, you can accelerate your workflow by using presets. You will find the Preset menu and controls in the Process Settings. It comes with a few DxO presets, and you can create your own presets with both the corrections and output settings.
Applying a preset
- Select your image(s) in the Lightbox, click on Process or Process with Preview.
- In the Preset menu, select the preset you want to apply.
- Check if the Corrections and Output settings meet your needs.
- Click on Process Now or Add to Queue.
Creating a preset
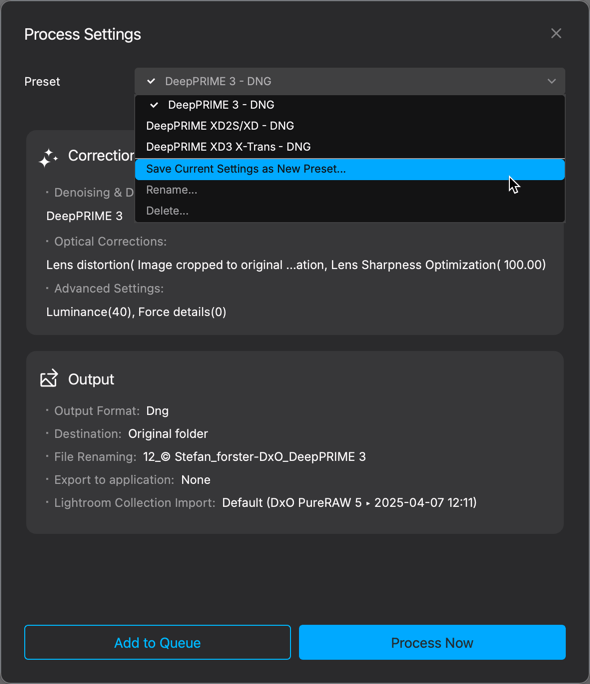
You can create as many presets as you want:
- Select your image(s) in the Lightbox, click on Process or Process with Preview.
- Select and adjust the settings you need*.
- In the Preset menu, choose Save Current Settings as New Preset…
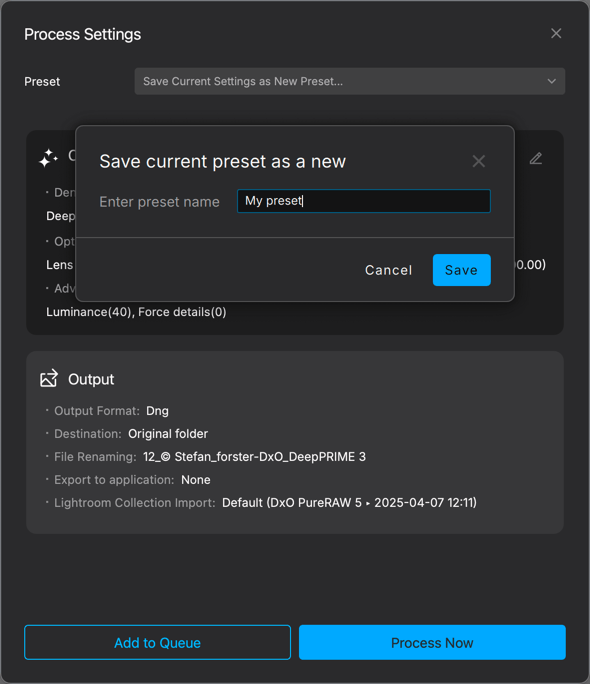
- A dialog box will open and let you name your preset.
- Click on Save.
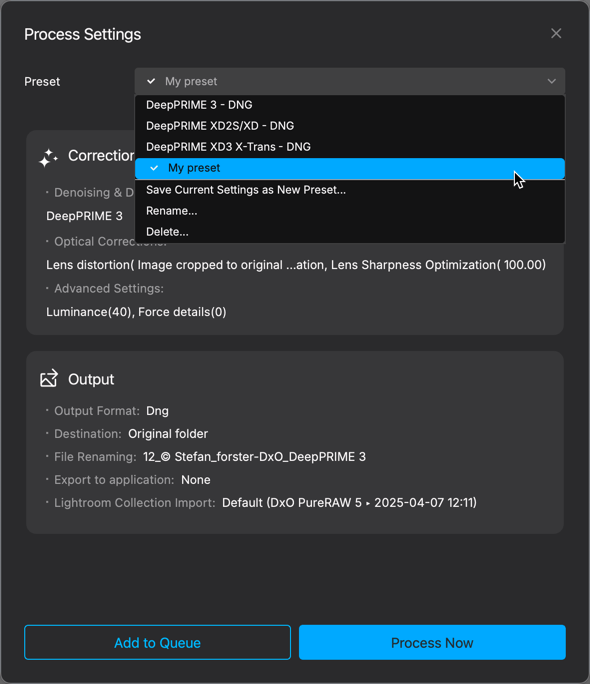
- Your custom preset shows in the Preset list.
- Make sure it is selected and click on Process Now or Add to Queue.
*Presets can include any tool and setting, EXCEPT local adjustments.
Renaming a preset
- In the Preset menu, select the preset you want to rename.
- Then, in the same menu, select Rename.
- Type the new name in the dialog box and click on Save.
- The renamed preset shows in the list and has replaced the previous version (the settings stay the same).
Modify and update a preset
- In the Preset menu, select the preset you want to modify.
- Go to the Image correction settings and/or Output sections.
- Change your settings accordingly (and validate by clicking on Apply if you are in the instant process mode).
- The Preset menu switches to Custom preset.
- If you click again on the preset chosen at step 1, a dialog box lets you save the changes.
Delete a preset
- In the Preset menu, select the preset you want to delete.
- Open the menu again and select Delete…
- A dialog box asks you to validate your choice.
- Click on Yes.
- The preset has been deleted and removed from the list.
The presets provided by DxO can’t be deleted or renamed, and if you need to alter one of their settings, you will have to create a new preset from it (see the Creating presets paragraph).
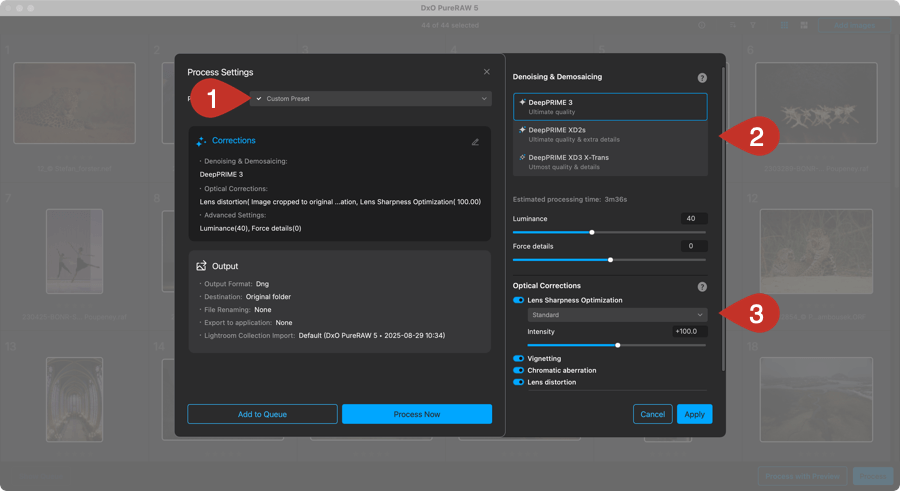
Denoising and demosaicing

In this section, you choose how DxO PureRAW will process and denoise your RAW files, using one of 3 options1:
- DeepPRIME 3: This method uses AI and deep learning technologies, and produces high-quality results, but faster than the other two methods.
- DeepPRIME XD2s/XD2: an advanced version of DeepPRIME that offers finer detail extraction. DeepPRIME XD2s goes even further with more details and no artifacts.
- DeepPRIME XD3 X-Trans: this is the next generation of DxO’s processing and denoising engine3, which goes farther in terms of detail extraction.
- 1From DxO PureRAW 5 onwards, the legacy processing and denoising modes, HQ and PRIME, are no longer available.
- 2DeepPRIME XD will be applied to Bayer and Fujifilm X-Trans sensors, DeepPRIME XD2s will be applied to Bayer sensor images only.
- 3DeepPRIME XD3 X-Trans will be applied to Fujifilm X-Trans sensor images only
.
The following adjustment sliders are available in each denoising & demosaicing mode:
- Luminance: lets you smooth-out or amplify the luminance noise, to find a different balance than the default setting (40) between graininess and detail preservation.
- Force details: determines the threshold of detail by altering the noise mode used. Set to 0 by default, the slider will extract more details when moved to the right, towards a less natural rendering, when slid to the left the rendering will be softer, with fewer details.
Applying optical corrections

DxO PureRAW lets you define the optical corrections you want to apply to your images. Choose all of them to take full advantage of DxO Labs’ technologies, or just some of them if you want to entrust these corrections to your usual software. Each correction can be activated or deactivated by clicking on the corresponding switch:
- Lens sharpness optimization: improves image detail and overall image sharpness from the center to the edge of the frame. Settings are:
- Soft: Intensity setting +75.
- Standard: Intensity setting +100, which is the default.
- Strong: Intensity setting +150.
- Hard: Intensity setting +200.
- Custom: this setting is linked to the Intensity slider, where you can adjust the level of sharpness to your taste.
- Vignetting: compensates for the loss of luminosity on the edges of the frame.
- Chromatic Aberration: removes color fringing found on high contrast contours.
- Lens Distortion: Corrects distorted lines. This involves choosing a preferred level of cropping; there are 3 options:
- Image cropped to original ratio: the image is cropped with the width and height proportions of the original. The bleeding edge of the corrected distortion is no longer visible.
- Maximum Rectangle: the image is cropped so that just the bleed is eliminated, regardless of the proportions of the original.
- Complete image area: the image is not cropped at all, retaining the bleed, visible as black zones around the edge. This option lets you leave the task of cropping to your usual image processing program.
Using local adjustments (Process with Preview mode only)
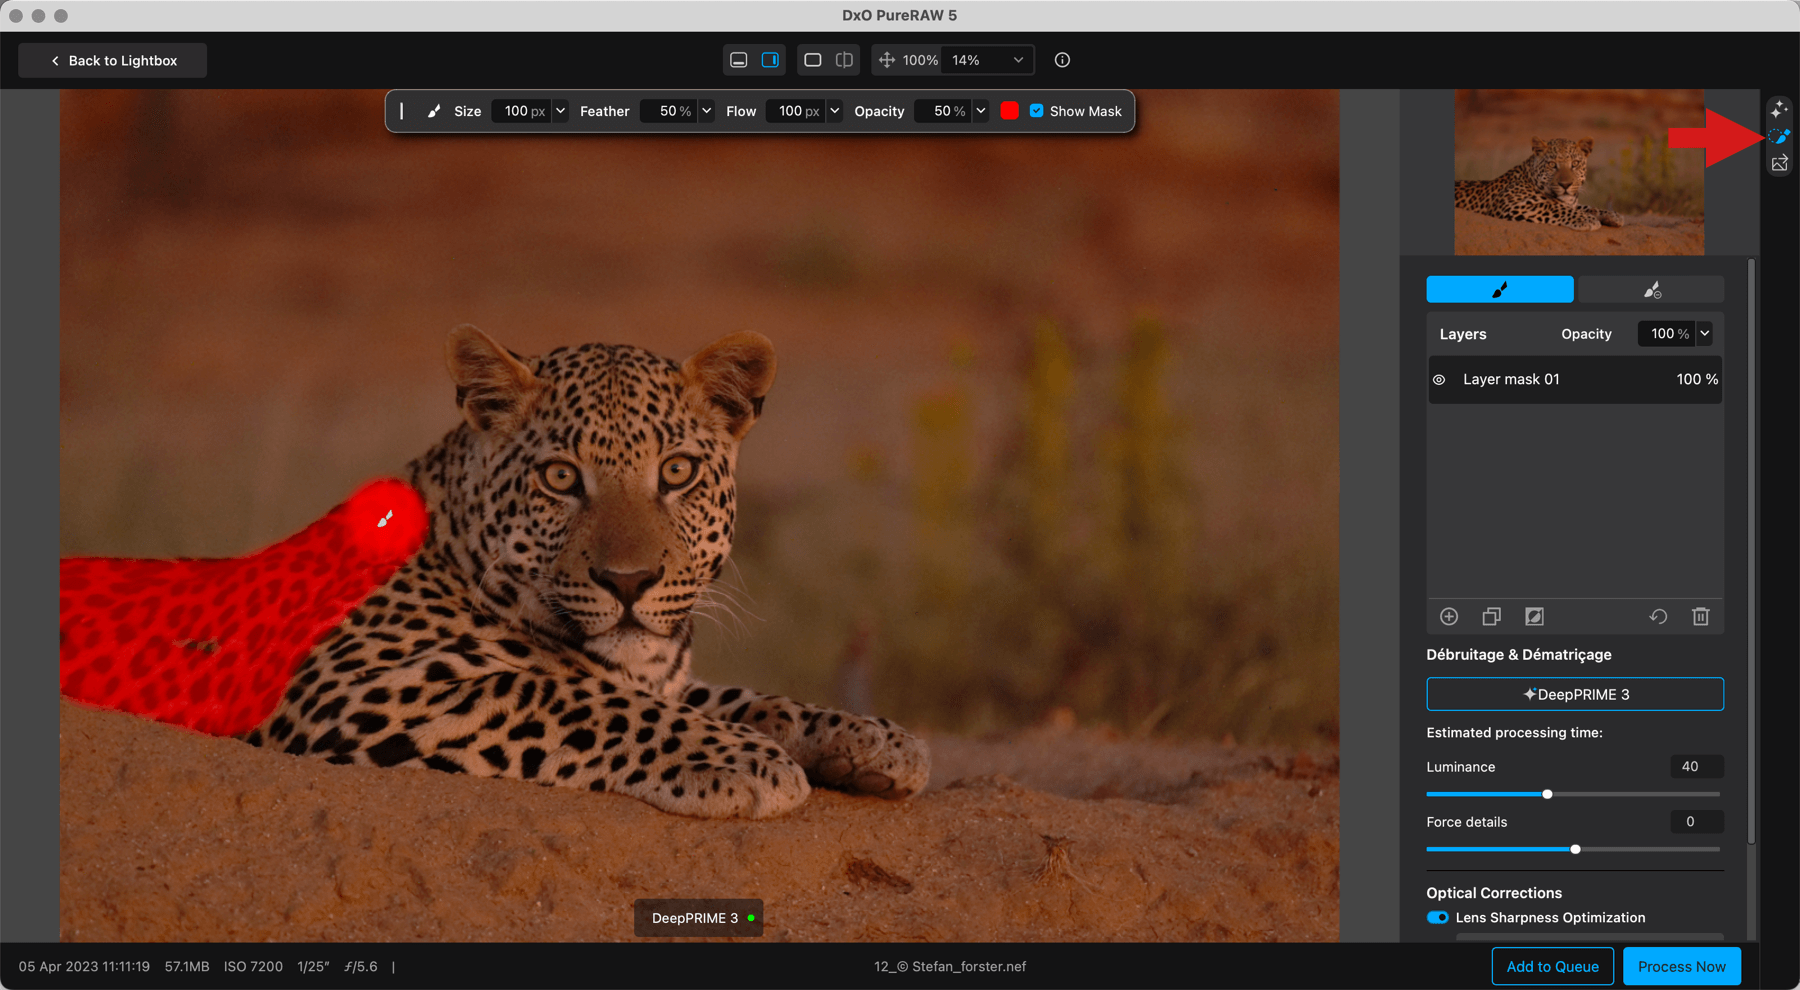
DxO PureRAW’s local adjustments allow you, using a brush and layer masks, to adapt the effects of noise reduction and lens sharpness optimization to specific areas of your image. For example, you can further enhance the sharpness of an image element or restore structure to a portion of the image or a smooth area that has been overly softened by noise reduction.
To access this feature, go to the vertical toolbar on the right, click the Local adjustments masks icon (middle).
Local Adjustments Interface
The tools and options for local adjustments are arranged in the right-hand panel and a floating toolbar at the top of the image.
Local Adjustments Panel
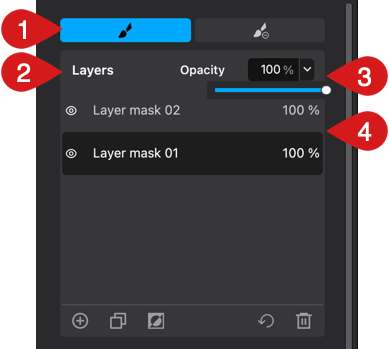
The tools and options for local adjustments are arranged as follows:
- Brush (left) and eraser (right): The first allows you to to define an area where you’ll be able to finetune your settings, while the second allows you to erase parts of this defined area. You can toogle from the brush to the eraser with the Alt (PC) or Option (Mac) keys. Keep pressing the key to erase and release when done.
- Layers panel: Displays the list of masks (with the most recent at the top).
- Opacity slider: Adjusts the intensity of the selected mask in the list.
- Layer mask list:
- Click the eye icon in front of the mask name to disable it, or check the empty box to reactivate it.
- The number on the right indicates the opacity percentage of each mask (default value is 40).
- You can rename a mask simply by double-clicking on it. Type the new name and press Enter to validate (renaming doesn’t change the mask list order).
- In the mask list, masks cannot be moved and reordered.
You can undo/redo brush or eraser strokes with the following keyboard shortcuts:
- PC: Ctrl+Z/Shift+Ctrl+Z
- Mac: Cmd+Z/Shift+Cmd+Z
Lower toolbar options (from left to right):
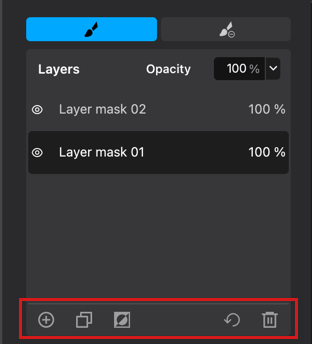
- “+” Button: Adds a new mask.
- Duplicate button: Duplicates the selected mask along with its corrections and settings.
- Invert button: Inverts the selected mask, applying corrections and settings to the rest of the image instead of the mask itself.
- Reset button: Removes all corrections and settings associated with the selected mask.
- Trash icon: Deletes the selected mask.
Tools
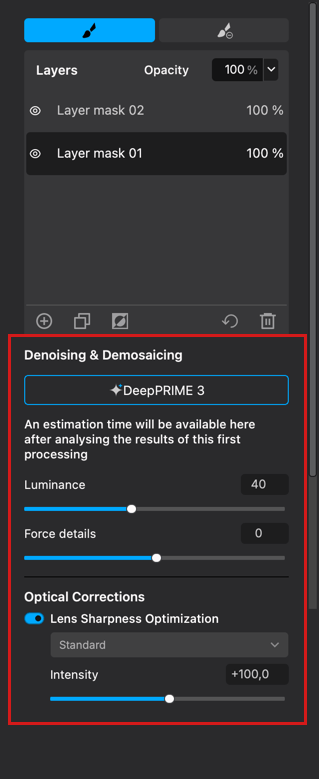
Below the Layers list, you will find the local Denoising & Demosaicing and Optical Corrections. These are the same global RAW processing, noise reduction, and lens sharpness optimization tools described earlier on this page. Note that the Denoising & Demosaicing method must be selected beforehand, and cannot be changed directly within local adjustments.
All sliders, Denoising & Demosaicing and Optical corrections, can be reset to their default value by a double-click.
Floating Toolbar
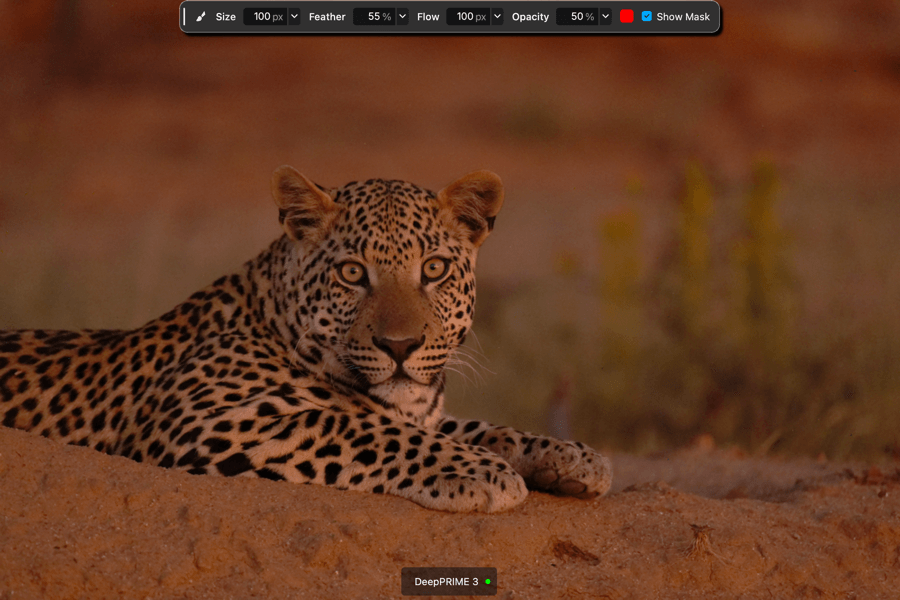
This toolbar, that you can drag all around the image display area, allows you to modify the brush and manage the mask display (from left to right):
- Size: Adjusts the brush diameter.
- Feather: Controls the softness of the brush edges (0%: hard edges, 100%: very soft edges).
- Flow: Adjusts the intensity of the correction applied by the brush (0%: no correction applied, 100%: maximum correction).
- Opacity: Controls the transparency of the brush stroke (10%: maximum transparency, 100%: no transparency). This setting does not affect the correction itself.
- Color: Opens the system color picker to change the mask color (red by default).
- Show Mask: Temporarily disables the display of the colored mask while keeping the corrections visible.
Using the brush and masks
Local adjustments usage is very simple:
- In the Image Corrections Settings, select the Denoising & Demosaicing you want to apply.
- Go to Local Adjustments by clicking the central button in the vertical toolbar on the right.
- Click the brush button (left side).
- Paint over the area of the image you want to modify.
- Below the Layers panel, adjust Denoising & Demosaicing and/or lens sharpness optimization settings. These apply to the active mask.
- Still within the active mask, you can switch brush and eraser to add or subtract from the mask, allowing you to fine-tune your corrections.
- To add a mask, click the + button and repeat steps 1–6.
- Invert or duplicate a mask as needed using the dedicated buttons. Then refine the selection with the brush or eraser (toggle with the Alt/Option key), and adjust the corrections at your convenience.
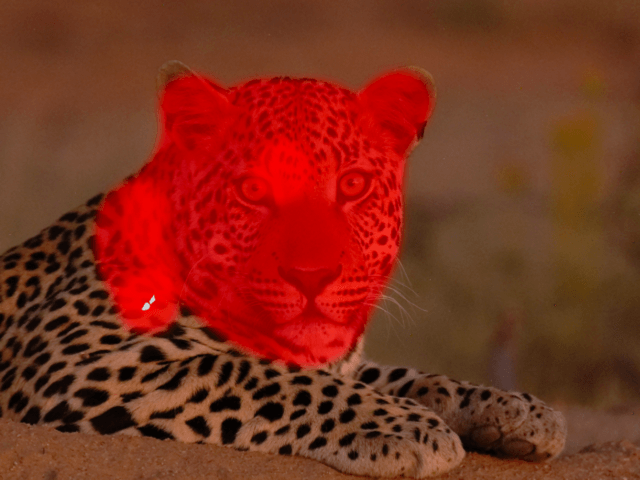
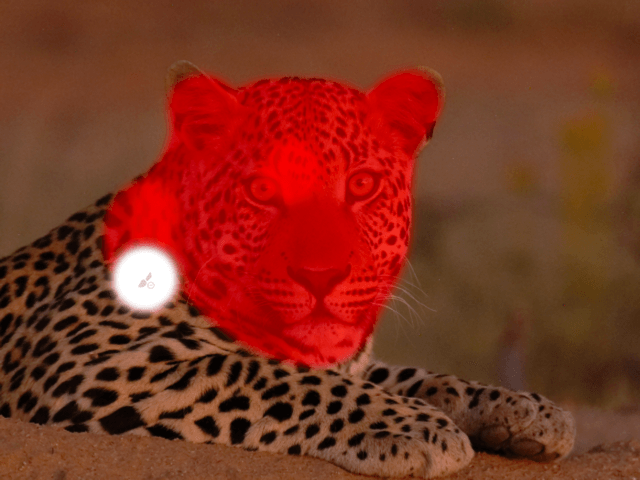
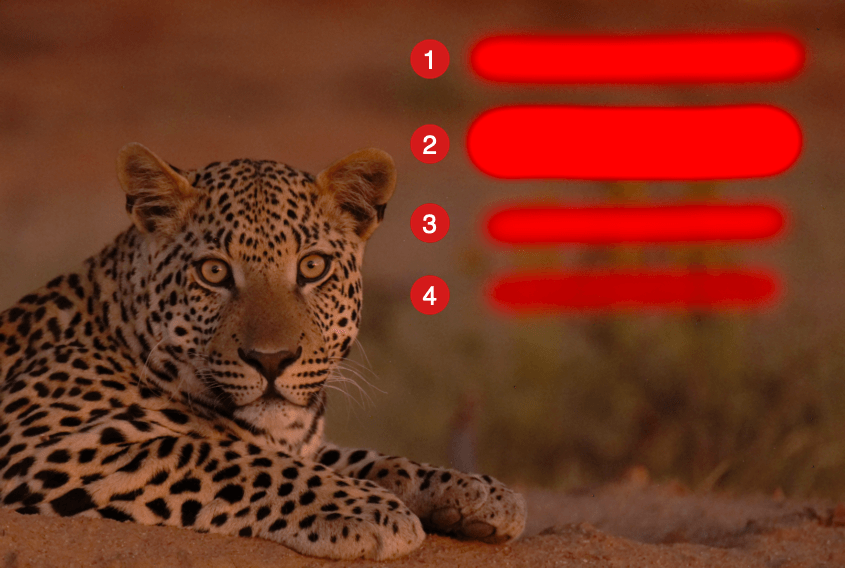
Brush settings comparison
- All settings 100%
- Feather 50%, all other settings 100%
- Flow 50%, all other settings 100%
- Opacity 50%, all other settings 100%
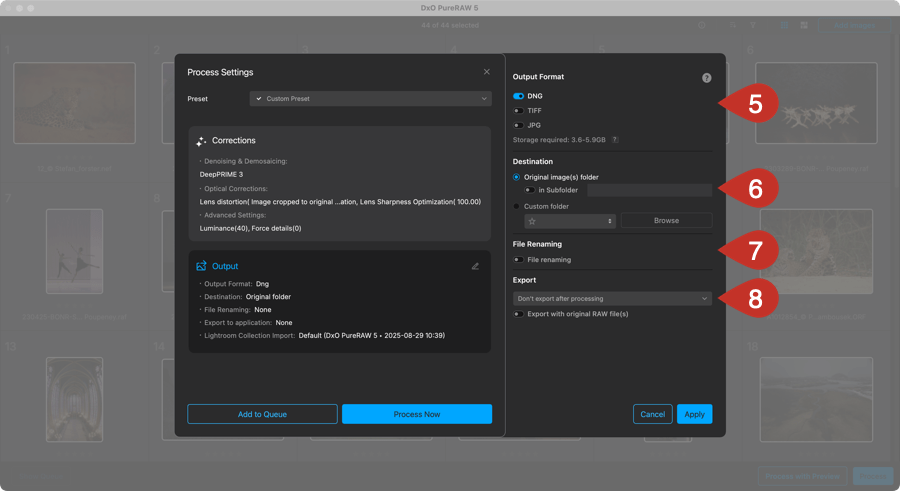
Setting the output formats
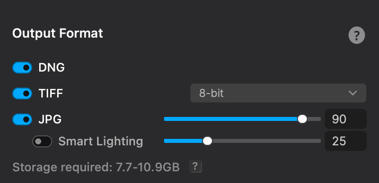
The best output format for your processed images will depend on how you want to use them. There are 3 options, though you can select all of them to create different format versions of your image all at once:
- DNG: Generates a Linear DNG file that retains the characteristics and reversibility of the original RAW file, allowing it to be further edited in a third-party program such as Lightroom Classic, or Camera Raw.
- JPG: generates a JPEG file for immediate use or distribution. If you select this format, 2 sliders are available :
- The top slider lets you adjust the compression, and therefore the quality, of the output file; the default setting is 90, on a scale of 10 to 100.
- In order to obtain immediate and ready-to-publish pictures, you can toggle Smart Lighting on and off: DxO Smart Lighting analyzes the image content, taking into account the bright and dark areas plus the contrast of the scene, and applies a balanced exposure. The slider controls the intensity of the corrections, and is set to 25 by default, which is a slight adjustment (50 is medium, and 75 is strong). Smart Lighting comes from DxO PhotoLab.
- TIFF: generate a high quality TIFF file for retouching work in another application such as Photoshop. When you select this format, you can choose from one of the following options:
- 8-bit, for a lighter weight TIFF file.
- 8-bit compressed – the TIFF file is compressed to save on storage space.
- 16-bit, for a maximum quality file that can be corrected and retouch further, although without the flexibility and reversibility of DNG.
When you select one or multiple output formats, DxO PureRAW calculates the required storage space and displays it immediately below the format options. This information is particularly important if you are dealing with several image batches.
Choosing a destination folder
This is where you choose where to send the processed images. In the Destination section, you have two options:

- Original image(s) folder: processed images are sent to the original images folder. You can also toggle a subfolder on and off, and type its name (default name is DxO).
- Custom folder: Lets you choose and/or create a destination folder after clicking on the Browse button, which opens a file browser window. By default, DxO PureRAW proposes the operating system’s Images folder. If you click on the double-arrow to the left of the Browse button, a floating window pops up with a list of favorite paths and recently used folders. You can mark a folder as a favorite by clicking on the star to the left of the folder path.
Output files renaming
The output files renaming is turned off by default and you need to toggle the File renaming button to activate it. In that case, you can select one of the 4 ready-to-use presets in the menu. Below, depending on your choice, you will see a preview of the file rename. The presets offer you different mixes of original file name, processing method, date and sequence number.

If you click on Edit, you will be able to create your own file names and save them as presets:
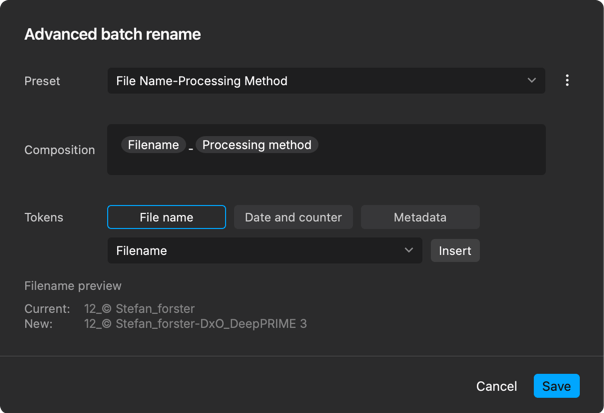
- Select one of the tokens:
- Filename: set of different tokens, including suffix and folder name.
- Date and counter: different date and time formats (HH, YYYY, DD, YYYYMMDD, etc.).
- Metadata: you can add metadata information in your file name, such as creator information, image description, copyright, location, camera settings and data etc.
- Choose a token in the relevant menus and click on Insert. The tokens will show up in the Composition field. You can add as many tokens as you wish, and mix the different categories.
- You can also type in free text, after clicking before, after or between tokens to add an insertion point.
- Whatever your choices, the window will show the filename preview in the lower left corner.
- To save your renaming preset, click on the Mange preset button:
- Save current settings preset: type the name of your preset in the pop-up and click on Create. The preset will show up in the Preset menu and will be directly available in the File Renaming section menu.
- Restore default preset settings: reverts your customized preset back to the preset where you started.
- Update content: save the changes when you modify an existing preset.
- Delete preset: removes the selected preset.
Export the processed images to the software of your choice
DxO PureRAW lets you open the processed images in the program of your choice. In the Export section, you will find the following options:
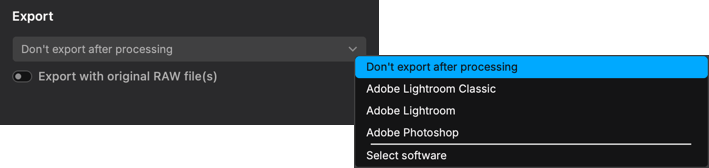
- Don’t export after processing: no processed image transfer is launched. Use this option if you want to check the processed images directly in DxO PureRAW or if you want to postpone reviewing or using of the processed images in your preferred software until another time.
- Adobe Lightroom Classic/Adobe Photoshop: these options only appear if they are installed on your computer. In the case of Lightroom Classic, images will be opened via the Import option, and in the case of Photoshop, the images will be opened directly. DNG will be opened in Camera Raw, as well as JPEG and/or TIFF if Photoshop and Camera Raw are set to open them.
- Select software: this option opens the program’s folder of your operating system. You can choose whichever program you like, and it will appear in the drop-down menu, even after you quit DxO PureRAW. You can add as many programs as you like.
The Export with original RAW file(s) toggle lets you attach the original images to the processed images and open them in the destination program too, where applicable.